
1.8t cam chain fitting/tensioner
- Thread starter vee_dub_modder
- Start date
-
- Tags
- 18t cam chain fitting or tensioner
You are using an out of date browser. It may not display this or other websites correctly.
You should upgrade or use an alternative browser.
You should upgrade or use an alternative browser.
First you need the compression tool for the tensioner, and a new Tensioner gasket, Rocker cover gasket, torque wrench capable of 10NM, T30 TORX socket, 19MM 12 POINT SOCKET FOR CRANKSHAFT PULLEY TO ROATATE THE ENGINE, 10MM socket, and a basic range of tools, socket set screw drivers etc.
1. Then coil packs, n249, Charge pipe, Top timing cover, Breather hoses, Then remove rocker cover
2. Remove splash guards off the inlet cam
3. Now you need to spin the engine and align all timing marks, Crank, Cam, and both of the notches in the end baring caps. MAKE SURE THERE ARE 16 ROLLERS BETWEEN EACH NOTCH AND MARK WITH TIPEX.
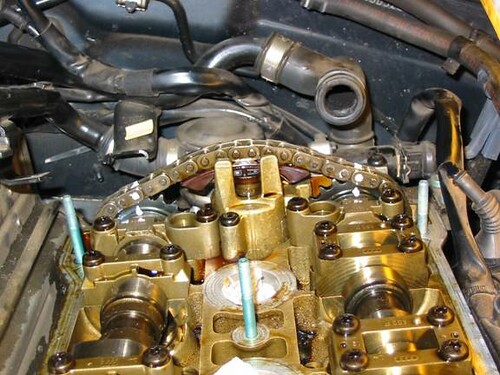

4. Once happy with timing Install the tensioner tool and tighten with 5mm allen key, BE CAREFUL NOT TO OVER TIGHTEN OR THE TOOL WILL BREAK!!

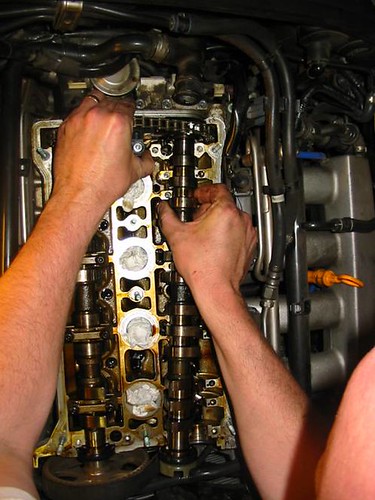
5. Now we need to start removing the bearing caps in order to remove the cam.
DO NOT REMOVE THE EXHAUST CAM AS IT IS STILL ATTACHED TO TIMING BELT, WE ONLY NEED TO REMOVE THE INLET CAM IN ORDER TO REPLACE TESNIONER. IF YOU ARE REMOVING BOTH CAMS THEN REFER TO TIMING BELT REMOVAL GUIDE, WHICH CAN BE SOURCED ON AUTODATA!
We need to loosen the bearing caps evenly same as headbolts to elimante anything bending/warping or breaking. We do this by removing, Cam position sensor located on double bearing caps, double baring cap at timing belt end, the 2 caps at the gearbox end then 3,5,4,2

WE ARE ONLY REMOVING THE BARING CAPS ON THE INLET SIDE, THESE ARE THE DOUBLE BEARING CAPS WITH 4 BOLTS, DO NOT REMOVE EXHAUST CAM! !
6. Now you can loosen the 4 bolts holding the tensioner on, Providing it has been unplugged it may need a bit of encouragment. Once loose you need to lift the inlet cam, and the tensioner up and towards the back of the engine, then remove the inlet cam & tensioner, Easier said than done!!
Now we need to clean off the old tensioner gasket, and install a new one, these consist of a half moon rubber and a metal gasket. When applying new gasket, add a smear of sealant to the hatched area.

If installing the old chain, align the paint marks with the camshaft marks. If installing a new chain, the distance between the notches A and B on the camshafts must equal the distance between 16 drive chain rollers.
- Cam chain tensioner by sliding it between the drive chain
- Camshafts with the chain tensioner lubricated with engine oil into the cylinder head
When installing the bearing caps, verify the markings on the caps are readable from the intake side of the cylinder head.
- Camshafts bearing caps No. 2 and 4. Tighten them in an alternating diagonal sequence to 10 Nm.
- Camshafts bearing caps 3,5, double cap and both end caps, Tighten the bolts to 10 Nm.
13. Verify the correct positions of the camshafts, Turn cranksahft 2 rotations clock wise, align crank shaft & camshaft marks and check the rear cam position, again 16 rollers between each notch
.
YOU MUST ALLOW 30 MUINETS BETWEEN ISNTALLING CAMSHAFT AND TURNING THE ENGINE AS VALVE - PISTON DAMAGE MAY OCCUR!
14. Remove the Tensioner tool.
15. Install or connect the following:
- Cylinder head-to-double bearing cap mating surface by lightly coating it with sealant. Tighten the remaining bearing caps to 10 Nm.
- CMP shutter wheel and housing cover
- Rocker cover
- Coil packs
- N249 and anything else removed.
Before starting the car, make sure you are happy with the timing marks, sufficent oil level, all tightening torques are observed.
I have explained this the best i have and have sourced images off the internet, BUT, i am not responsible for damage caused while following what i have just wrote, please take on board you do this at YOUR OWN RISK. If you are unsure please refer to VAG technical manuals, Autodata or a fully skill technician for help. Make sure you CHECK, THEN CHECK AGAIN, as failure to notice incorect timing may result in valve - piston damage.
1. Then coil packs, n249, Charge pipe, Top timing cover, Breather hoses, Then remove rocker cover
2. Remove splash guards off the inlet cam
3. Now you need to spin the engine and align all timing marks, Crank, Cam, and both of the notches in the end baring caps. MAKE SURE THERE ARE 16 ROLLERS BETWEEN EACH NOTCH AND MARK WITH TIPEX.
4. Once happy with timing Install the tensioner tool and tighten with 5mm allen key, BE CAREFUL NOT TO OVER TIGHTEN OR THE TOOL WILL BREAK!!
5. Now we need to start removing the bearing caps in order to remove the cam.
DO NOT REMOVE THE EXHAUST CAM AS IT IS STILL ATTACHED TO TIMING BELT, WE ONLY NEED TO REMOVE THE INLET CAM IN ORDER TO REPLACE TESNIONER. IF YOU ARE REMOVING BOTH CAMS THEN REFER TO TIMING BELT REMOVAL GUIDE, WHICH CAN BE SOURCED ON AUTODATA!
We need to loosen the bearing caps evenly same as headbolts to elimante anything bending/warping or breaking. We do this by removing, Cam position sensor located on double bearing caps, double baring cap at timing belt end, the 2 caps at the gearbox end then 3,5,4,2
WE ARE ONLY REMOVING THE BARING CAPS ON THE INLET SIDE, THESE ARE THE DOUBLE BEARING CAPS WITH 4 BOLTS, DO NOT REMOVE EXHAUST CAM! !
6. Now you can loosen the 4 bolts holding the tensioner on, Providing it has been unplugged it may need a bit of encouragment. Once loose you need to lift the inlet cam, and the tensioner up and towards the back of the engine, then remove the inlet cam & tensioner, Easier said than done!!
Now we need to clean off the old tensioner gasket, and install a new one, these consist of a half moon rubber and a metal gasket. When applying new gasket, add a smear of sealant to the hatched area.
If installing the old chain, align the paint marks with the camshaft marks. If installing a new chain, the distance between the notches A and B on the camshafts must equal the distance between 16 drive chain rollers.
- Cam chain tensioner by sliding it between the drive chain
- Camshafts with the chain tensioner lubricated with engine oil into the cylinder head
When installing the bearing caps, verify the markings on the caps are readable from the intake side of the cylinder head.
- Camshafts bearing caps No. 2 and 4. Tighten them in an alternating diagonal sequence to 10 Nm.
- Camshafts bearing caps 3,5, double cap and both end caps, Tighten the bolts to 10 Nm.
13. Verify the correct positions of the camshafts, Turn cranksahft 2 rotations clock wise, align crank shaft & camshaft marks and check the rear cam position, again 16 rollers between each notch
YOU MUST ALLOW 30 MUINETS BETWEEN ISNTALLING CAMSHAFT AND TURNING THE ENGINE AS VALVE - PISTON DAMAGE MAY OCCUR!
14. Remove the Tensioner tool.
15. Install or connect the following:
- Cylinder head-to-double bearing cap mating surface by lightly coating it with sealant. Tighten the remaining bearing caps to 10 Nm.
- CMP shutter wheel and housing cover
- Rocker cover
- Coil packs
- N249 and anything else removed.
Before starting the car, make sure you are happy with the timing marks, sufficent oil level, all tightening torques are observed.
I have explained this the best i have and have sourced images off the internet, BUT, i am not responsible for damage caused while following what i have just wrote, please take on board you do this at YOUR OWN RISK. If you are unsure please refer to VAG technical manuals, Autodata or a fully skill technician for help. Make sure you CHECK, THEN CHECK AGAIN, as failure to notice incorect timing may result in valve - piston damage.
Last edited:
yes mate, a big help ") doing my mates Skoda, he's had the head rebuilt and keeps getting the eml on. I checked it out on vagcom over the weekend and had cam position DTC in the ECU. all the timing looked okay at the belt end and after pulling the cover off it turned out to be chain timing. as i've not done a 20v head before i thought i better check... just as well i did too as its bet more complex than the abf/kr engines i'm used to lol.
doing my mates Skoda, he's had the head rebuilt and keeps getting the eml on. I checked it out on vagcom over the weekend and had cam position DTC in the ECU. all the timing looked okay at the belt end and after pulling the cover off it turned out to be chain timing. as i've not done a 20v head before i thought i better check... just as well i did too as its bet more complex than the abf/kr engines i'm used to lol.
Thanks again for your help chap!
doing my mates Skoda, he's had the head rebuilt and keeps getting the eml on. I checked it out on vagcom over the weekend and had cam position DTC in the ECU. all the timing looked okay at the belt end and after pulling the cover off it turned out to be chain timing. as i've not done a 20v head before i thought i better check... just as well i did too as its bet more complex than the abf/kr engines i'm used to lol.Thanks again for your help chap!
paul-murphys
efr 6758 here i come
Similar threads
- Replies
- 3
- Views
- 190
- Replies
- 0
- Views
- 434
