2017 MK3 Leon Faulty Microphone

Dec 16, 2023
4
2
I bought my MK3 Leon FR about three weeks ago. When I was familiarising myself with everything I set up my phone to use Android auto and tested voice control which worked fine.

A week later I tried to use voice commands with android auto again, and nothing was being picked up. I have continuously tried using commands and have also tested the built in voice control but still nothing is being picked up. The same with phone calls made from the car.

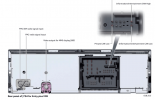
I thought it was likely that the microphone had just died so ordered a genuine replacement and tried swapping it out in the overhead panel. Still nothing.

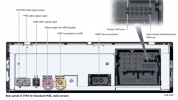
Today I have taken it to a dealer for diagnosis and they have told me that their is a problem with the media system in general picking up the microphone and the whole thing needs replacing for around £1200. They have suggested going back to the dealer I purchased from to see what they will do about it as I haven't had the car very long. They are only a small one man dealer and I haven't been able to get through yet, I'm not holding out much hope of that going anywhere.

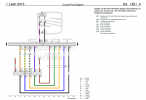
In the meantime I am trying to look into other possibilities. Perhaps the entire wiring for the microphone to the head unit needs replacing. When I swapped the mic it simply unplugs inside the overhead panel.

Alternatively does anyone know if aftermarket aux/bluetooth microphones are an option? It doesn't seem worth spending so much fixing such a small issue, or going through the trouble of returning the car if it comes to that. But it would be useful to have the functionality back.
 

serdar_18fr

Active Member
May 29, 2021
329
1
191
There may not be any problem with the microphones or the head unit.
I'd make sure that the wiring between microphone socket in the overhead panel and the head unit is trouble free before doing anything else, simply using a multimeter at both ends.
 
Dec 16, 2023
4
2
I had thought about getting a multimeter to test the wiring but I'm not sure exactly how to do so. Could you explain? I used to have one years ago that broke and was always confused which was the correct setting to choose.

Are you also able to tell me where the other end of the wire plugs into? Is it the EasyConnect unit in the glovebox, or somewhere behind the screen?

Thanks!
 
  • Like
Reactions: serdar_18fr

serdar_18fr

Active Member
May 29, 2021
329
1
191
I had thought about getting a multimeter to test the wiring but I'm not sure exactly how to do so. Could you explain? I used to have one years ago that broke and was always confused which was the correct setting to choose.

Are you also able to tell me where the other end of the wire plugs into? Is it the EasyConnect unit in the glovebox, or somewhere behind the screen?

Thanks!

I don't know the exact wiring by heart but there should be two or three wires max, one or two going to the unit in the glovebox and the other going to one of the ground points in the car, probably. I can look up for the actual wiring when I have more time and get back to you.

As for measuring the connectivity, you need to put the multimeter in resistance mode, put each probe at the ends of the wiring, and follow the display. There are Youtube videos on "how to measure resistance with a multimeter". But of course you need to know the pin layout of the connector that plugs into the unit. Also ground wire may be harder to track as it most probably does not reach up to unit, being connected to a ground point somewhere else, but there might be another way of measuring whether it is properly connected to the ground wiring of the car, somebody with more knowledge of electrical things can help there.
 

serdar_18fr

Active Member
May 29, 2021
329
1
191
I had thought about getting a multimeter to test the wiring but I'm not sure exactly how to do so. Could you explain? I used to have one years ago that broke and was always confused which was the correct setting to choose.

Are you also able to tell me where the other end of the wire plugs into? Is it the EasyConnect unit in the glovebox, or somewhere behind the screen?

Thanks!
This is the correct procedure of measuring connectivity.


Sent from my 23013PC75G using Tapatalk
 

serdar_18fr

Active Member
May 29, 2021
329
1
191
I had thought about getting a multimeter to test the wiring but I'm not sure exactly how to do so. Could you explain? I used to have one years ago that broke and was always confused which was the correct setting to choose.

Are you also able to tell me where the other end of the wire plugs into? Is it the EasyConnect unit in the glovebox, or somewhere behind the screen?

Thanks!

Hi again,

I looked up for the wiring diagram of the unit in glovebox. There are a lot of different models depending on the model year & trim level but it looks like microphone is always connected to the same pins of the same socket on the unit, so it should be fairly easy to identify the wires.

First of all, there should be two pins on the microphone itself, one for positive and one for negative.
It is plugged into a 2-pin connector on the overhead panel as you know.
I don't know whether it is physically possible to plug the microphone incorrectly (reversed) but the pin number 1 on this connector should match the negative side of the microphone and pin number 2 on the connector should match the positive side of it.
There should be a purple wire going from the pin 1 and a black wire going from the pin 2, to the unit in the glovebox.

There are three 12-pin sockets on the back of the unit.
Each one has two rows of 6 pins, numbered from 1-6 on one row and 7-12 on the other.
(Depending on the unit model and its features, there may be missing pins on the sockets, but all of them have 12 pin positions)
Black wire from the microphone comes to the pin number 1 in one of those three 12-pin sockets.
Purple wire from the microphone comes to the pin number 7 in one of those three 12-pin sockets.
So these two wires should be connected to two pins on top of each other, one in the first pin of the first row (black on 1), the other in the first pin of the second row (purple on 7).

So, if you can see the purple and black on one of the 12 pin sockets on top of each other, those should be microphone wires. The other sockets do not have same colored wires at the same pin positions.

In the diagram attached below, R38 is the microphone and J794 is the unit in the glovebox.
T12h is a connector which plugs into one of the 12-pin sockets on the unit.
Also in the other two images, you can see the three 12-pin sockets on the back of the unit, one is missing some pins, the other has full 12 pins.

That's all from me for now, we can talk & do some more research if needed.

Cheers,
Serdar
 

Attachments

  • mic.png
    mic.png
    41.3 KB · Views: 31
  • j794_01.png
    j794_01.png
    53.1 KB · Views: 38
  • j794_02.png
    j794_02.png
    64.1 KB · Views: 34
  • Like
Reactions: Walone
Dec 16, 2023
4
2
Hi again,

I looked up for the wiring diagram of the unit in glovebox. There are a lot of different models depending on the model year & trim level but it looks like microphone is always connected to the same pins of the same socket on the unit, so it should be fairly easy to identify the wires.

First of all, there should be two pins on the microphone itself, one for positive and one for negative.
It is plugged into a 2-pin connector on the overhead panel as you know.
I don't know whether it is physically possible to plug the microphone incorrectly (reversed) but the pin number 1 on this connector should match the negative side of the microphone and pin number 2 on the connector should match the positive side of it.
There should be a purple wire going from the pin 1 and a black wire going from the pin 2, to the unit in the glovebox.

There are three 12-pin sockets on the back of the unit.
Each one has two rows of 6 pins, numbered from 1-6 on one row and 7-12 on the other.
(Depending on the unit model and its features, there may be missing pins on the sockets, but all of them have 12 pin positions)
Black wire from the microphone comes to the pin number 1 in one of those three 12-pin sockets.
Purple wire from the microphone comes to the pin number 7 in one of those three 12-pin sockets.
So these two wires should be connected to two pins on top of each other, one in the first pin of the first row (black on 1), the other in the first pin of the second row (purple on 7).

So, if you can see the purple and black on one of the 12 pin sockets on top of each other, those should be microphone wires. The other sockets do not have same colored wires at the same pin positions.

In the diagram attached below, R38 is the microphone and J794 is the unit in the glovebox.
T12h is a connector which plugs into one of the 12-pin sockets on the unit.
Also in the other two images, you can see the three 12-pin sockets on the back of the unit, one is missing some pins, the other has full 12 pins.

That's all from me for now, we can talk & do some more research if needed.

Cheers,
Serdar
 
Dec 16, 2023
4
2
Thanks for your responses, I'm sorry for the delay replying. I missed the notifications!

I ended up finding a local garage that specializes in retrofitting options for VAG cars. I've been to see them today and they have done some diagnosis. I felt more comfortable doing this rather than messing around with things myself and possibly breaking something further.

Two error codes come up which they said indicated either a problem with the wiring loom or the head unit. They first plugged a new microphone in to my head unit, which didn't work. Then plugged in a spare head unit which cleared the error codes, so unfortunately looks like it is my head unit that is faulty.

I am going back tomorrow to have the new one fitted, but as a positive they are doing it for half the cost of the dealers.
 
  • Like
Reactions: serdar_18fr
Adrian Flux insurance services - discount for forum members.