
Since the dawn of time I was very curious what was happening under my gear knob. What caused the feeling of looseness? How can I make it more precise? Do I have to change anything? Is this another Horst Fuchs commercial? NOPE.
After a little digging around the internet, how the selecting of gears work and getting more knowledge I found out about Diesel Geek shifter bushings, adjusting the bowdens in engine bay and also shimming the ball socket. I tried all of the above and after little steps, every time I did one of these the shifter felt more and more precise with a lot less play. If you have a feeling of a lot of play in your gear knob, vibrations or bad shifting of gears you need to try some of their tutorials. You can diagnose your bad bushings by watching this video from Diesel Geek.
www.youtube.com/watch?v=cBBgD0g-BGQ
Now I went a little further and did all of the above mentioned, everytime i did it it felt better and better. Since they do not have a tutorial on how to change the bushings I took some time on preparing one. This is for Seat Leon MK1 1.9 TDI (81 kw, ASV, 2001) It should be the same for any Seat Leon MK1, with the difference of cable ends being plastic or metallic. Enjoy!
https://mega.nz/#!LZsQWZDK!P9wT7dv5AddXDn6XhueBoJ1L8Ard1frJ3U9BD8Y9QdQ
Let's start.
Now I would like to guide you on how to install the shifter bushings from under the car. There are two methods of doing this. The hard way (my way) or the easy way. The easy way is to take off the last part of your exhaust (after the catalyst convertor – CC later called) – the resonator out of the way so the middle part – the catalyst convertor can be moved a little out of the way. Since I did it the hard way and did not want to meddle with the exhaust I had a lot of trouble of getting the heatshield around the convertor out of the way.
Things you will need:
• Dieselgeek.com shifter bushing set
• 4x “sombrero” exhaust nuts (either one is fine N 903 350 05, N 907 965 01, N 907 965 02)
• Circlip priers
• Socket wrench with 10mm and 13mm (I think)
• Monkey wrench
• 3-4 hours of free time
Now what I did is:
1. Jack up the car, it is better to jack up the car a lot. For example using a lift or driving on some blocks.
2. First thing to do was to take out the heatshield around the CC. WARNING it is a major pain in the ass when you do not remove the exhaust. You have to bend, curse, bend, push pull and trust me that from under the car only on some stands where there is not much room – let’s just say I wanted to cry. You do not have to worry about bending the heatshield, it can be easily bent back. Mine was a “U” shape when I started then it was a “C” and almost an “I”.
This photo was taken from another vehicle but the heatshield mount is the same. Although there is no middle section crossbar on this photo.

3. The heatshield is held in place by 4 “fasteners” or as I like to call them sombreros. The part number is: N 903 350 05, N 907 965 01, N 907 965 02. Either of them will work and they cost around 0, 30 € per one. (They can be different).

4. I also unscrewed the middle section exhaust holder. Which then let me to wiggle the heatshield and take it out more easily. There are 8-10 M10 or M13 screws holding it. It will not completely fall down! You will only be able to push the whole exhaust a little to the ground and trust me 3-4 centimetres of space is a major difference. (Ask your girlfriend. Hehe")
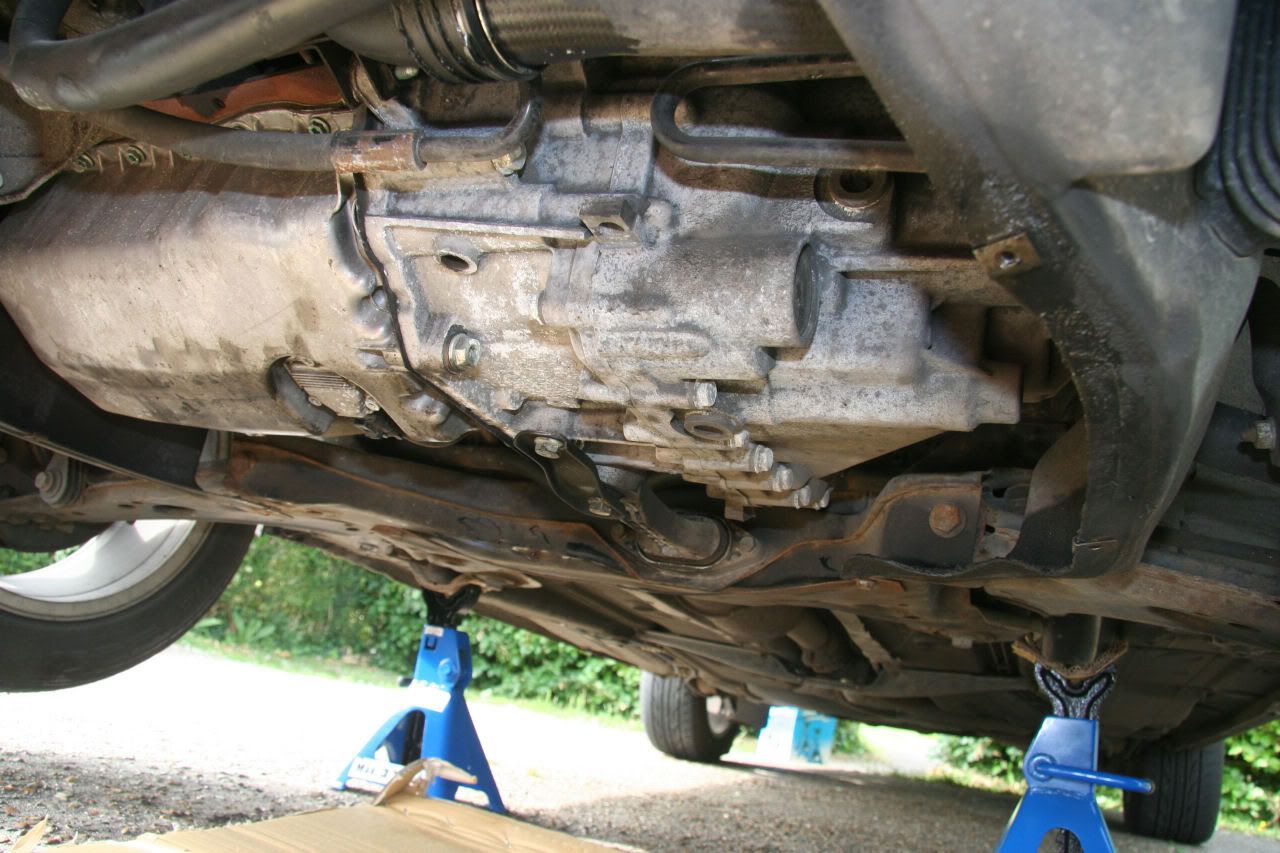
The photo on the left is how the exhaust crosspiece brace looks like. The photo on right is just for illustration on how it is screwed to the car. When you go outside and look under the car you will definitely see it (1.9 TDI).

PRO TIP ON BENDING: I bent the heatshield horizontal mounts to vertical so it does not have a Ω but more like an ∩ shape from profile and you just circle it around the exhaust pipe.
5. After taking out the heatshield you will be able to see the shifter box. Now the best way to get inside it is to take out the bolts on the back 2x M10 or M13. And two that are under the tray in your car. (I removed the bottom cover already)


6. When the heatshield is out of the way and 4 screws (2 interior nuts, 2 exterior screws) holding the shifter case are loose. The shifter cable housing will fall down on to the exhaust pipe. From there you need to use a butter knife, small screwdriver, machete or something you can pry one side of the cover off. This is how the bottom lid of the housing looks like when it’s off. Do not be afraid to use some force. It’s a thin metal so it can be bend back.

7. When the bottom lid is off you will be able to see and take out the old bushings. I think somebody has already changed the shifter cable (as a whole) because one of mine was metallic and the other was plastic. (I have 2001 Seat Leon MK1)

One of them has a black “hat” the other I taken off just by simply prying it out. When they are off you need to slide off the shifter cables. Now you need to take out the rubber bushings out of the cable ends. Mine came after a lot of negotiation, so be prepared to use low profile knife to cut them out. When this is done first slide the new bushings on to the gear knob mechanism and then slide the shifter cables onto them. The bigger bushing comes with a metal clip to hold it in place. First insert the bushing, then the cable, then use the pliers to insert the clip.

You will need a special kind of pliers for that metal clip. There are two kinds and I recommend using the ones that are in an L shape. I did it with those that are straight.

8. After you inserted both of the bushings. It’s time to put it all back together. Before you start putting the bottom lid on straighten out the metal brackets so it is easier to put it back on. This part took me most of the time since it just would not hold into place. I recommend you to take a monkey wrench and do one on each side in middle and then the others.

When you have this done. All you need to do is screw it together. If you have anybody around tell them to screw the inside ones by hand so it will not fall down onto the exhaust pipe while you push it from the ground up for them. When they are done screw the back ones.
Go into the car and screw the inner ones. Then comes the hardest part of putting back the heatshield. I used hands to get it around the exhaust pipe. A lot of pushing and moulding the thin metal. This was the most difficult part. After it’s in place you can start moulding it to circa the same shape with wood, hammer anything that has a small tip like screwdriver or else you will puncture it! Do not be afraid to lay it on the exhaust mould it then try to screw it to the car, if it does not fit 1st time try it some more. I did not bother bending it to 100 % shape as before, I did not want it to touch the hot exhaust so I just bent it to the “U” shape, and it had like 90% shape of the previous one.
Then just screw the little sombreros on. From my experience of changing the engine covers these sombreros are a pain in the ass. I think it’s better to use the sombreros with combination of M6 nuts which fit the screws from the car and hold the sombreros in place.
I also recommend doing the shimmering of ball socket and adjusting the play of bowdens in the engine bay:
Shimming the ball socket
https://www.youtube.com/watch?v=TO-jPaC3z1I
Engine shifter adjustment (bowden adjustment)
https://www.youtube.com/watch?v=sheTKD03hmo
Made by the one and only Welo_SVK.
All thanks goes to Dieselgeek.com.
After a little digging around the internet, how the selecting of gears work and getting more knowledge I found out about Diesel Geek shifter bushings, adjusting the bowdens in engine bay and also shimming the ball socket. I tried all of the above and after little steps, every time I did one of these the shifter felt more and more precise with a lot less play. If you have a feeling of a lot of play in your gear knob, vibrations or bad shifting of gears you need to try some of their tutorials. You can diagnose your bad bushings by watching this video from Diesel Geek.
www.youtube.com/watch?v=cBBgD0g-BGQ
Now I went a little further and did all of the above mentioned, everytime i did it it felt better and better. Since they do not have a tutorial on how to change the bushings I took some time on preparing one. This is for Seat Leon MK1 1.9 TDI (81 kw, ASV, 2001) It should be the same for any Seat Leon MK1, with the difference of cable ends being plastic or metallic. Enjoy!
https://mega.nz/#!LZsQWZDK!P9wT7dv5AddXDn6XhueBoJ1L8Ard1frJ3U9BD8Y9QdQ
Let's start.
Now I would like to guide you on how to install the shifter bushings from under the car. There are two methods of doing this. The hard way (my way) or the easy way. The easy way is to take off the last part of your exhaust (after the catalyst convertor – CC later called) – the resonator out of the way so the middle part – the catalyst convertor can be moved a little out of the way. Since I did it the hard way and did not want to meddle with the exhaust I had a lot of trouble of getting the heatshield around the convertor out of the way.
Things you will need:
• Dieselgeek.com shifter bushing set
• 4x “sombrero” exhaust nuts (either one is fine N 903 350 05, N 907 965 01, N 907 965 02)
• Circlip priers
• Socket wrench with 10mm and 13mm (I think)
• Monkey wrench
• 3-4 hours of free time
Now what I did is:
1. Jack up the car, it is better to jack up the car a lot. For example using a lift or driving on some blocks.
2. First thing to do was to take out the heatshield around the CC. WARNING it is a major pain in the ass when you do not remove the exhaust. You have to bend, curse, bend, push pull and trust me that from under the car only on some stands where there is not much room – let’s just say I wanted to cry. You do not have to worry about bending the heatshield, it can be easily bent back. Mine was a “U” shape when I started then it was a “C” and almost an “I”.
This photo was taken from another vehicle but the heatshield mount is the same. Although there is no middle section crossbar on this photo.
3. The heatshield is held in place by 4 “fasteners” or as I like to call them sombreros. The part number is: N 903 350 05, N 907 965 01, N 907 965 02. Either of them will work and they cost around 0, 30 € per one. (They can be different).
4. I also unscrewed the middle section exhaust holder. Which then let me to wiggle the heatshield and take it out more easily. There are 8-10 M10 or M13 screws holding it. It will not completely fall down! You will only be able to push the whole exhaust a little to the ground and trust me 3-4 centimetres of space is a major difference. (Ask your girlfriend. Hehe
The photo on the left is how the exhaust crosspiece brace looks like. The photo on right is just for illustration on how it is screwed to the car. When you go outside and look under the car you will definitely see it (1.9 TDI).
PRO TIP ON BENDING: I bent the heatshield horizontal mounts to vertical so it does not have a Ω but more like an ∩ shape from profile and you just circle it around the exhaust pipe.
5. After taking out the heatshield you will be able to see the shifter box. Now the best way to get inside it is to take out the bolts on the back 2x M10 or M13. And two that are under the tray in your car. (I removed the bottom cover already)
6. When the heatshield is out of the way and 4 screws (2 interior nuts, 2 exterior screws) holding the shifter case are loose. The shifter cable housing will fall down on to the exhaust pipe. From there you need to use a butter knife, small screwdriver, machete or something you can pry one side of the cover off. This is how the bottom lid of the housing looks like when it’s off. Do not be afraid to use some force. It’s a thin metal so it can be bend back.
7. When the bottom lid is off you will be able to see and take out the old bushings. I think somebody has already changed the shifter cable (as a whole) because one of mine was metallic and the other was plastic. (I have 2001 Seat Leon MK1)
One of them has a black “hat” the other I taken off just by simply prying it out. When they are off you need to slide off the shifter cables. Now you need to take out the rubber bushings out of the cable ends. Mine came after a lot of negotiation, so be prepared to use low profile knife to cut them out. When this is done first slide the new bushings on to the gear knob mechanism and then slide the shifter cables onto them. The bigger bushing comes with a metal clip to hold it in place. First insert the bushing, then the cable, then use the pliers to insert the clip.
You will need a special kind of pliers for that metal clip. There are two kinds and I recommend using the ones that are in an L shape. I did it with those that are straight.
8. After you inserted both of the bushings. It’s time to put it all back together. Before you start putting the bottom lid on straighten out the metal brackets so it is easier to put it back on. This part took me most of the time since it just would not hold into place. I recommend you to take a monkey wrench and do one on each side in middle and then the others.
When you have this done. All you need to do is screw it together. If you have anybody around tell them to screw the inside ones by hand so it will not fall down onto the exhaust pipe while you push it from the ground up for them. When they are done screw the back ones.
Go into the car and screw the inner ones. Then comes the hardest part of putting back the heatshield. I used hands to get it around the exhaust pipe. A lot of pushing and moulding the thin metal. This was the most difficult part. After it’s in place you can start moulding it to circa the same shape with wood, hammer anything that has a small tip like screwdriver or else you will puncture it! Do not be afraid to lay it on the exhaust mould it then try to screw it to the car, if it does not fit 1st time try it some more. I did not bother bending it to 100 % shape as before, I did not want it to touch the hot exhaust so I just bent it to the “U” shape, and it had like 90% shape of the previous one.
Then just screw the little sombreros on. From my experience of changing the engine covers these sombreros are a pain in the ass. I think it’s better to use the sombreros with combination of M6 nuts which fit the screws from the car and hold the sombreros in place.
I also recommend doing the shimmering of ball socket and adjusting the play of bowdens in the engine bay:
Shimming the ball socket
https://www.youtube.com/watch?v=TO-jPaC3z1I
Engine shifter adjustment (bowden adjustment)
https://www.youtube.com/watch?v=sheTKD03hmo
Made by the one and only Welo_SVK.
All thanks goes to Dieselgeek.com.
Last edited:
