
Right well it's fitted. Although i need take the tubing off to remove the outer plastic as i wasn't sure if it was supposed to be there or not lol I can be stupid at times...
Also i'm very new to under the bonnet moding. So i may have done something wrong, if i have and you notice please point it out.
Wasn't hard to fit. Couple of confused moments but all in all a pretty easy install.
All you need is a torx screwdriver set and some wider mouth pliers, 150mm will do.
I didn't take step by step photos as i completely forgot sorry, it was freezing out and i have man flu so just got on with it. I'll try and describe as thoroughly as i can what i did, although it may not be the most efficient way/ order to do it in lol
Take the engine cover off, lift it at the front because there are two connections underneath that will pop out, then pull it forwards and it'll slide off. This shows the second metal clip holding the first part that i removed the "T" shaped piping. Use the pliers to open the clip and slide the pipe off of its connection being careful as it's still attached at the other two ends. Wiggle with force the small connection pipe off. Its a tight fit, but a bit of thumbing will get it off.
This is the part in mention:

Repeat for the other clip to remove the other side off, although i removed the component all in one. If you do that/ once you've done that there are only two bolts left. On on the bottom right hand side of the airbox. A couple of inches down behind the battery. That's a torx screw. Once that's remove the whole airbox will lift off but it has to "bungs" holding it in place so pull firmly but carefully as somewires may be caught on it.
All thats left is the intake scoop at the front of the engine bay. On the left of it (as your looking at the car) there's a torx screw driver two sizes down from the last torx you used. Remove this. The other side of the scoop is "clipped" in. Pull it out with a sliding motion to the left. Again be careful of the wiring surrounding it.
Once you've done that you'll end up with this:

Oh and sorry if the photos are blurred and with low lighting levels i was shivering like mad lol
This what the engine bay will look like:

Next attach the "T" shaped piping to its place at the top left in the picture. Make sure you place the circular clamps over the tubing before fitting it. You can tighten them but there's not much need at this point. Annoyingly the "FORGE" writing was on the wrong side of my pipe so it's not on show lol. Attach the small tube to the "Stem" of the "T" with the clip in place.
You can attach the air filter. This is where you may want to tighten the clamps as it's got some weight to it, and you don't want it to fall off and scratch now do ya lol


What i did next was fit the air scoop, this is where i'm a bit confused as the bolt fits fine but the otherside doesn't "clip" in like the OEM.. So i'm going to have to find another screw and fix it at both sides. I just tightened it on the one side firmly and made sure it did'nt have any movement. Should be ok for now.
Then it's just the main tubing. DON'T do what i did and leave the thick plastic on lol take it off! I had it in my head that i was to do with heat protection. I'm an idiot now i have to go take it apart again lol
It's quite a tight fit in the engine bay but it does work! Again put the clips on before putting it on.
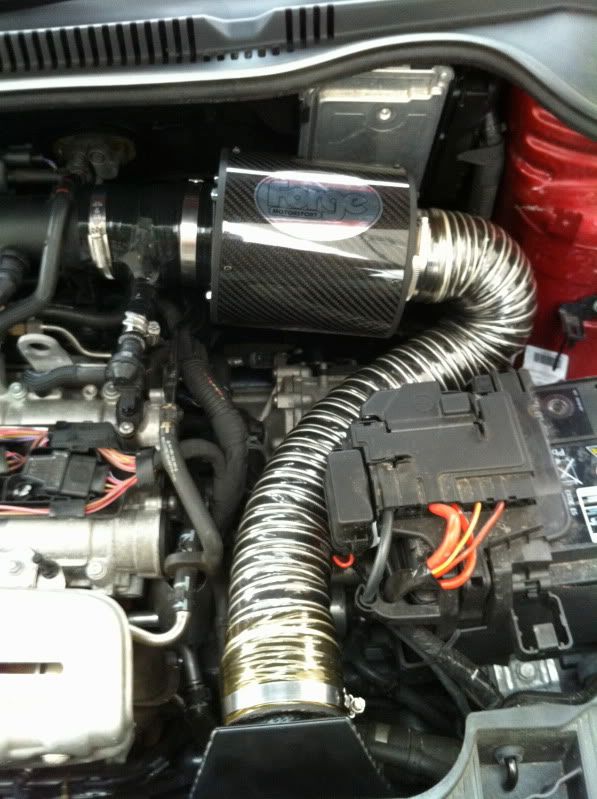

And there you are.
I did make two videos one of before and after. Problem being the "before" video was taken on Monday and the after video was taken today. Theres more wind on the video of today, and although i thought i held the camera in the same place, i clearly didn't when comparing the videos. So it's useless for sound comparison as the after video has the camera further away i'll try and take another "After" video tomorrow.
My personal thoughts are that it sounds much much better, smoother and refined but in a "sporty" way if that makes sense lol
Hope this wall of text is of help to someone.
Also i'm very new to under the bonnet moding. So i may have done something wrong, if i have and you notice please point it out.
Wasn't hard to fit. Couple of confused moments but all in all a pretty easy install.
All you need is a torx screwdriver set and some wider mouth pliers, 150mm will do.
I didn't take step by step photos as i completely forgot sorry, it was freezing out and i have man flu so just got on with it. I'll try and describe as thoroughly as i can what i did, although it may not be the most efficient way/ order to do it in lol
Take the engine cover off, lift it at the front because there are two connections underneath that will pop out, then pull it forwards and it'll slide off. This shows the second metal clip holding the first part that i removed the "T" shaped piping. Use the pliers to open the clip and slide the pipe off of its connection being careful as it's still attached at the other two ends. Wiggle with force the small connection pipe off. Its a tight fit, but a bit of thumbing will get it off.
This is the part in mention:
Repeat for the other clip to remove the other side off, although i removed the component all in one. If you do that/ once you've done that there are only two bolts left. On on the bottom right hand side of the airbox. A couple of inches down behind the battery. That's a torx screw. Once that's remove the whole airbox will lift off but it has to "bungs" holding it in place so pull firmly but carefully as somewires may be caught on it.
All thats left is the intake scoop at the front of the engine bay. On the left of it (as your looking at the car) there's a torx screw driver two sizes down from the last torx you used. Remove this. The other side of the scoop is "clipped" in. Pull it out with a sliding motion to the left. Again be careful of the wiring surrounding it.
Once you've done that you'll end up with this:
Oh and sorry if the photos are blurred and with low lighting levels i was shivering like mad lol
This what the engine bay will look like:
Next attach the "T" shaped piping to its place at the top left in the picture. Make sure you place the circular clamps over the tubing before fitting it. You can tighten them but there's not much need at this point. Annoyingly the "FORGE" writing was on the wrong side of my pipe so it's not on show lol. Attach the small tube to the "Stem" of the "T" with the clip in place.
You can attach the air filter. This is where you may want to tighten the clamps as it's got some weight to it, and you don't want it to fall off and scratch now do ya lol
What i did next was fit the air scoop, this is where i'm a bit confused as the bolt fits fine but the otherside doesn't "clip" in like the OEM.. So i'm going to have to find another screw and fix it at both sides. I just tightened it on the one side firmly and made sure it did'nt have any movement. Should be ok for now.
Then it's just the main tubing. DON'T do what i did and leave the thick plastic on lol take it off! I had it in my head that i was to do with heat protection. I'm an idiot now i have to go take it apart again lol
It's quite a tight fit in the engine bay but it does work! Again put the clips on before putting it on.
And there you are.
I did make two videos one of before and after. Problem being the "before" video was taken on Monday and the after video was taken today. Theres more wind on the video of today, and although i thought i held the camera in the same place, i clearly didn't when comparing the videos. So it's useless for sound comparison as the after video has the camera further away i'll try and take another "After" video tomorrow.
My personal thoughts are that it sounds much much better, smoother and refined but in a "sporty" way if that makes sense lol
Hope this wall of text is of help to someone.
")
