Ok so here a guide on how to remove the EGR valve and inlet manifold for cleaning.
There are no specialist tools required making it an ideal job if you have a few hours spares and don't mind getting dirty!
Tools required (this is all you "need" but if you have a decent socket set and a variety of Allen keys life will be made easier, all will become apparent later!)
5mm hex(Allen) key
6mm hex(Allen) key - short ones are best
Medium 3/8" drive ratchet handle
10mm 3/8" drive socket
12mm 3/8" drive socket
6" 3/8" drive extension
Small 1/4" drive ratchet handle
6" 1/4" drive extension
Small 1/4" extension (approx 1" but doesn't have to be exact, just a small one!)
1/4" bit holder
6mm bit for above
5mm bit for above
Torque wrench..... if your that way inclined, personally I don't always bother. I did shear a bolt tho...
Any other extensions and socket set accessories would be worth having too just in case!
Flat blade screwdriver
Mole grips
Pot for nuts and bolts
Wd40 or similar
Something clean about the size of your engine cover, this will cover your engine later on
Old washing up bowl, or somewhere that is ok to get really dirty! This stuff is horrendous!
Cleaning fluid of choice, brake cleaner, petrol, kerosine etc, anything that will degrease
Protective equipment... GLOVES! Lots of gloves! Loads of rag/paper towel and think about eye protection too as you don't want this stuff in your eyes.. Hint, have a bottle of water with about a 2mm hole in the lid, that way you have a way of washing your eye out if something happens!
Ok to get started...
Make sure ignition is off, key is out and I personally tape over the barrel just to make sure I don't forget and try and start the engine, or someone else try's when your away making a brew! Trust me it happens!
Make sure you have an area sorted for any oily parts, don't want to be running around the place dripping oil everywhere!
Stuff a few towels down the back of the engine (don't forget to take them out after!) as you will more than likely drop a few bolts! Easier to pick them off a towel that them ping down into the depths of the engine bay!
I appreciate some of the instruction in here may be a little bit obvious, but it's aimed at all experience levels so please bear with it!
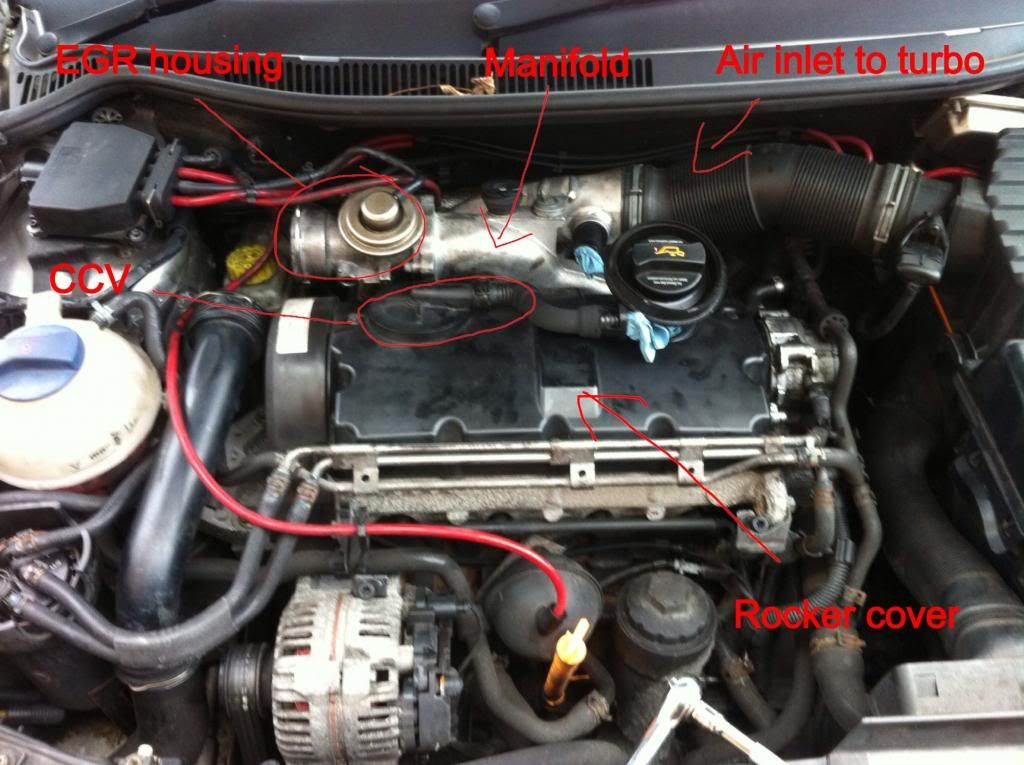
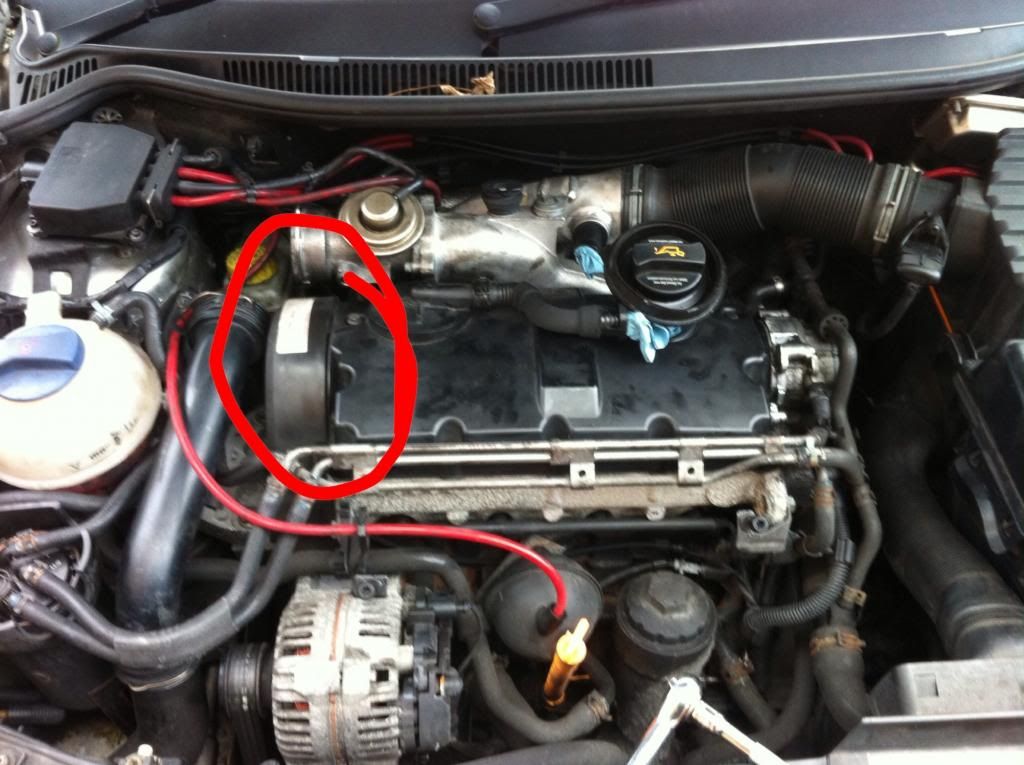
Engine cover off
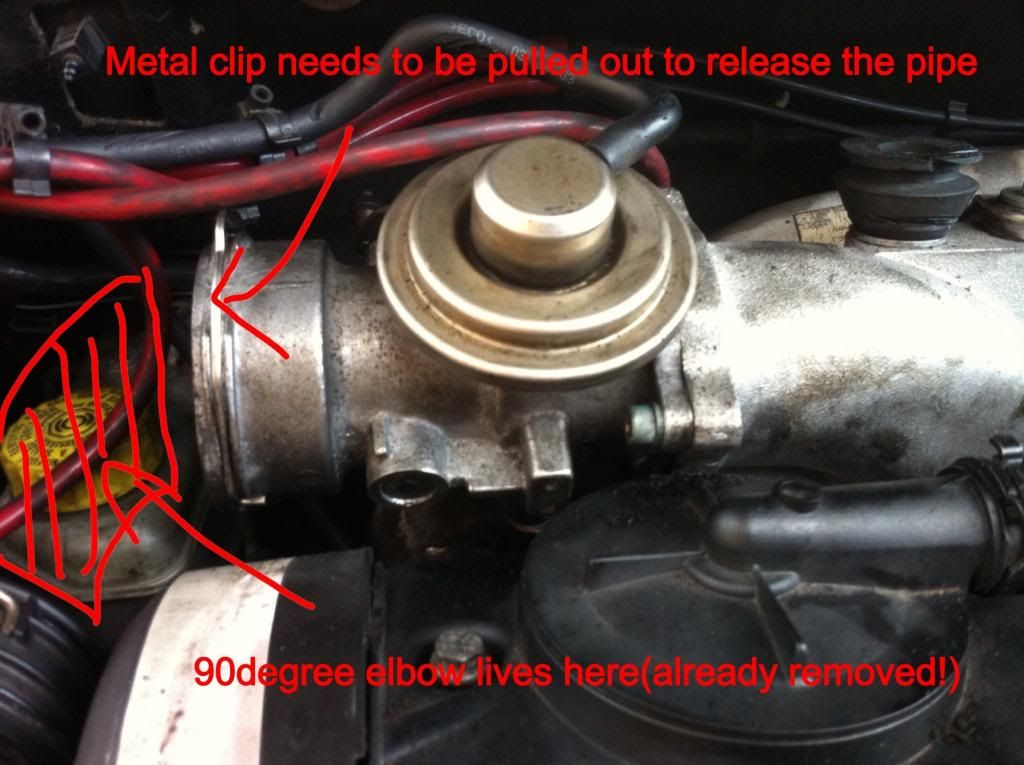
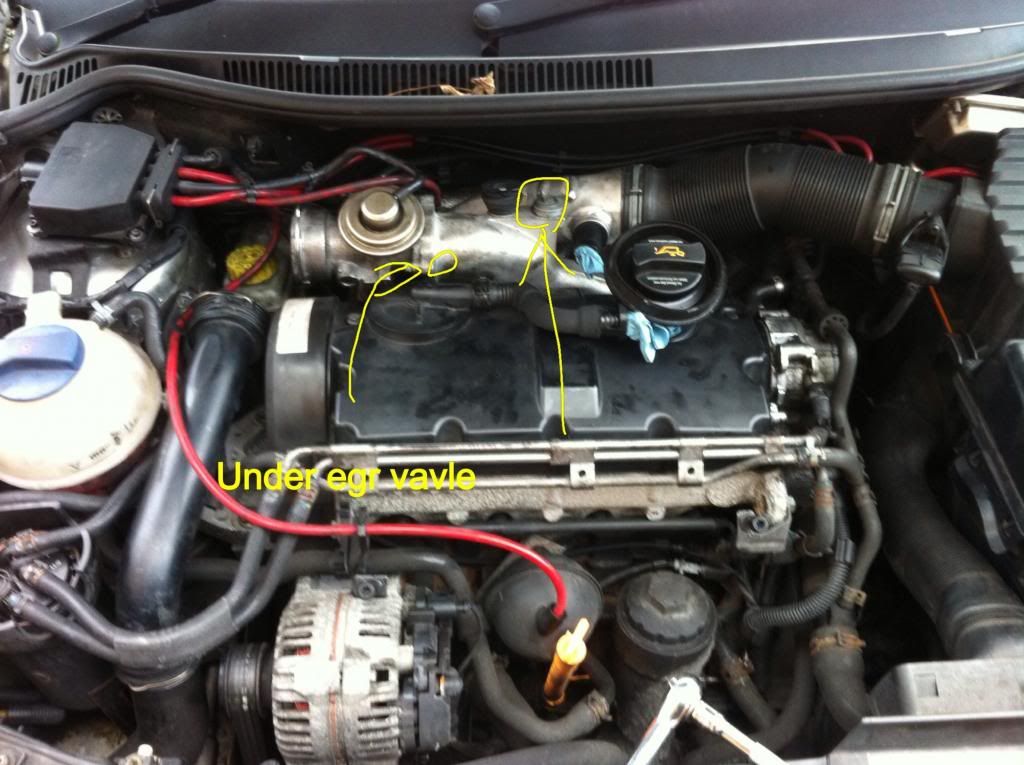
Remove 90 degree elbow, and the plastic pipe if you prefer. To remove them you need to pull the metal clip arrowed, away from the pipe until it clicks, you can use the screwdriver to get under it if you need but careful you don't damage the rubber pipe.
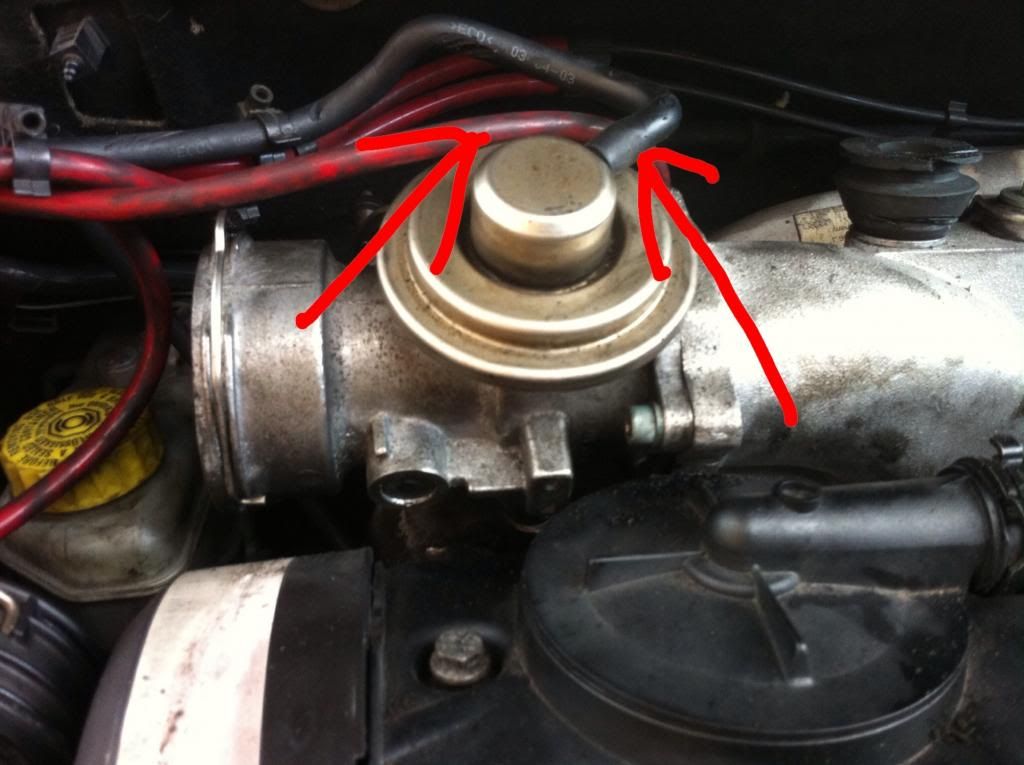
Next remove the 2 vacuum lines arrowed, by gently pulling them off the connectors, from the EGR valve and tuck out of the way
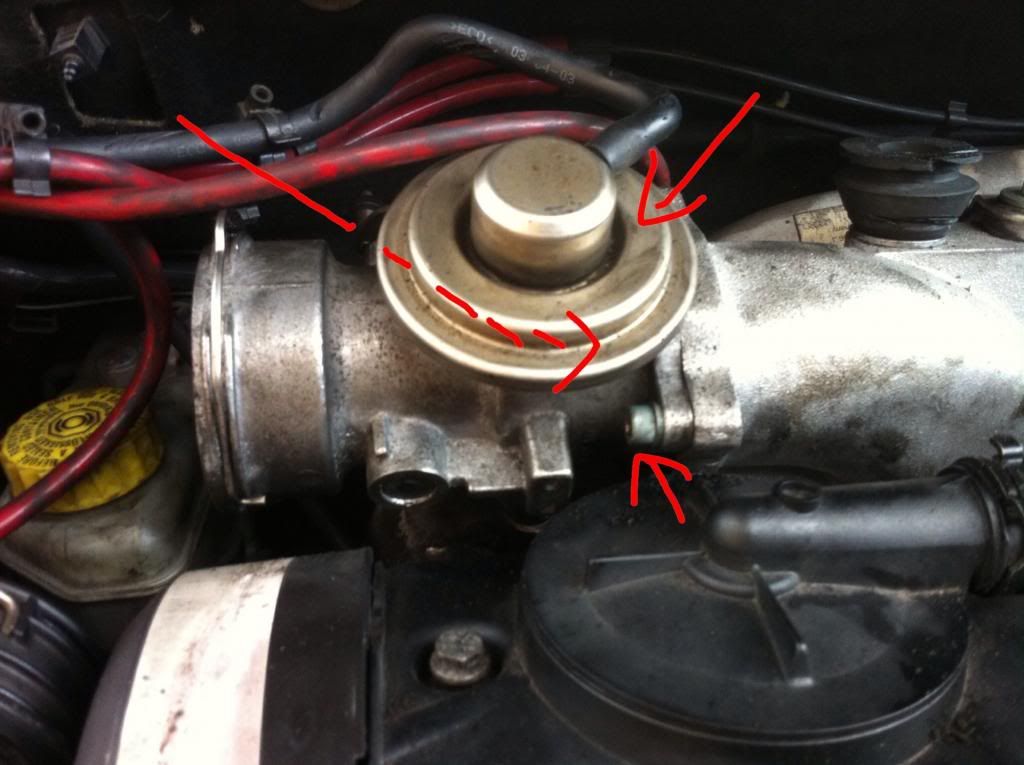
Next, with your 5mm Allen key, or small ratchet, extension and 5mm bit, undo the 3 bolts that mount the egr to the inlet. Note, one is tucked down the back, if you look at it facing the bolts they make a triangle so should help you find it.
Next one depends weather your taking the inlet off too.
If you are, you may as well do it as per part a ( as this needs to be removed later on anyway). If your just doing the egr, pick whichever way seems easiest to you at the time. Note though in part a, there is a small risk of rounding the nuts off as they can be corroded and if you don't need to touch them, its probably best left alone!
A - removing the egr valve via the exhaust manifold mounting point
Using feel and a bit of sight, you should see a gold small diameter pipe going up into the bottom of the egr valve. If you trace down a few inches, you should reach where it bolts to the exhaust manifold. Spray some wd40 or equivalent on the nuts if you feel you need to, but mine were ok and I'm on 154kmiles!
These are 12mm nuts and I found the best way to get them was as per pic below.
Feel free to undo the yellow arrowed nut and pipe (mole grips are best) for more access.
Once they are loose you can either leave everything in place loose( as you can just about get enough room without removing it) or just take it off anyway to make life easier.
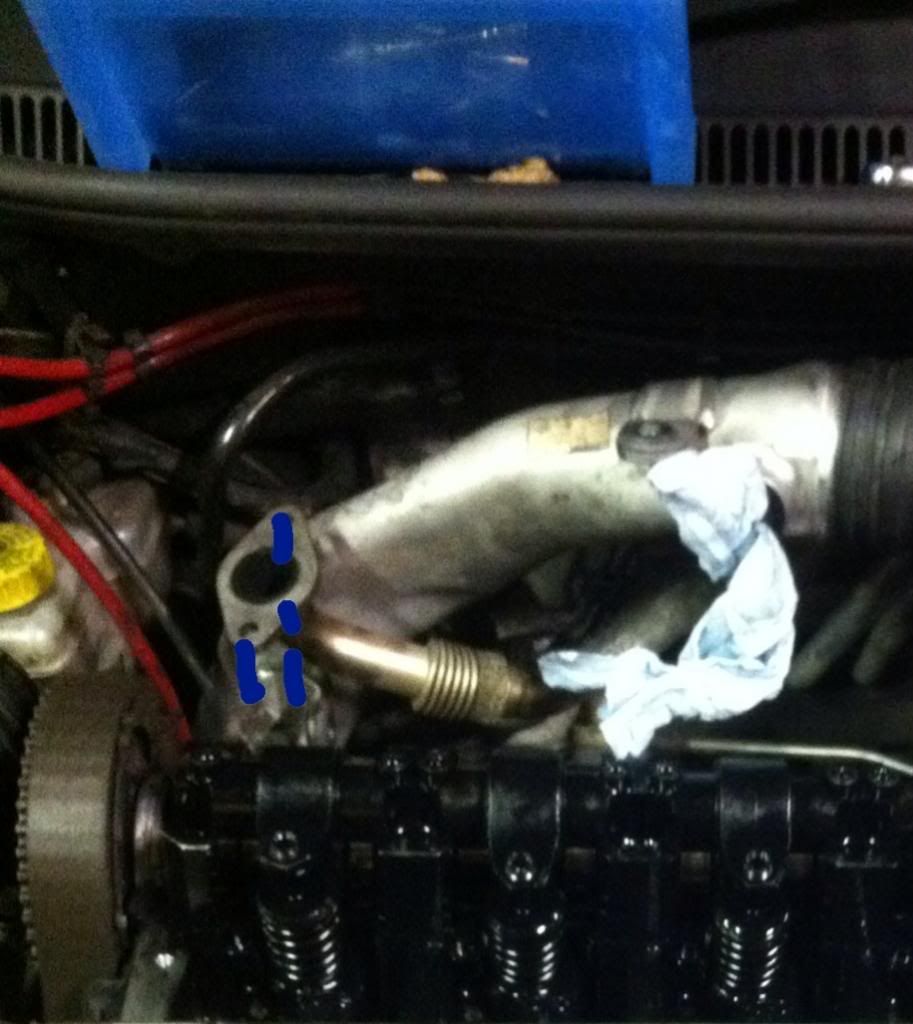
B - removing the egr valve via the egr valve to down pipe point.
This can be tricky but it's doable. There are 2 6mm Allen nuts going into the bottom of the egr valve. To get at these you will need the Allen key that hopefully is short enough to clear the brake fluid resivour. As per pic this is where I had problems!
Persever though if this is the route you take, it can be done it just takes a few attempts!
Note. There is a metal gasket between the egr valve and the pipe so make sure you keep it safe
Bet your glad you have those towels stuffed down the back now!
That should now be egr valve off! Either clean and refit, or if your now on a roll, place to one side and crack on with the intake. After all, no one likes a half job!
The intake
Right now I know this isn't necessary but I did it anyway as I wanted the clearance, had an injector connection fault code to sort and I wanted to see how the cams were wearing. Feel free to skip this step, although I'm sure you all want to see a shiny camshaft!
Please note the refitting section before deciding though as that may influence your decision
Engine cover
Remove cambelt upper cover. 2 metal clips, one fro none back, then cover lifts up to remove
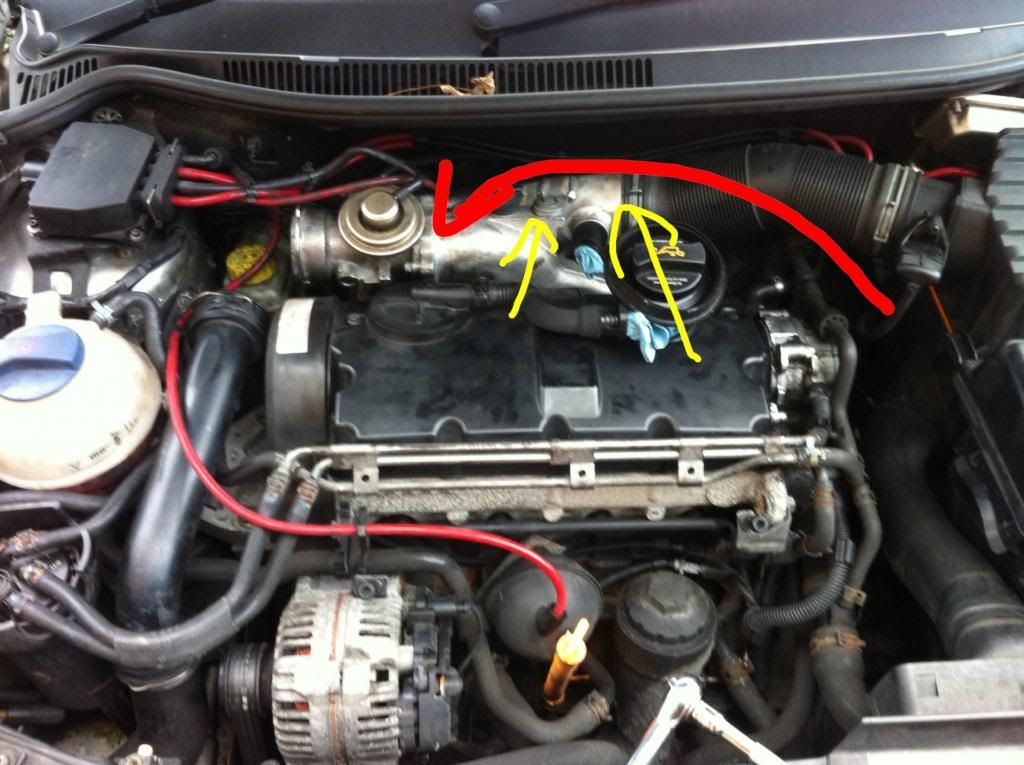
There is a pipe going into the inlet ( just after the Maf sensor)
Remove this by squeezing the clip as per pic
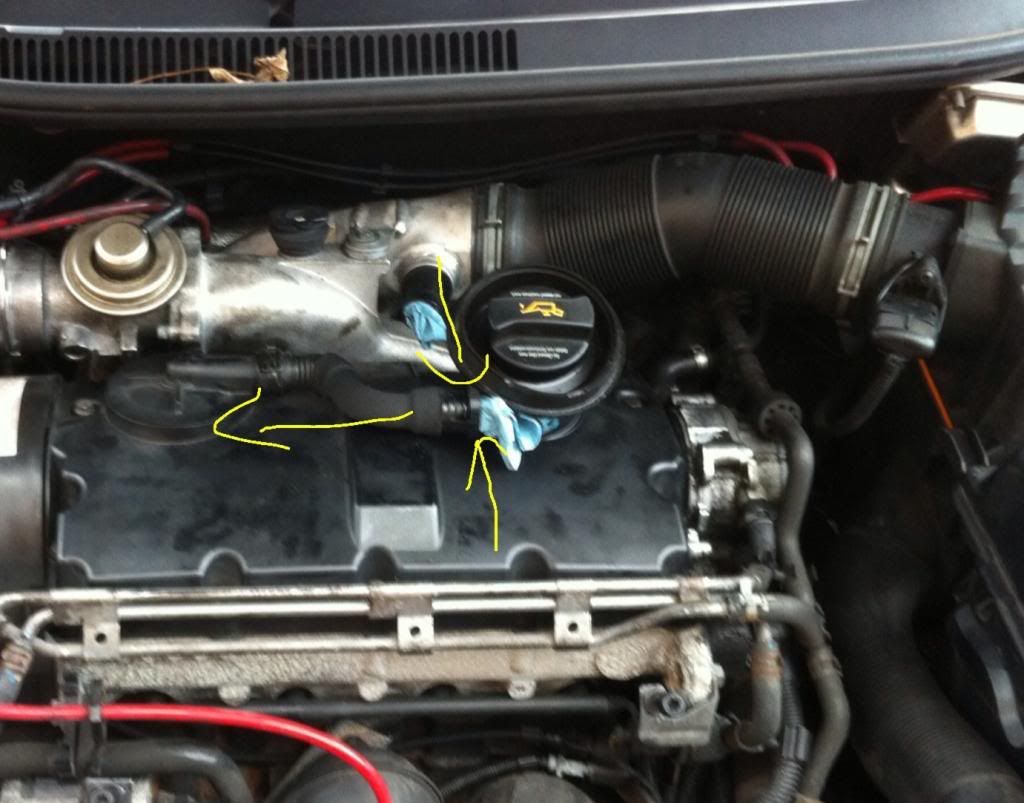
Plug the open ends with rag or similar ( careful on the intake side as if something gets in there it's already past the air filter)
12 10mm bolts hold this on, undo them all
Note they will not come all of the way out as they are stopped from falling out of the cover as a safety precaution I assume during mantinence (stops them falling into the engine I assume). CHECK THOUGH AS YOURS MAY BE DIFFERENT
You will need to pull the solid pipes at the front away as these are held in by the 2 bolts arrowed.
Now this is the careful bit.
First of all make sure there are no tools or loose objects in the area or on yourself, (ie don't hold anything between your teeth or in the other hand! Sod's law is a cruel one!
With a bit of persuasion the cover should lift away from the engine. TAKE CARE, don't use anything sharp to lever it off, you don't want to damage the seal or the metal of the head
Note there will be oil but don't panic, it's only residual and it's not held in the bit your taking off
Now it's a bit fiddly to get off but I basically lifted it as high as it would go, then tilted it back and jiggled it out. Again, make sure there is nothing loose on or around the area. If something drops in the engine your in trouble!
Cover off, car ****! Here you will see your (hopefully) smooth shiny camshaft, valve srpings, top part of the injectors and buried under that the valves themselves.
Don't stop for too long tho! Get it covered over so nothing can get in there!
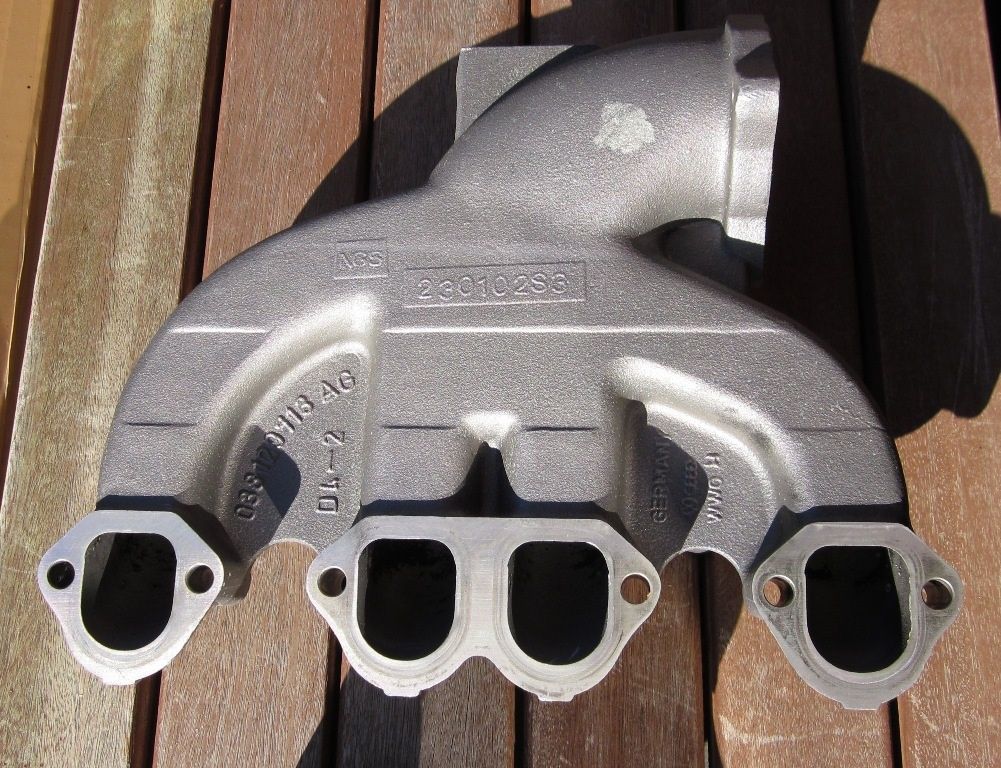
Manifold
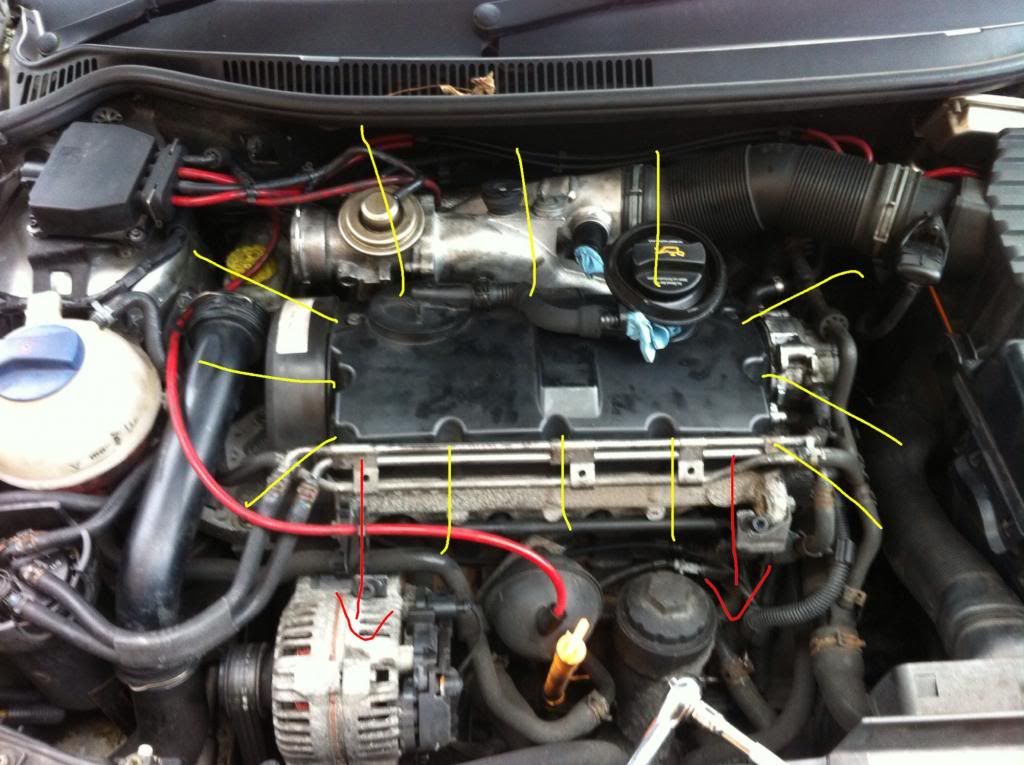
Remove arrowed bolts that holds the intake pipe to the manifold
Separate the intake where the metal pipe meets the black plastic pipe. Mole grips to squeeze the clip and leave them on there, just slide the clip up the pipe and out of the way
Now the manifold itself
6 6mm Allen bolts secure this. 2 are visible, arrowed in blue. The rest are not! This is where everyone wishes they had lady hands!
I recommend the 1/4" drive ratchet, 6" extension and the bit holder and bit.
I have arrowed the rough location, and pic below of how the manifold looks from the other side, but obviously of little use as you can't see from there!
NOTE exhaust manifold bolts are hex nuts so you can't get confused. If you find a 6mm Allen bolt, then that's the one!
Have a good feel around and remember the bolts are angled slightly so the ratchet handle end will need to be a bit lower that the bolt end. Otherwise you won't get the bit in at all or well enough. Make sure the bit is in properly so you don't round any off!
They are not on too tight but need a but of force with the small ratchet.
Knuckles and wrists cut up yet!? Told you it was easy!
Once all 6 are off, recovered/found and safe, INCLUDING 1 washer per bolt!, you can start to maneuver the manifold out.
FIRST , to make life easier, there is a 10mm bolt arrowed, undo this and the whole intake pipe will have a lot more play, allowing you to wriggle the manifold out a lot easier.
Just be mindful that the manifold has a metal gasket, so account for that and either leave it where it is or take it out.
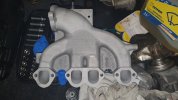
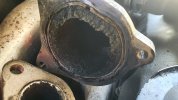
Ok so the manifold is out, and probably full of gunk!
But before you run off to clean, make sure there is nothing that can get into the intake ports. Direct to engine so you want nothing to get in there!
Now clean to your hearts content! I just used a scraper, loads of brake cleaner, and a thin brush, but I didn't have time to make mine sparkle as I was only planning on doing th egr and didn't have a guide either! So you have no excuses!
Once clean and dry and after pics have been taken for the worlds cleanest inlet competition time to re fit
Refitting is reverse of removal, with the following notes.
Engine cover has a tightening sequence, best practise is to start in the middle and work out in an even order. Don't have the exact sequence at the moment but will add when I get it.
Good practice is ensure all mating surfaces are clean and apply a small amount of sealant where the bearing caps meet the cover. Although I didn't haven't had it leak
Manifold, ensure gasket is in good cond and in correct place. your supposed to replace it but it's metal so I was happy to reuse.
Manifold is fiddly, but it's easier now because you've had all that practise finding bolts!
Torque settings as per Haynes manual. Need to add these in when I get my Haynes back!
Only ones to watch for though are the rocker cover ones, iirc 10nm so not a lot. I sheared one but I'm thinking it was already buggered as it didn't take much. £5 per bolt from seat if you need one!
Final steps. Ensure everything is done up, connected and all tools are out of the engine bay.
Hope this helps!")
PLEASE NOTE, THIS IS ADVICE ONLY AND I CANNOT BE HELD ACCOUNTABLE FOR ANY LOSSES OR DAMAGE ARISING AS A RESULT OF THIS INFORMATION.
There are no specialist tools required making it an ideal job if you have a few hours spares and don't mind getting dirty!
Tools required (this is all you "need" but if you have a decent socket set and a variety of Allen keys life will be made easier, all will become apparent later!)
5mm hex(Allen) key
6mm hex(Allen) key - short ones are best
Medium 3/8" drive ratchet handle
10mm 3/8" drive socket
12mm 3/8" drive socket
6" 3/8" drive extension
Small 1/4" drive ratchet handle
6" 1/4" drive extension
Small 1/4" extension (approx 1" but doesn't have to be exact, just a small one!)
1/4" bit holder
6mm bit for above
5mm bit for above
Torque wrench..... if your that way inclined, personally I don't always bother. I did shear a bolt tho...
Any other extensions and socket set accessories would be worth having too just in case!
Flat blade screwdriver
Mole grips
Pot for nuts and bolts
Wd40 or similar
Something clean about the size of your engine cover, this will cover your engine later on
Old washing up bowl, or somewhere that is ok to get really dirty! This stuff is horrendous!
Cleaning fluid of choice, brake cleaner, petrol, kerosine etc, anything that will degrease
Protective equipment... GLOVES! Lots of gloves! Loads of rag/paper towel and think about eye protection too as you don't want this stuff in your eyes.. Hint, have a bottle of water with about a 2mm hole in the lid, that way you have a way of washing your eye out if something happens!
Ok to get started...
Make sure ignition is off, key is out and I personally tape over the barrel just to make sure I don't forget and try and start the engine, or someone else try's when your away making a brew! Trust me it happens!
Make sure you have an area sorted for any oily parts, don't want to be running around the place dripping oil everywhere!
Stuff a few towels down the back of the engine (don't forget to take them out after!) as you will more than likely drop a few bolts! Easier to pick them off a towel that them ping down into the depths of the engine bay!
I appreciate some of the instruction in here may be a little bit obvious, but it's aimed at all experience levels so please bear with it!

Engine cover off
Remove 90 degree elbow, and the plastic pipe if you prefer. To remove them you need to pull the metal clip arrowed, away from the pipe until it clicks, you can use the screwdriver to get under it if you need but careful you don't damage the rubber pipe.

Next remove the 2 vacuum lines arrowed, by gently pulling them off the connectors, from the EGR valve and tuck out of the way

Next, with your 5mm Allen key, or small ratchet, extension and 5mm bit, undo the 3 bolts that mount the egr to the inlet. Note, one is tucked down the back, if you look at it facing the bolts they make a triangle so should help you find it.

Next one depends weather your taking the inlet off too.
If you are, you may as well do it as per part a ( as this needs to be removed later on anyway). If your just doing the egr, pick whichever way seems easiest to you at the time. Note though in part a, there is a small risk of rounding the nuts off as they can be corroded and if you don't need to touch them, its probably best left alone!
A - removing the egr valve via the exhaust manifold mounting point
Using feel and a bit of sight, you should see a gold small diameter pipe going up into the bottom of the egr valve. If you trace down a few inches, you should reach where it bolts to the exhaust manifold. Spray some wd40 or equivalent on the nuts if you feel you need to, but mine were ok and I'm on 154kmiles!
These are 12mm nuts and I found the best way to get them was as per pic below.
Feel free to undo the yellow arrowed nut and pipe (mole grips are best) for more access.

Once they are loose you can either leave everything in place loose( as you can just about get enough room without removing it) or just take it off anyway to make life easier.
B - removing the egr valve via the egr valve to down pipe point.
This can be tricky but it's doable. There are 2 6mm Allen nuts going into the bottom of the egr valve. To get at these you will need the Allen key that hopefully is short enough to clear the brake fluid resivour. As per pic this is where I had problems!

Persever though if this is the route you take, it can be done it just takes a few attempts!
Note. There is a metal gasket between the egr valve and the pipe so make sure you keep it safe
Bet your glad you have those towels stuffed down the back now!
That should now be egr valve off! Either clean and refit, or if your now on a roll, place to one side and crack on with the intake. After all, no one likes a half job!
The intake
Right now I know this isn't necessary but I did it anyway as I wanted the clearance, had an injector connection fault code to sort and I wanted to see how the cams were wearing. Feel free to skip this step, although I'm sure you all want to see a shiny camshaft!
Please note the refitting section before deciding though as that may influence your decision
Engine cover
Remove cambelt upper cover. 2 metal clips, one fro none back, then cover lifts up to remove

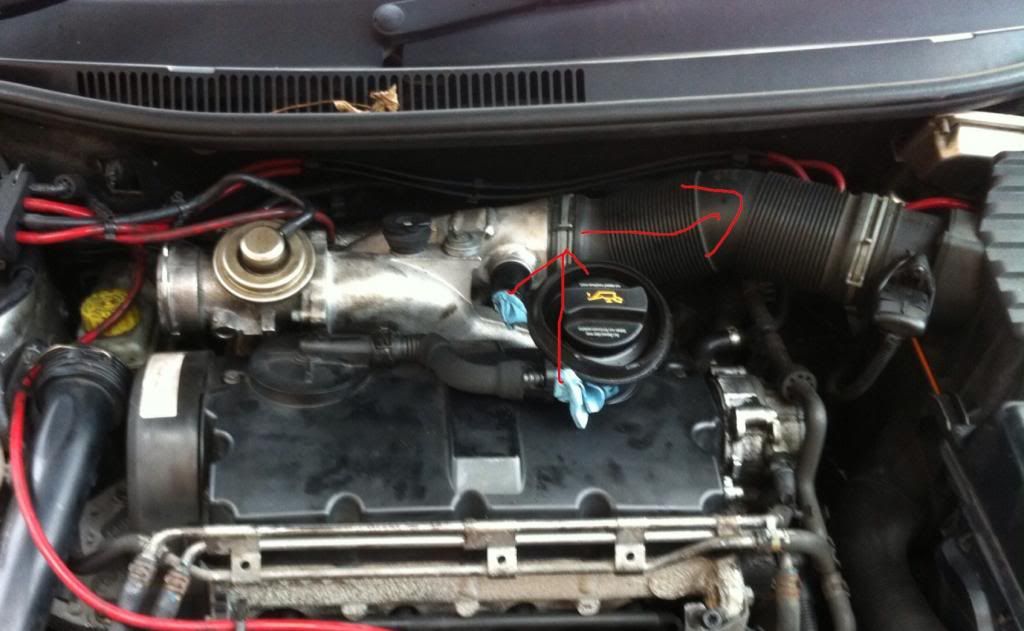
There is a pipe going into the inlet ( just after the Maf sensor)
Remove this by squeezing the clip as per pic

Plug the open ends with rag or similar ( careful on the intake side as if something gets in there it's already past the air filter)
12 10mm bolts hold this on, undo them all
Note they will not come all of the way out as they are stopped from falling out of the cover as a safety precaution I assume during mantinence (stops them falling into the engine I assume). CHECK THOUGH AS YOURS MAY BE DIFFERENT
You will need to pull the solid pipes at the front away as these are held in by the 2 bolts arrowed.

Now this is the careful bit.
First of all make sure there are no tools or loose objects in the area or on yourself, (ie don't hold anything between your teeth or in the other hand! Sod's law is a cruel one!
With a bit of persuasion the cover should lift away from the engine. TAKE CARE, don't use anything sharp to lever it off, you don't want to damage the seal or the metal of the head
Note there will be oil but don't panic, it's only residual and it's not held in the bit your taking off
Now it's a bit fiddly to get off but I basically lifted it as high as it would go, then tilted it back and jiggled it out. Again, make sure there is nothing loose on or around the area. If something drops in the engine your in trouble!
Cover off, car ****! Here you will see your (hopefully) smooth shiny camshaft, valve srpings, top part of the injectors and buried under that the valves themselves.
Don't stop for too long tho! Get it covered over so nothing can get in there!
Manifold
Remove arrowed bolts that holds the intake pipe to the manifold

Separate the intake where the metal pipe meets the black plastic pipe. Mole grips to squeeze the clip and leave them on there, just slide the clip up the pipe and out of the way

Now the manifold itself
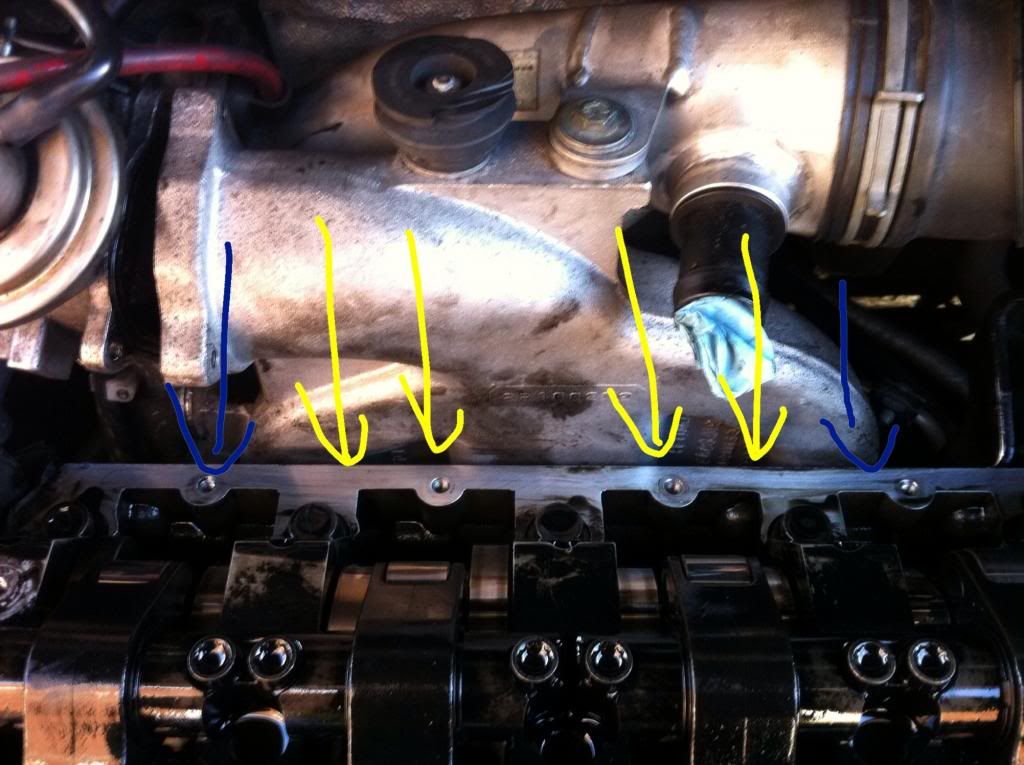
6 6mm Allen bolts secure this. 2 are visible, arrowed in blue. The rest are not! This is where everyone wishes they had lady hands!
I recommend the 1/4" drive ratchet, 6" extension and the bit holder and bit.
I have arrowed the rough location, and pic below of how the manifold looks from the other side, but obviously of little use as you can't see from there!


NOTE exhaust manifold bolts are hex nuts so you can't get confused. If you find a 6mm Allen bolt, then that's the one!
Have a good feel around and remember the bolts are angled slightly so the ratchet handle end will need to be a bit lower that the bolt end. Otherwise you won't get the bit in at all or well enough. Make sure the bit is in properly so you don't round any off!
They are not on too tight but need a but of force with the small ratchet.
Knuckles and wrists cut up yet!? Told you it was easy!
Once all 6 are off, recovered/found and safe, INCLUDING 1 washer per bolt!, you can start to maneuver the manifold out.
FIRST , to make life easier, there is a 10mm bolt arrowed, undo this and the whole intake pipe will have a lot more play, allowing you to wriggle the manifold out a lot easier.
Just be mindful that the manifold has a metal gasket, so account for that and either leave it where it is or take it out.
Ok so the manifold is out, and probably full of gunk!
But before you run off to clean, make sure there is nothing that can get into the intake ports. Direct to engine so you want nothing to get in there!
Now clean to your hearts content! I just used a scraper, loads of brake cleaner, and a thin brush, but I didn't have time to make mine sparkle as I was only planning on doing th egr and didn't have a guide either! So you have no excuses!
Once clean and dry and after pics have been taken for the worlds cleanest inlet competition time to re fit
Refitting is reverse of removal, with the following notes.
Engine cover has a tightening sequence, best practise is to start in the middle and work out in an even order. Don't have the exact sequence at the moment but will add when I get it.
Good practice is ensure all mating surfaces are clean and apply a small amount of sealant where the bearing caps meet the cover. Although I didn't haven't had it leak
Manifold, ensure gasket is in good cond and in correct place. your supposed to replace it but it's metal so I was happy to reuse.
Manifold is fiddly, but it's easier now because you've had all that practise finding bolts!
Torque settings as per Haynes manual. Need to add these in when I get my Haynes back!
Only ones to watch for though are the rocker cover ones, iirc 10nm so not a lot. I sheared one but I'm thinking it was already buggered as it didn't take much. £5 per bolt from seat if you need one!
Final steps. Ensure everything is done up, connected and all tools are out of the engine bay.
Hope this helps!
PLEASE NOTE, THIS IS ADVICE ONLY AND I CANNOT BE HELD ACCOUNTABLE FOR ANY LOSSES OR DAMAGE ARISING AS A RESULT OF THIS INFORMATION.