
You are using an out of date browser. It may not display this or other websites correctly.
You should upgrade or use an alternative browser.
You should upgrade or use an alternative browser.
Hi Jon, i have one question for you... I have OEM Bi-xenon lights on my Seat Leon FR TFSI... But, the ring in the right headlight was dropped and i must to disassemble that headlight...
You wrote that you put headlight in oven at 95 C for 15 min to easy remove lens... I 'm interested how you put lens back, what silicone (or glue, or something like that...) you use?
Thanks
You wrote that you put headlight in oven at 95 C for 15 min to easy remove lens... I 'm interested how you put lens back, what silicone (or glue, or something like that...) you use?
Thanks
Hi Jon, i have one question for you... I have OEM Bi-xenon lights on my Seat Leon FR TFSI... But, the ring in the right headlight was dropped and i must to disassemble that headlight...
You wrote that you put headlight in oven at 95 C for 15 min to easy remove lens... I 'm interested how you put lens back, what silicone (or glue, or something like that...) you use?
Thanks
I used a strip of butyl rubber sealant bought off ebay. Scraped off the OEM silicone sealant & layed the rubber sealant in the channel where the lens sits.
togashi
Guest
Congrats
First of all, this is a really nice mod you have done here! Congratulations!
But I was wondering about the electrical wiring and so on... Was it hard to make all the connections and to make them match the original wiring? How did you do the connection for the shutter to change when you switch from one beam to the other?
Now I want to do something similar on my Ibiza headlights. If I had some spare ones I would have already started.
Thanks and once again great job!
The wiring for the shutter uses the main beam feed inside the headlight.
So one wire goes to the positive & one wire goes to earth. When you switch on the main beam it will activate the shutter.
The rest is just like a normal HID kit that uses the dipped beam feed.
So one wire goes to the positive & one wire goes to earth. When you switch on the main beam it will activate the shutter.
The rest is just like a normal HID kit that uses the dipped beam feed.
togashi
Guest
Thanks a lot for the info Jon.
If I'll be able to make something similar to this I'll surely post it here also.
If I'll be able to make something similar to this I'll surely post it here also.
Well mate, big ups for your diy capabilities! Congrats!
I'd be interested to replicate what you did but I'd like to know [and this is gonna be a bad question] why you sold'em. What headlamps are you on now? Stock halogens?
Thank you in advance!
I'd be interested to replicate what you did but I'd like to know [and this is gonna be a bad question] why you sold'em. What headlamps are you on now? Stock halogens?
Thank you in advance!
There's also someone who took this one step further:
http://www.youtube.com/watch?v=imIiglkq7HA&feature=related
This guy has some serious talent for this stuff!
http://www.youtube.com/watch?v=imIiglkq7HA&feature=related
This guy has some serious talent for this stuff!
Pavel
Guest
Jon I have a few question but at first I want to say thanks for a great job. Now I now what projectors I will use.
And now the questions:
1. Did you have any problem with fitting protective cap for dipped beam?
I mean when D2S to Amp adapters connected to lamp you just close cap as is?
2. Did you change coding using VCDS from halogen to xenon at Central electronic unit?
3. Did you do any new hole to put cable from ballast inside the headlight?
Last edited by a moderator:
Guys I'll tell you, take a good long search on the net as you can find good prices on used lamps.
Pavel
Guest
Guys I'll tell you, take a good long search on the net as you can find good prices on used lamps.
You mean used original bixenon?
If so I know when I can by it but as I know there is a problem with link it with manual headlight range control or install full kit with all sensors but it very expensive.
So for now I'm planing do the same (retrofit halogen).
You mean used original bixenon?
If so I know when I can by it but as I know there is a problem with link it with manual headlight range control or install full kit with all sensors but it very expensive.
So for now I'm planing do the same (retrofit halogen).
No buddy, you can retrofit original xenons no prob:
http://www.seatcupra.net/forums/showthread.php?t=158731
A picture of my retrofitted headlights. I have also changed the CECM so that I can use for FTP the bi-xenons without using the high-beam halogen bulbs at all. They now work exactly as the original bi-xenon headlights, without the AFS of course.

Last edited:
How did you do this Bill and at what sort of cost if you don't mind me asking! They look awesome
Thanks for the comment. First of all I would have never done it if I hadn't seen this thread. The only tricky thing I believe is to open the headlights. Everything else with patience can be done with no problem.
I bought the things from www.theretrofitsource.com. The package that I bought is their best.
Bi-xenon FX-R Stage IV Kit
Ballasts: Denso Slim (35W)
Bulbs: Philips D2S 85122+ 4300K
Projectors: LHD
Re-sealing Glue: Yes. (Buttyl Rubber Glue)
Shrouds: Ocular (I would recommend trying the iris ones, as ocular don't hide entirely the projector from the side but not 100% sure if they'll do the job too I guess you have to try)
Wire Harness: DON'T choose any of the options if you have a facelift Leon with can-bus. You must e-mail them first and tell them you want the Morimoto standalone can-bus relay harness instead. They will send you a custom invoice. They have excellent customer support. If you don't take this harness you will have bulb out messages no matter what.
Cost for the parts from the retrofit source was 420$+shipping. I think it was 50$. So about 360 euros.
You also need to buy an external power supply to power the xenon-bulbs when you will be aligning the beam of the projectors. I recommend a 12V/10 A. About 40 euros if you don't have one.
Glue for the projector about 7 euro. (I can recommend you one if you decide to do it)
Clamps if you don't have any about 10-15 euros.
3M carbon vinnyl about 3-5 euros.
Vag com coding. Xenon with shutters option must be checked if you don't want flickering.
Projector shutter wiring.
If you like dual headlights you can just connect the projector wires to the halogen high beam. So when you FTP the halogen bulbs will flash and the projector shutter will move up (no problem though as the xenon bulbs are off). When you turn your lights on, the low xenon beam will be on and when you move your stalk for your high beam the halogens will turn on and the projector shroud will move giving you dual headlights.
Now for someone that wants their headlights to work exactly as the OEM (I am one) you must buy a highline CECM as if you don't have a highline one the 2 pins required to trigger the shutters aren't there. That is if you don't want the high beam halogen to work with the high beam of the bi-xenon projectors. So now for me the high-beam halogen don't work at all. For FTP the CECM gives power to the low-beam (that means the xenon bulbs light up) and also moves the shutter up, so you have FTP. If you turn on the lights only the low beam turns on and if I move the stalk the shutter is moved giving the xenon high beam and a true bi-xenon projector.
Cost for the used CECM was 120 euros from ebay.de (New it's about 350-400 euros).
Total cost about 550 euros including the highline CECM.
The OEM headlights cost here in greece from the stealers about 450 euros each headlight with bulbs and ballasts, but I would also need the highline CECM. So the total cost would be about 1000 euros. So with half the price I have something with better components (the ballast and bulbs that I have are far much better than the OEM ones) and custom made by me which is priceless.
The guide that I used is the following. Amazing guy.
(1) How to build HID projector headlights
http://www.youtube.com/watch?v=imIiglkq7HA
(2) How to build HID projector headlights
http://www.youtube.com/watch?v=qExaAFgvquE
(3) How to build HID projector headlights (This video is for educational purposes only as you won't be making shrouds)
http://www.youtube.com/watch?v=mg_C_jtonZw
(4) How to build HID projector headlights
http://www.youtube.com/watch?v=tQ1repIX_UU
I did some things differently though. I didn't use an oven to open them as they don't fit in mine! So I used a heatgun (actually it's not that good to use an oven to open them). I was applying heat to an area of 4-6 inches and then with a wide flat tool I was prying off the lens and I was working my way around. Then with the same tool after taking off the lens I cleaned all the old glue.
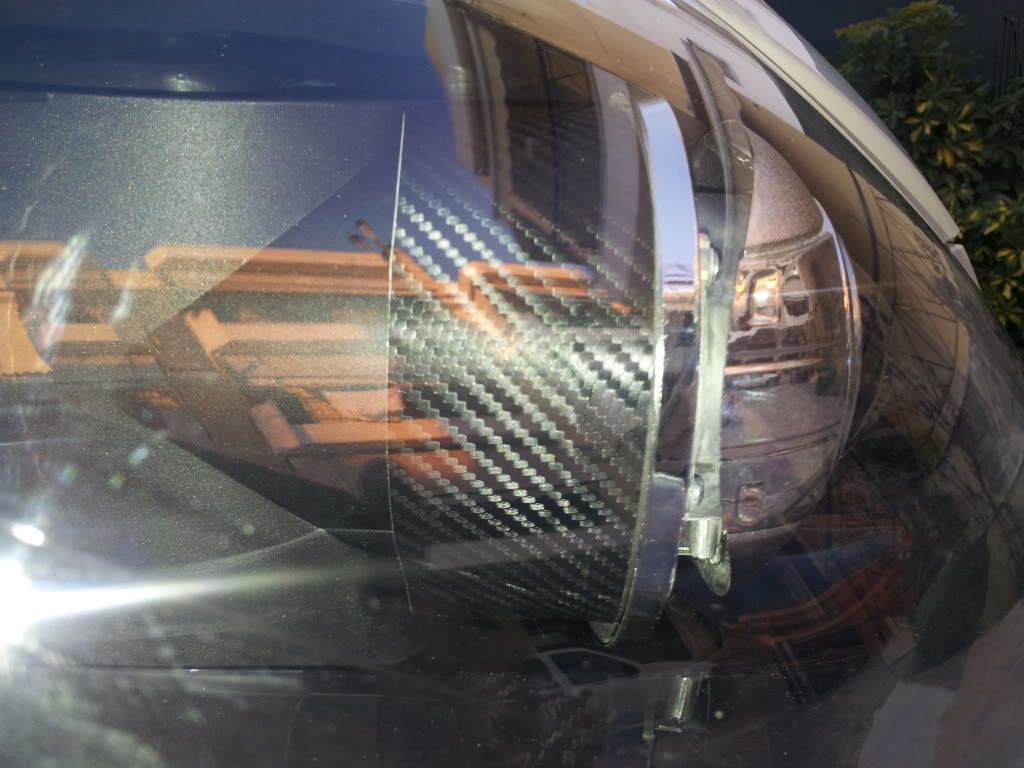
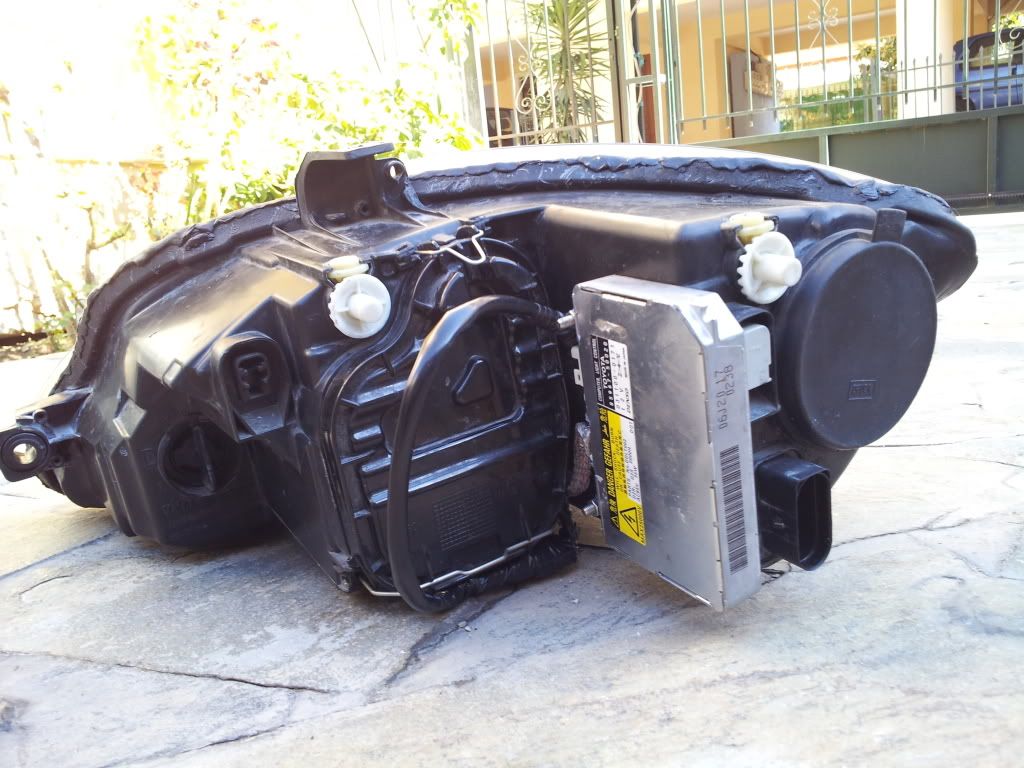
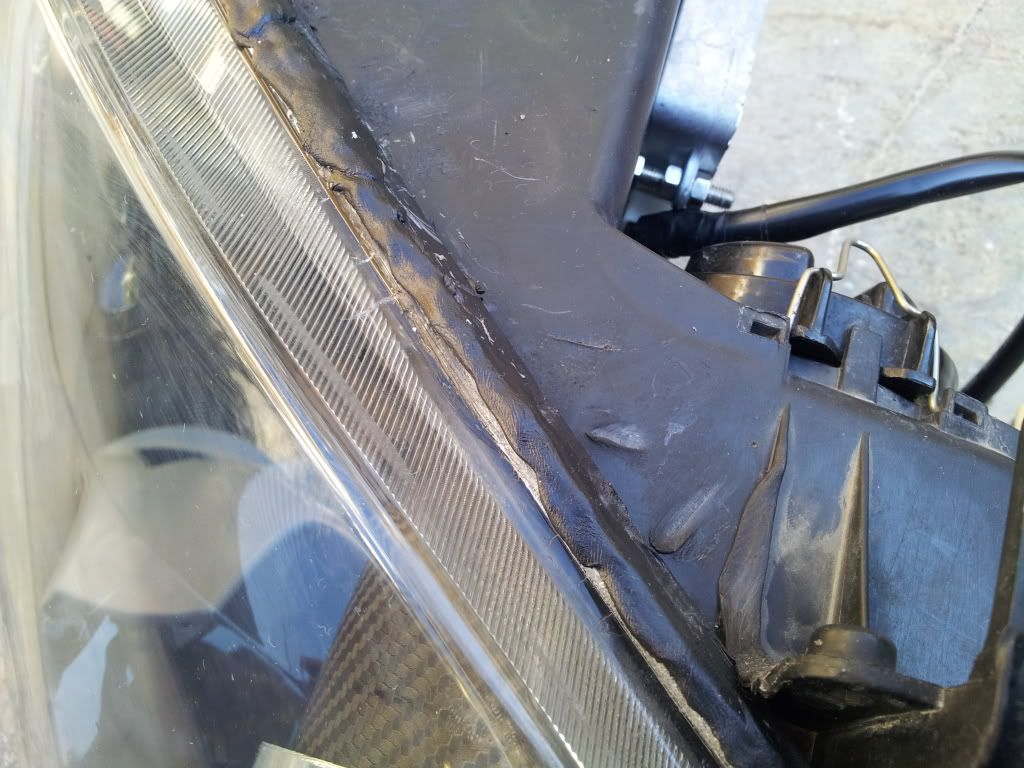
I then removed the reflector. You need to drill a tiny hole on the back to gain access which is needed for one screw. Made a custom bracket (I used the back of a thin cd case). You need to make a bracket that it won't move no matter what and also align the lines of the reflector. I then marked the cut-off beam at a wall about 12 feet away. I then used a dremel to make the hole to the reflector for the projector to fit. Don't use silicone rubber sealant. I can propose of a different glue to use. Then place and glue the projector at the reflector and align the cut-off marks on the wall of the halogen bulbs with the projector cut-off. I skipped the part of creating a shroud as I had bought them. Skip video 3. Place the reflector back to the headlight. Put the shrouds and the carbon vinyl at the side. Place the buttyl rubber glue, don't stretch it too much. And then place the lens. Apply heat and use clamps. Also place buttyl rubber glue and create a protective seal as you can see on my headlight at my previous post.
DON'T USE SILICONE ANYWHERE ON THE HEADLIGHT.
Another hint is when you remove the healight from the car to mark with a marker the exact place that they are on the chassis in order to place them at the exact same place.
For anything else I will be happy to help.
I bought the things from www.theretrofitsource.com. The package that I bought is their best.
Bi-xenon FX-R Stage IV Kit
Ballasts: Denso Slim (35W)
Bulbs: Philips D2S 85122+ 4300K
Projectors: LHD
Re-sealing Glue: Yes. (Buttyl Rubber Glue)
Shrouds: Ocular (I would recommend trying the iris ones, as ocular don't hide entirely the projector from the side but not 100% sure if they'll do the job too I guess you have to try)
Wire Harness: DON'T choose any of the options if you have a facelift Leon with can-bus. You must e-mail them first and tell them you want the Morimoto standalone can-bus relay harness instead. They will send you a custom invoice. They have excellent customer support. If you don't take this harness you will have bulb out messages no matter what.
Cost for the parts from the retrofit source was 420$+shipping. I think it was 50$. So about 360 euros.
You also need to buy an external power supply to power the xenon-bulbs when you will be aligning the beam of the projectors. I recommend a 12V/10 A. About 40 euros if you don't have one.
Glue for the projector about 7 euro. (I can recommend you one if you decide to do it)
Clamps if you don't have any about 10-15 euros.
3M carbon vinnyl about 3-5 euros.
Vag com coding. Xenon with shutters option must be checked if you don't want flickering.
Projector shutter wiring.
If you like dual headlights you can just connect the projector wires to the halogen high beam. So when you FTP the halogen bulbs will flash and the projector shutter will move up (no problem though as the xenon bulbs are off). When you turn your lights on, the low xenon beam will be on and when you move your stalk for your high beam the halogens will turn on and the projector shroud will move giving you dual headlights.
Now for someone that wants their headlights to work exactly as the OEM (I am one) you must buy a highline CECM as if you don't have a highline one the 2 pins required to trigger the shutters aren't there. That is if you don't want the high beam halogen to work with the high beam of the bi-xenon projectors. So now for me the high-beam halogen don't work at all. For FTP the CECM gives power to the low-beam (that means the xenon bulbs light up) and also moves the shutter up, so you have FTP. If you turn on the lights only the low beam turns on and if I move the stalk the shutter is moved giving the xenon high beam and a true bi-xenon projector.
Cost for the used CECM was 120 euros from ebay.de (New it's about 350-400 euros).
Total cost about 550 euros including the highline CECM.
The OEM headlights cost here in greece from the stealers about 450 euros each headlight with bulbs and ballasts, but I would also need the highline CECM. So the total cost would be about 1000 euros. So with half the price I have something with better components (the ballast and bulbs that I have are far much better than the OEM ones) and custom made by me which is priceless.
The guide that I used is the following. Amazing guy.
(1) How to build HID projector headlights
http://www.youtube.com/watch?v=imIiglkq7HA
(2) How to build HID projector headlights
http://www.youtube.com/watch?v=qExaAFgvquE
(3) How to build HID projector headlights (This video is for educational purposes only as you won't be making shrouds)
http://www.youtube.com/watch?v=mg_C_jtonZw
(4) How to build HID projector headlights
http://www.youtube.com/watch?v=tQ1repIX_UU
I did some things differently though. I didn't use an oven to open them as they don't fit in mine!
So I used a heatgun (actually it's not that good to use an oven to open them). I was applying heat to an area of 4-6 inches and then with a wide flat tool I was prying off the lens and I was working my way around. Then with the same tool after taking off the lens I cleaned all the old glue. I then removed the reflector. You need to drill a tiny hole on the back to gain access which is needed for one screw. Made a custom bracket (I used the back of a thin cd case). You need to make a bracket that it won't move no matter what and also align the lines of the reflector. I then marked the cut-off beam at a wall about 12 feet away. I then used a dremel to make the hole to the reflector for the projector to fit. Don't use silicone rubber sealant. I can propose of a different glue to use. Then place and glue the projector at the reflector and align the cut-off marks on the wall of the halogen bulbs with the projector cut-off. I skipped the part of creating a shroud as I had bought them. Skip video 3. Place the reflector back to the headlight. Put the shrouds and the carbon vinyl at the side. Place the buttyl rubber glue, don't stretch it too much. And then place the lens. Apply heat and use clamps. Also place buttyl rubber glue and create a protective seal as you can see on my headlight at my previous post.
DON'T USE SILICONE ANYWHERE ON THE HEADLIGHT.
Another hint is when you remove the healight from the car to mark with a marker the exact place that they are on the chassis in order to place them at the exact same place.
For anything else I will be happy to help.
Last edited:
I have installed my oem xenon headlights with oem bulbs and ballasts on my 2011 seat Leon that came with halogens. I used the tuning fanatics adaptor to connect between the 10 pin and the 14 pin sockets and plugs. The main beam immediately worked without any vag com coding. I ran the two extra wires from the plugs into the cabin and they are currently in the cabin just above the clutch in my left hand drive Leon. I have been told that in order to get the bi xenon feature to work - thus getting the shutters to open and close, I need to connect these two wires lot plugs A5 and D6 on the cecm. Only problem is that I can't find them! Just above the clutch are 3 large plugs and that isn't it.
Can anyone offer any help?
From what I understand, when the headlights are on - meaning that the xenon main beam is on, when I flash my headlights, the shutter opens and this is the high beam.
When the headlights are off, if I flash my high beam, the xenon isn't used now because it takes a few secs to come up to temperature so the halogen bulbs are used as high beam. Is this right?
If I can't manage the cecm and the extra two wires? Is it possible to use vag com to code the car so that it will always use the halogen bulb as the high beam?
Thanks in advance to anyone that may be able to help.
I have OEM xenons on my 2007.
I coded them via VAG-Com because they were flicking A LOT without coding. I think that could have damaged them.
I still gotta get my lazy ass off of the chair and pull the two wires from the adapters to the CECM, but I got normal halogens when I flash, both when the xenons are on or off.
This is because there's a separate coding for the bi-xenons. Basically my ecu now knows the car has a normal xenon headlight with halogens for the high beam. Don't ask me why since AFAIK the Leon only came with bi-xenons but it can be done and it suits me ok at this time.
I don't know about the 2011 version, but on my 2007 it works ok.
Well I pulled the two wires through the fire wall and connected them on the gold plug on the cecm to plugs 48 and 49, unfortunately the xenon high beams are not working despite my vag com coding. The main beam does however work. I would be happy to have just the halogen bulb work as my high beam at all times - whether the xenons are on or off. Does anyone know how to code this option?
These photos might help....
This is the socket on the cecm that I am using to connect the two extra wires for the xenon high beams.

In this picture you can see the plugs and the yellow wires that run from the headlights into the cabin. The plug I am using is the gold one on the right. In this plug I connected the two yellow wires into holes 48 and 49.

My cecm is a bcm pq35 m and it seems that no matter what I do in vag com, the xenon main beam always works and the shutters on the xenon bulb won't open for high beam and I can't get the halogen high beam working either.
A very knowledgeable and helpful forum member called Rob (bubble) is making a huge effort to help me sort this out but we are unsuccessful so far. Any help would be appreciated. I honestly don't care if my high beams are the xenons or the halogens as long as I can get something working.
This is the socket on the cecm that I am using to connect the two extra wires for the xenon high beams.
In this picture you can see the plugs and the yellow wires that run from the headlights into the cabin. The plug I am using is the gold one on the right. In this plug I connected the two yellow wires into holes 48 and 49.
My cecm is a bcm pq35 m and it seems that no matter what I do in vag com, the xenon main beam always works and the shutters on the xenon bulb won't open for high beam and I can't get the halogen high beam working either.
A very knowledgeable and helpful forum member called Rob (bubble) is making a huge effort to help me sort this out but we are unsuccessful so far. Any help would be appreciated. I honestly don't care if my high beams are the xenons or the halogens as long as I can get something working.
Last edited:
I have OEM xenons on my 2007.
I coded them via VAG-Com because they were flicking A LOT without coding. I think that could have damaged them.
I still gotta get my lazy ass off of the chair and pull the two wires from the adapters to the CECM, but I got normal halogens when I flash, both when the xenons are on or off.
This is because there's a separate coding for the bi-xenons. Basically my ecu now knows the car has a normal xenon headlight with halogens for the high beam. Don't ask me why since AFAIK the Leon only came with bi-xenons but it can be done and it suits me ok at this time.
I don't know about the 2011 version, but on my 2007 it works ok.
Any idea how to code this in vagcom? To get a setup like yours?
Similar threads
- Replies
- 0
- Views
- 198
- Replies
- 0
- Views
- 157
- Replies
- 16
- Views
- 2K
