Audi S3 GT3582R stroker Build (previously GT3071r)

tufftybloke

Badger 5 Edition
Feb 28, 2009
657
0
Gloucestershire, UK
Managed to grab a ramp this afternoon...

IMAG0523-1.jpg


IMAG0524-1.jpg


IMAG0525.jpg


Ta-da!!!!
IMAG0527.jpg


IMAG0536-1.jpg


IMAG0535.jpg


I have a front end alignment booked for Friday so hopefully that will draw a line under the suspension mods on the car...

Couple of small issues... there is a bit of a gap where wheel arch rubbish could get into the engine bay...
IMAG0529.jpg


...will have to add a splash guard or something at some point...

Also noticed the 'new' drop link I had fitted to get the car back on the road looks in a sorry state...
IMAG0530.jpg


...In fairness they did cost a mere £5 each but kinda expected for them to last a little longer... ah well... they don't knock yet so will wait until they do and swap them out for something a little better

In other news... I have got hold of...

_57.jpg


:)

<tuffty/>
 

Pimped up vario

Cordy Cruizer
Nov 20, 2009
1,291
0
Belfast N Ireland
If you bottom out the suspension is there a chance that the camber plates could stretch/damage the metal in the turrets? They should certainly feel more positive. Even with new strut rubber top mounts from seat I still got deflection of the strut piston rod of 5mm or so up in to the turret where the strut top nut is. You'll not have that at all. What about a blanking cap similar to the ones used to cap turbo inlet/outlets whilst they are in storage? They're bound to come in different diameters and colours. They may be able to be made to look like standard turret caps. It's interesting to see the different geometry setups regarding the hub flange carriers. The plates on your car sort of come out and forward at an angle were as the camber angle on my cordoba adjusts where the strut bottom meets the hub flange carrier and comes straight out. But of course this is your thread and about your car and not mine so in you wish me to shhh, just say. I do love suspension as a topic.
 
Last edited:

tufftybloke

Badger 5 Edition
Feb 28, 2009
657
0
Gloucestershire, UK
If you bottom out the suspension is there a chance that the camber plates could stretch/damage the metal in the turrets? They should certainly feel more positive.

Even with new strut rubber top mounts from seat I still got deflection of the strut piston rod of 5mm or so up in to the turret where the strut top nut is. You'll not have that at all. What about a blanking cap similar to the ones used to cap turbo inlet/outlets whilst they are in storage?

They're bound to come in different diameters and colours. They may be able to be made to look like standard turret caps. It's interesting to see the different geometry setups regarding the hub flange carriers.

The plates on your car sort of come out and forward at an angle were as the camber angle on my cordoba adjusts where the strut bottom meets the hub flange carrier and comes straight out. But of course this is your thread and about your car and not mine so in you wish me to shhh, just say. I do love suspension as a topic.

Always a chance I guess, will cross that bridge as and when it happens... the whole car feels well... nice... its not noisy or harsh or crashy... it just feels solid...

Will look into solutions to block up the hole later... I'd rather not cover them up just yet... While I am an OEM fanatic I kinda like what they add to the bay visually... bit like the larger inlet, gives a hint that something is 'different' :whistle:

<tuffty/>
 

tufftybloke

Badger 5 Edition
Feb 28, 2009
657
0
Gloucestershire, UK
Happy New Year to everyone etc... started in a traditional manner on new years day with this...
IMAG0538-1.jpg


Washed the car as she was a little dirty from all the salted roads of late...
IMAG0540-1.jpg


...then took her over to get the front aligned...
IMAG0542.jpg


Scores on the doors... top being the before, below being the after
IMAG0543.jpg


For reference I pulled up the factory settings...
S3_alignment.jpg


On the road she feels massively planted... none of the nervousness experienced before... the extra grip from the tyres is very noticeable although while I have still not pushed her hard when I am accelerating out of corners the back end is not trying to break free and she digs in and goes...

In fairness I am not going to be the best person in the world to comment on handling as I am not a press on kinda driver but I can say I am getting my confidence back in the grip and the handling and very pleased with the results... I can now happily draw a line under the handling...

While I am sure its not up to Prawns level she feels just about right for how I am prepared to drive and feels more confidence inspiring than ever before...

Be interesting to see how it handles the next power hike lol

In other news I had notification that the RNS-E has shipped and should be with me Monday... plan will be to mod the facia out of the car as I have a full console to play with then modify the RCA loom I bought (pictured below) to hook up to my amps...
IMAG0537-1.jpg


At some point I still need to get around to fitting the electronic cross over and extra 4 channel amp to have a fully active speaker system...
CRW_4641.jpg


..but that will be when the weather is a bit better maybe... :)

<tuffty/>
 

tufftybloke

Badger 5 Edition
Feb 28, 2009
657
0
Gloucestershire, UK
So after a bit of a cockup at UPS it finally arrived...

IMAG0562.jpg


Looms all present and correct...
IMAG0563.jpg


IMAG0570.jpg


The main adaptor looks fully loaded so cd changer and bose etc... the line outs are wired in too which will make it easier to graft in the RCA adaptor loom...
IMAG0571.jpg


Double DIN console ready.... will take the cage out and fit into my car rather than use the whole console of course but its useful for out of the car mocking up :)
IMAG0572.jpg


...a quick test fit...
IMAG0565.jpg


The double DIN climate unit I have is not a soul black (soft touch) version like the one I have in the car... this means the buttons are mint but it looks a little off comparedto the rest of the interior but it will do until I can sort a proper one out :)

As you can see the A4 RNS-E is a little too wide at the top so some trimming required there... the aluminium strip at the bottom also need to go...
IMAG0566.jpg


IMAG0567.jpg


IMAG0569.jpg


As you can see... need to trim the back of this to allow this to fit...
IMAG0568.jpg


IMAG0574.jpg


Should be fun :)

<tuffty/>
 
Mar 20, 2009
1,707
0
Largs Scotland
Thanks mate. Could that still be fitted to the B6?

Definitely a mod for the future! Got to do the control arms first which isn't going to be a nice job on the drive!
 

tufftybloke

Badger 5 Edition
Feb 28, 2009
657
0
Gloucestershire, UK
Thanks mate. Could that still be fitted to the B6?

Definitely a mod for the future! Got to do the control arms first which isn't going to be a nice job on the drive!

I would imagine so... there are a fair few threads on US forums I think I stumbled across doing this so a quick google should net you what you need

<tuffty/>
 

tufftybloke

Badger 5 Edition
Feb 28, 2009
657
0
Gloucestershire, UK
Masked up the RNS-E ready to start trimming the front panel..
IMAG0598.jpg


IMAG0600.jpg


One thing that vague guides don't mention is the approach to take with this... I went in assuming I just needed to trim the bottom as this is the suggestion but... what I should have done is fitted the top trim (where the cup holder etc is) first and adjusted the cage to allow the gap between the top of the RNS-E and the top trim to be as minimal as possible... I didn't think of this as it would have closed up the gap I was left with...
IMAG0604.jpg


There is enough meat on the bottom of the RNS-E to have done this and kept a tight gap... I also had a slight hiccup on the bottom too :/
IMAG0603.jpg


Not perfect sadly... RNS-E front panels come up for sale occasionally... I might see if I can track one down and have another go...

Next job was to remove the console to be able to swap out the cages...
IMAG0606.jpg


IMAG0607.jpg


IMAG0608.jpg


There is a screw each side here that needs undoing to release the console plus two behind the top trim panel...
IMAG0611.jpg


IMAG0613.jpg


All out... phew!
IMAG0614.jpg


Double DIN vs single DIN cage...
IMAG0615.jpg


Cut the plug of the RCA adaptor as I was going to try and pin the OE plug but as I have Bose there is already wiring from the cars loom for line out going to the Bose amp so I cut the RNS-E adaptor and soldered the RCA lead on...
IMAG0620.jpg


IMAG0625.jpg


Put the console back in and fitted the headunit in... took a lot of juggling to get the unit pushed back enough to fit in... had to rearrange the looms to get it all in but finaly it clicked in...
IMAG0626.jpg


The unit was coded for an A4 so I need to recode it for an A6 and change the startup screen... I also need to do all the other required coding to get it working with the DIS... I didn't need to wire the canbus as my car already has this for the instruments...

Just need to work the correct coding out as I didn't have time and a phone line fault at Bill's unit meant no easy internet access so I will have a look tomorrow at work ;P

Navigation appears to work too... I stuck the GPS sensor just under the dash, it was magnetic so I placed it on the dash cross member

Other than the gaps which I think I can close up a bit I am happy with the outcome so far...

<tuffty/>
 

tufftybloke

Badger 5 Edition
Feb 28, 2009
657
0
Gloucestershire, UK
Went out this evening to code up the RNS-E...

First thing to do was to code the unit for the A6 (<2004) as this is the one closest technically speaking... I also soft coded features relevant to the setup I was looking for...
In VCDS you need to go into the (56) radio module... (07) Coding and enter a soft code based on the following...

0?xxxxx: Model
1 - Lamborghini
2 - Audi A3 (8P)
3 - Audi A4 (> 2004)
4 - Audi A4 Cabriolet (> 2004)
5 - Audi A6 (< 2004)
6 - Audi TT (> 2007) (sw US 0150+, EU 0500+)
7 - Audi R8 (sw US 0150+, EU 0500+)

0x?xxxx: Diagnostics for front speakers
0 - activ
1 - inactiv

0xx?xxx: Sound characteristics
0 - linear
1 - Audi A4 (> 2004)
2 - Audi A6 (< 2004)
3 - Audi A4 Cabriolet (> 2004)
4 - Audi TT (> 2004)
5 - Audi A3 (8P)
9 - Bose Soundsystem

0xxx?xx: Telephone/telematics
1 - no telephone (supply voltage for microphone actively)
2 - Mobile phone preparation (Temic - Speisesp. Microphone inactively)
3 - Mobile phone preparation (Cullmann - Speisesp. Microphone inactively)
4 - Mobile phone preparation (Nokia - Speisesp. Microphone inactively)
5 - Telematics Europe (supply voltage microphone inactively)
6 - Telematics US (supply voltage microphone inactively)
7 - Base plate diagnostic capable with comfort control

0xxxx?x: Options I
1 - default
2 - Digital-Radio
3 - Satelite-Radio
4 - Satelite- and Digital-Radio
5 - AUX in (Euro sw 0650+)
6 - AUX in and DAB (Euro sw 0650+)

0xxxxx?: Options II
1 - default
2 - TV-Tuner
3 - CD-Changer
4 - TV-Tuner and CD-Changer
5 - Multifunction Steering Wheel
6 - TV-Tuner and Multifunction Steering Wheel
7 - CD-Changer and Multifunction Steering Wheel
8 - TV-Tuner, CD-Changer und Multifunction Steering Wheel


I used the following soft code... 0510153 which makes up the following softcode:

0
5 - Audi A6 (< 2004)
1 - inactiv
0 - linear
1 - no telephone (supply voltage for microphone actively)
5 - AUX in
3 - CD-Changer


I then coded the dash to allow use of the DIS...
Module 17 (Instrument cluster) -> Adaptation -> Function 10 -> Channel 62
+01 - Radio
+02 - Telefon
+04 - Navigation
+08 - Telematics


I used 01 + 04 + 08 = 13 to softcode as this allows the DIS to display the radio/track etc, navigation and 08 because FIS Control is coded as telematics

While there I also coded out GALA as it drives me nuts...
Module 17 (Instrument cluster) -> Adaptation -> Channel 008 (GALA)
000 - GALA off
001 - Charakteristics 1
002 - Charakteristics 2
003 - Charakteristics 3
004 - Charakteristics 4
005 - Charakteristics 5
255 - GALA via microphone (Bose AudioPilot)


I set this to 000

I have not checked the navigation display in the DIS as not had time to go out for a drive but all the other stuff works as expected...

Only problem I have had so far is the driver of my Andy Mac Stealth Sub... its been in service for over ten years (first in my A4 and then in the AMSS in the S3) and has finally given up the ghost...

Sub bass is a little farty now so I have dropped the levels down on it so its barely audible until I can source a replacement driver

<tuffty/>
 
Last edited:

tufftybloke

Badger 5 Edition
Feb 28, 2009
657
0
Gloucestershire, UK
Seeing as the weather is a little iffy I swapped over to the winters for a couple of weeks... (the A2 making a cameo appearance too)
IMAG0628.jpg


I still have a soft spot for the original Avus wheels... really does finish the sleeper look but then I see her with the RSTT's and I get over it LOL...
IMAG0540-1.jpg


Anyhoo... managed to sort out the final bit of coding to get sat nav sorted on the DIS...
IMAG0638.jpg


IMAG0637.jpg


I then had a look at my sub woofer as its been making a farty noise recently... the problem is pretty obvious...

http://youtu.be/oaYjrR8Vj30

Disappointing... in fairness it is a 12 year old driver thats been in my A4 and now the S3... thats a lot of trance, drum n' bass and Disturbed ;)

A new JL Audio driver will be sorted shortly...

I have also come to the conclusion that sorting MP3's out onto SD cards for the RNS-E is one of the suckiest jobs ever and it can't even cope with gapless mix albums inserting a pregnant pause as it transitions tracks so I have ordered the same Connects2 "CTAADIPOD003.2" iPod adaptor I am using in the A2 so I can use my iPod as before...
images-Products-prodview-CTAADIPOD0032.jpg


..it just works...

<tuffty/>
 

tufftybloke

Badger 5 Edition
Feb 28, 2009
657
0
Gloucestershire, UK
New sub arrived so set to work swapping it out...

IMAG0648-1.jpg


IMAG0649-1.jpg


Well theres ya praaaablam!!...
IMAG0654.jpg


The new driver was quite a bit different...
IMAG0651-1.jpg


IMAG0652-1.jpg


Massive magnet and impressive cone/suspension... fitted fine into the AMSS box (utmost respect to the late Andy Mac)
IMAG0657-1.jpg


Back in its hidey hole...
IMAG0658-1.jpg


...and all stealthy again :D
IMAG0659.jpg


Did a quick check to see if the rest of the audio gear would fit where I hoped to put it...
IMAG0660.jpg


Job for the better weather :)

<tuffty/>
 

tufftybloke

Badger 5 Edition
Feb 28, 2009
657
0
Gloucestershire, UK
The unfortunate side affect of having a working sub again is its highlighted my rattly handle problem again so Sunday I decided to sort it out... I also took the oportunity to swap out the front tweeters as one of the Focals stopped working a few years ago and I have been using an OE one instead in its place... grabbed some Alpine tweeters at a decent price so swapped them out too...

This of course meant taking the door panel off and as this crops up from time to time I took a few pics to show how easy it is to do...

First there are two very stumpy screws to undo at the top corners of the panel that need to be undone...
IMAG0662.jpg


IMAG0663.jpg


Then undo the screw holding the door grab handle inner trim in place...
IMAG0664.jpg


Remove this to reveal two screws securing the panel to the door...
IMAG0665.jpg


Remove those then lift the door panel up and away from the door...
IMAG0666.jpg


The door handle cable is secured in a clip on the frame, unclipping it makes it easier to pull the door panel away... with that done I swapped out the tweeters which fitted nicely in the OE position and added a spring to the handle to stop it rattling about... which actual worked!...

IMAG0667.jpg


<tuffty/>
 

tufftybloke

Badger 5 Edition
Feb 28, 2009
657
0
Gloucestershire, UK
What a build!!! Don't come on this forum very much anymore but Jesus Christ, I'm going to start doing.. Will be keeping an eye on this!!��

Thanks mate although by coming to the party a little late the list of things to do is pretty small these days...

Cams are on the list to lift the power, a gearbox rebuild, refurbishing a reardiff/haldex and prop shaft (so a running gear refresh essentially)

Few interior bits and the last of the stereo stuff to do...

...oh and a respray is on the list too :)

<tuffty/>
 

tufftybloke

Badger 5 Edition
Feb 28, 2009
657
0
Gloucestershire, UK
Not cleaned the car for a little while so needed to get the winter salt off...

IMAG0672.jpg


And gave her another coat of Jeffs Werkstat Acrylic Jett...
IMAG0673.jpg


Todays other task was to fix my arm rest that has been stuck in the up position for the last few months..
IMAG0674.jpg


Knowing this is a common issue I searched and found a couple of decent links that have decent info
http://00626e1.netsolhost.com/formoshun/s3/Armrest.htm
http://www.audiworld.com/tech/int56.shtml

So armed with this, I made a start... finding the screws was fun... they had been flocked over... using a T8 torx I undid all four...
IMAG0675.jpg


The issue here is the plastic 'pins' that operate a metal sprung loaded plunger which puts quite a strain on the plastic (go figure)
IMAG0676.jpg


IMAG0678.jpg


...all this leads to them breaking which causes this problem...
IMAG0677.jpg


So based on the fixes used in the links above I drilled a hole...
IMAG0681.jpg


...tapped it for M4...
IMAG0682.jpg


...screwed in a bit of M4 studding...
IMAG0683.jpg


...epoxy'd it in place...
IMAG0684.jpg


...put it all back together and now can adjust the arm rest again... woohoo!!
IMAG0687.jpg


One more job off the list :D

<tuffty/>
 
Last edited:

tufftybloke

Badger 5 Edition
Feb 28, 2009
657
0
Gloucestershire, UK
Had a slight 'moment' the other night where I had to pull up a bit smartish due to a pair of foxes humping in the middle of a country lane I happened to be 'travelling' down...

No harm became the foxes or the car but... the brakes felt horrible...

After a little bit of reading up and a little chat with brakespert Prawn I decided on a set of DS1.11 pads from Ferodo...

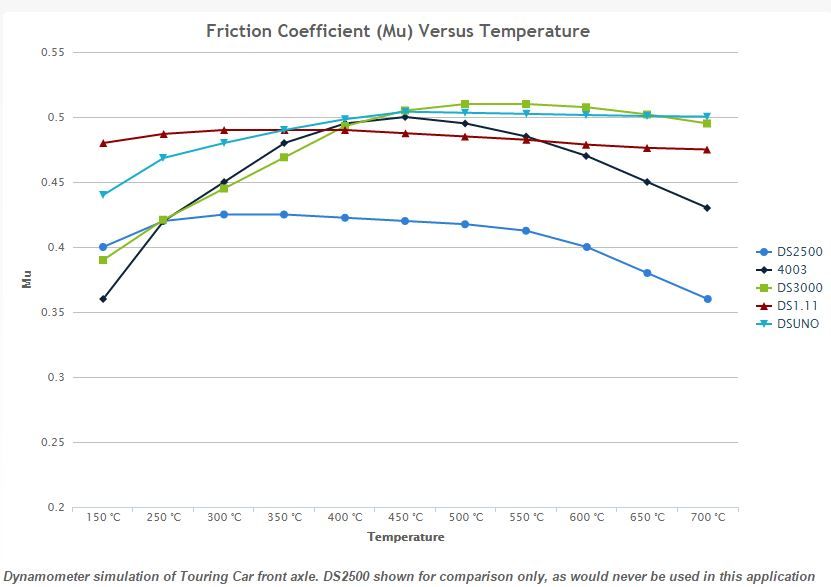
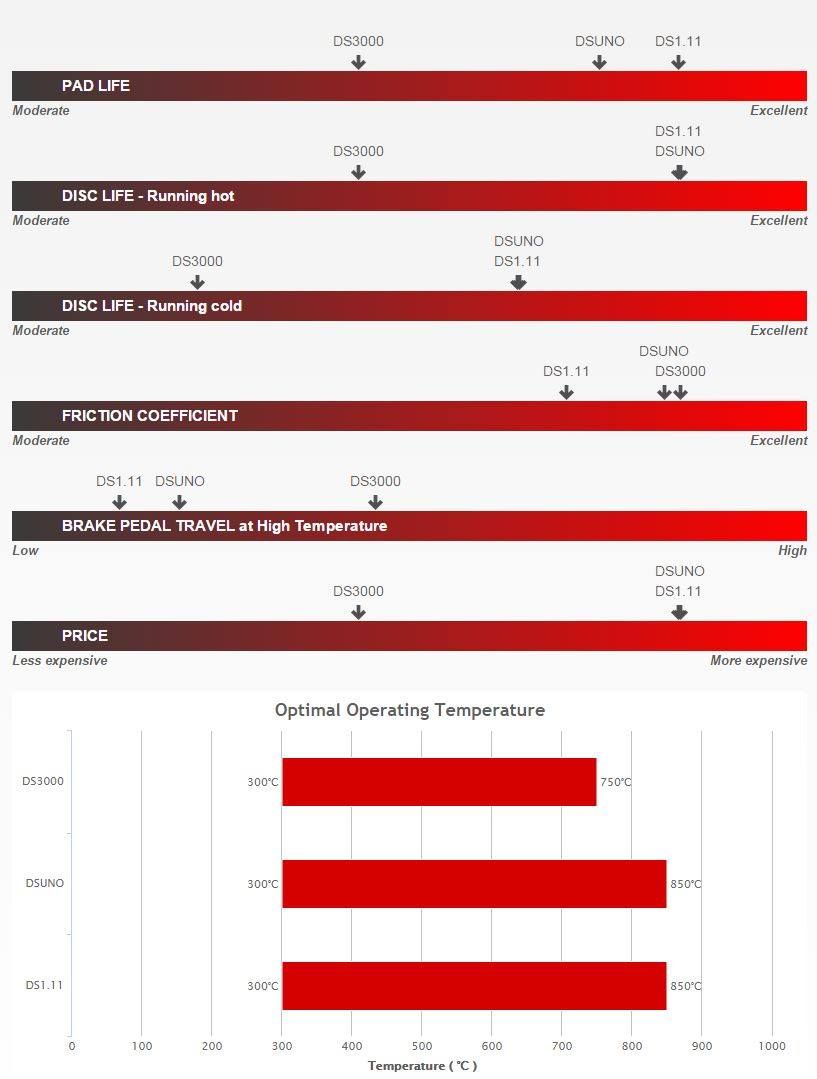
Here are a couple of graphs taken from Ferodo's web site...

DS2500vs.jpg


DS3000vsDS111.jpg


Essentially I was going to go for DS3000 but... they have a habit of wearing out discs (by all accounts) and also wearing them selves out too... the DS1.11 pad is described thusly...


Several brake pads on the market boast 'ceramic' technology. DS1.11 is the real thing. It is based upon a chemical family known as Siloxanes. Unlike carbon based materials, siloxane chains do not decompose at high temperatures and so DS1.11 keeps on working up to the highest temperatures a brake pad could ever see. That means it won't fade and has excellent life, the best in the Ferodo Racing range. Moreover the performance remains exactly the same throughout the pad's (long) life. It is formulated to provide a very flat friction profile at a medium/high level of friction. The pad compression is very low, always, and so pedal travel is short and consistent.

The main characteristics of DS1.11 are:

  • Heavy duty endurance material
  • Applications - touring car, GT, single seat
  • Average friction coefficient 0.46 over working temperature range of 200°-700°C
  • Long life
  • Very kind to discs

(Excerpt taken from http://www.ferodoracing.com/products/car-racing/racing-brake-pads/ds1-11/)

They are an endurance pad and as you can see from the graphs perform better overall than the DS2500's I did have...

So Bill ordered some up and...
IMAG0708-1.jpg


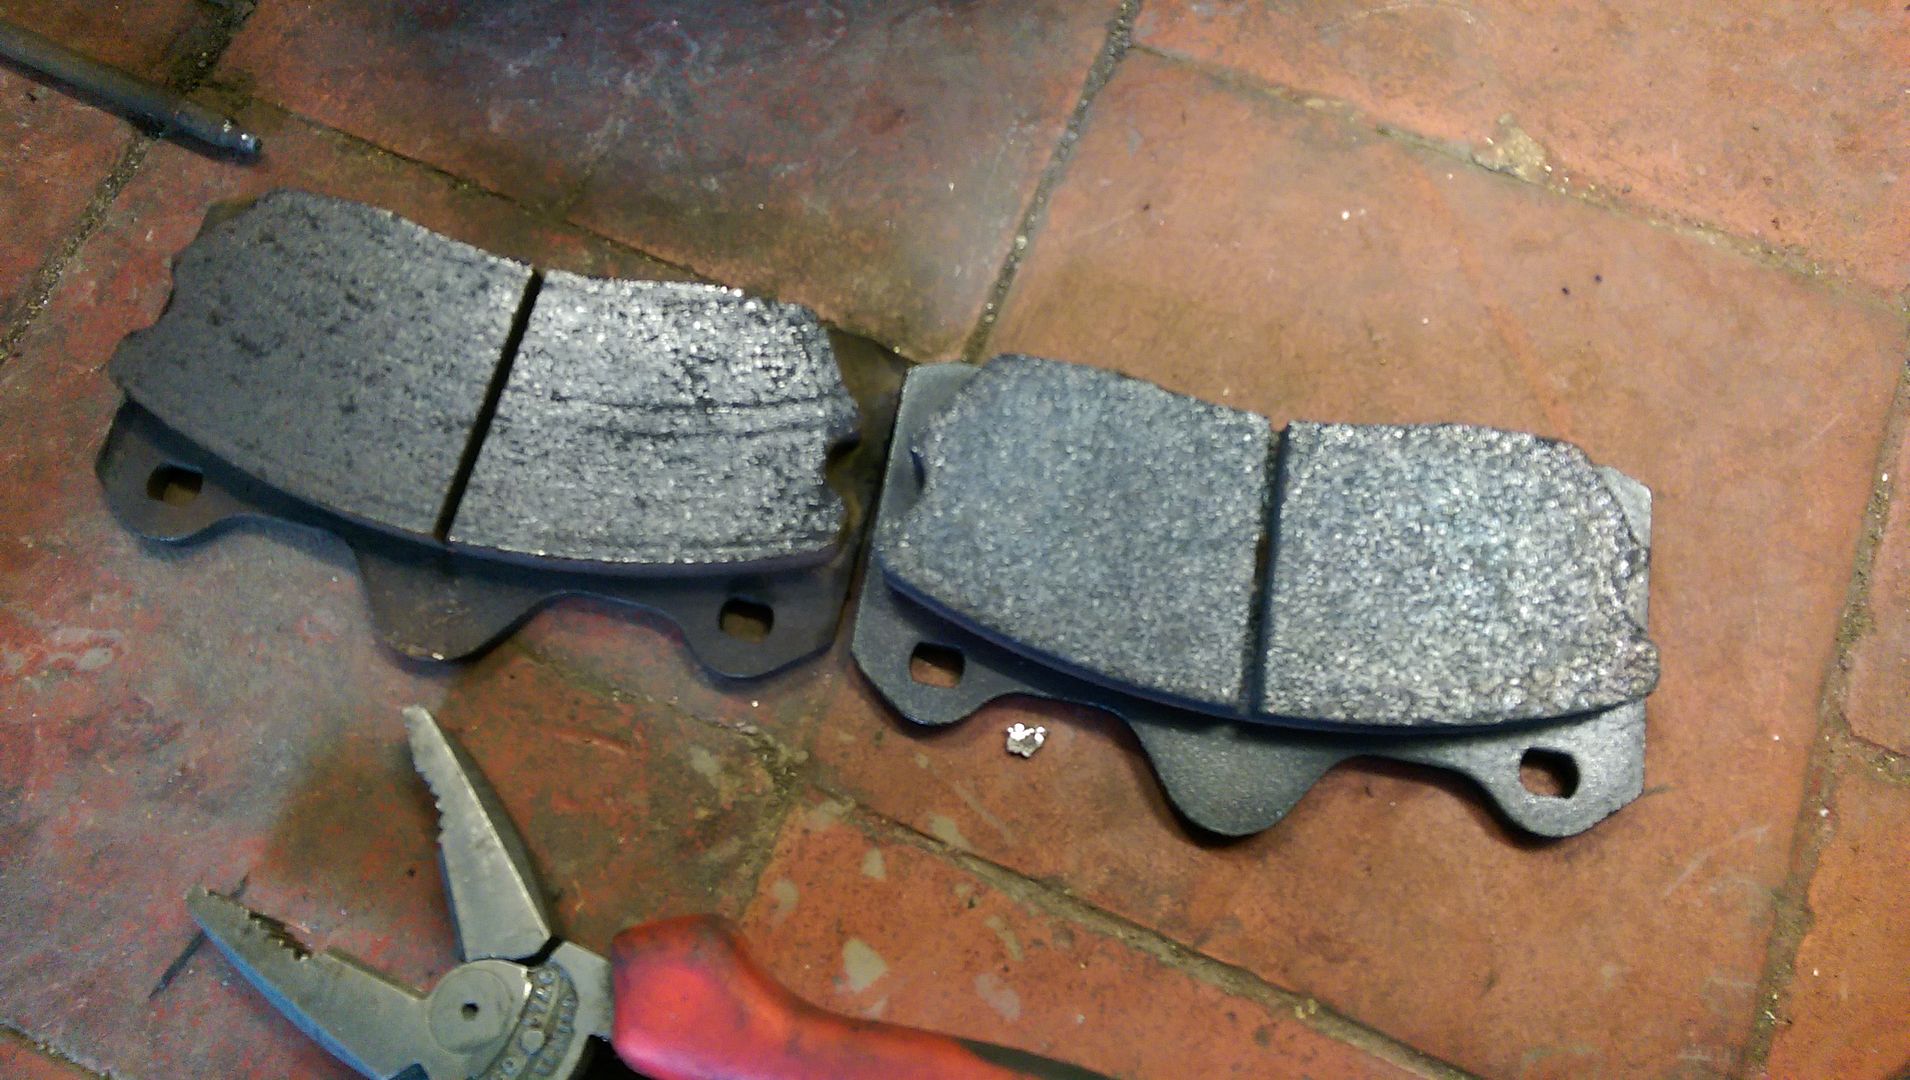
..and swapped them out with the DS2500's... (DS2500 on left, DS1.11 on right
IMAG0710.jpg


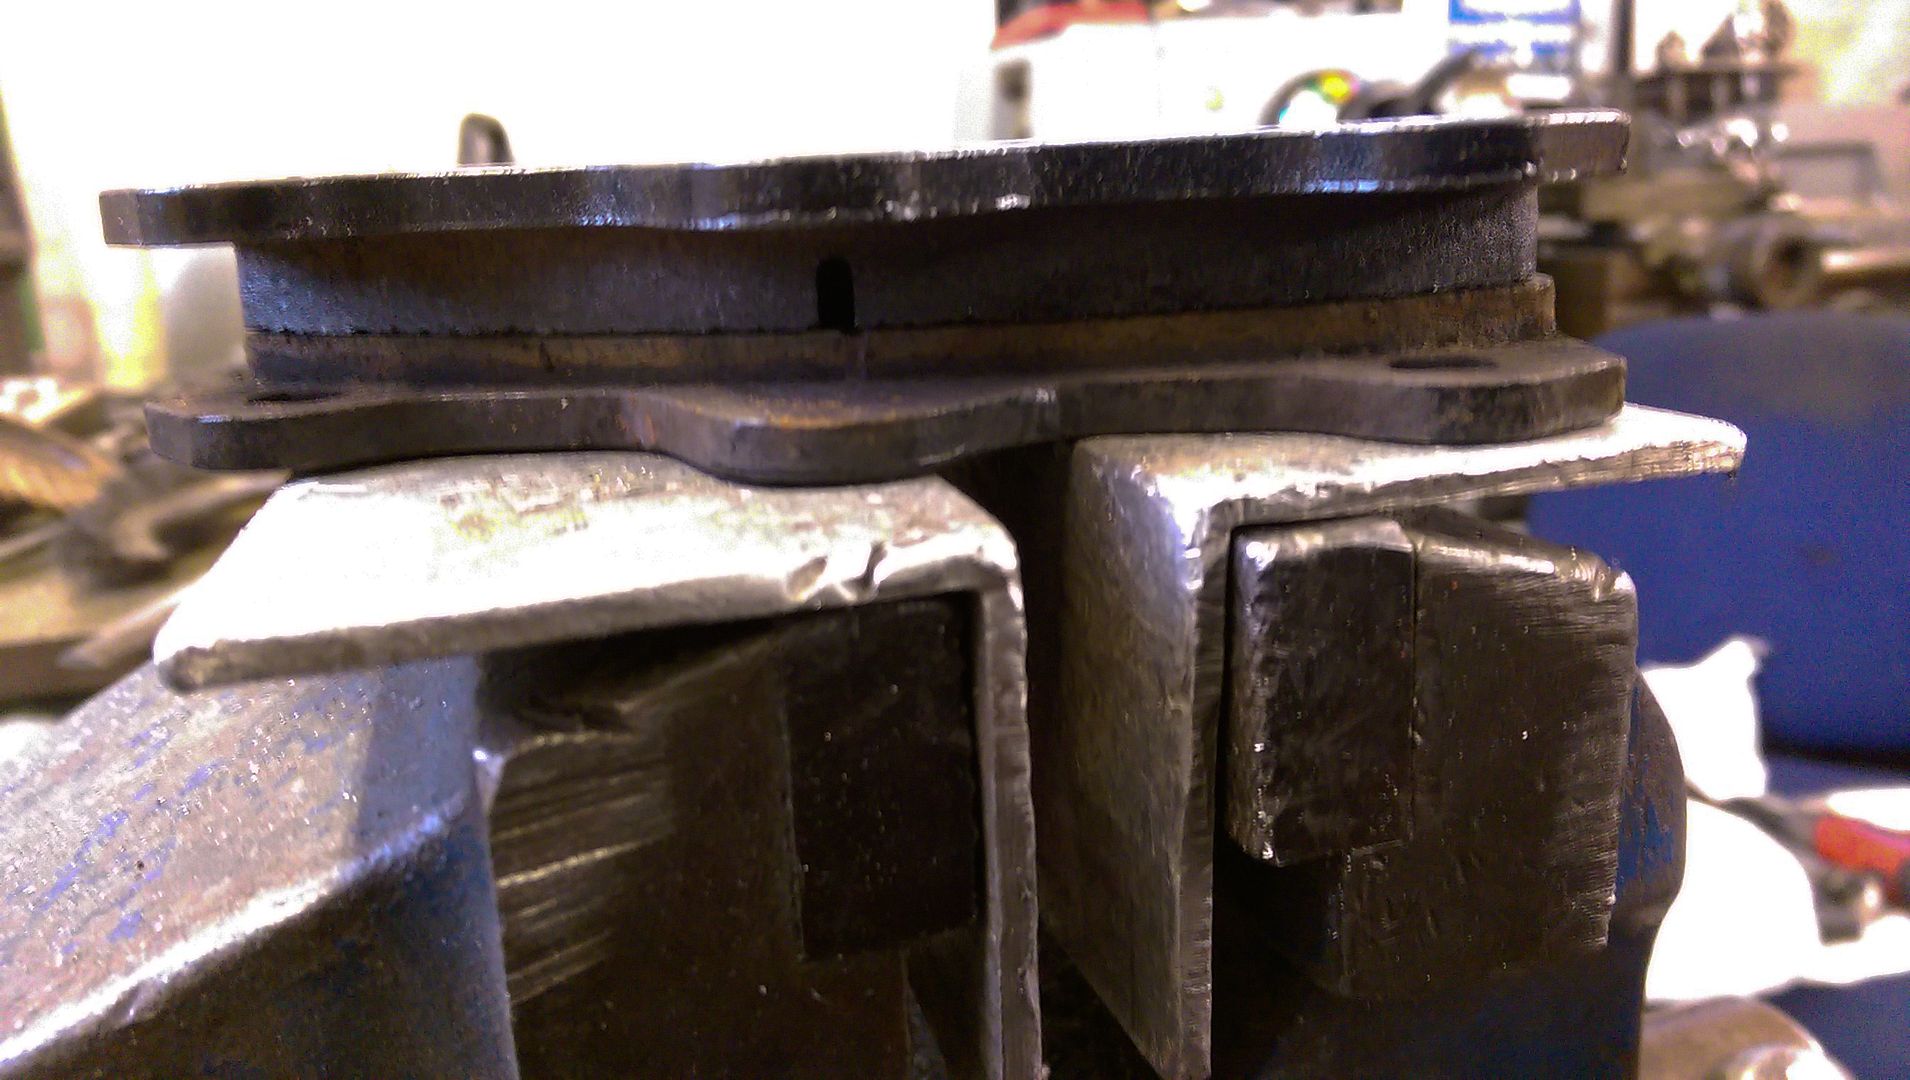
One thing to note though is that the normal pad for my AP calipers is supposed to be 55mm deep... this is a bit of a problem on my rotors as they are designed for a 50mm pad... this was causing me issues with pad knock off as the inboard pad over hung the inside edge of the rotor and the outboard pad back plate was catching the bell as it wore down...

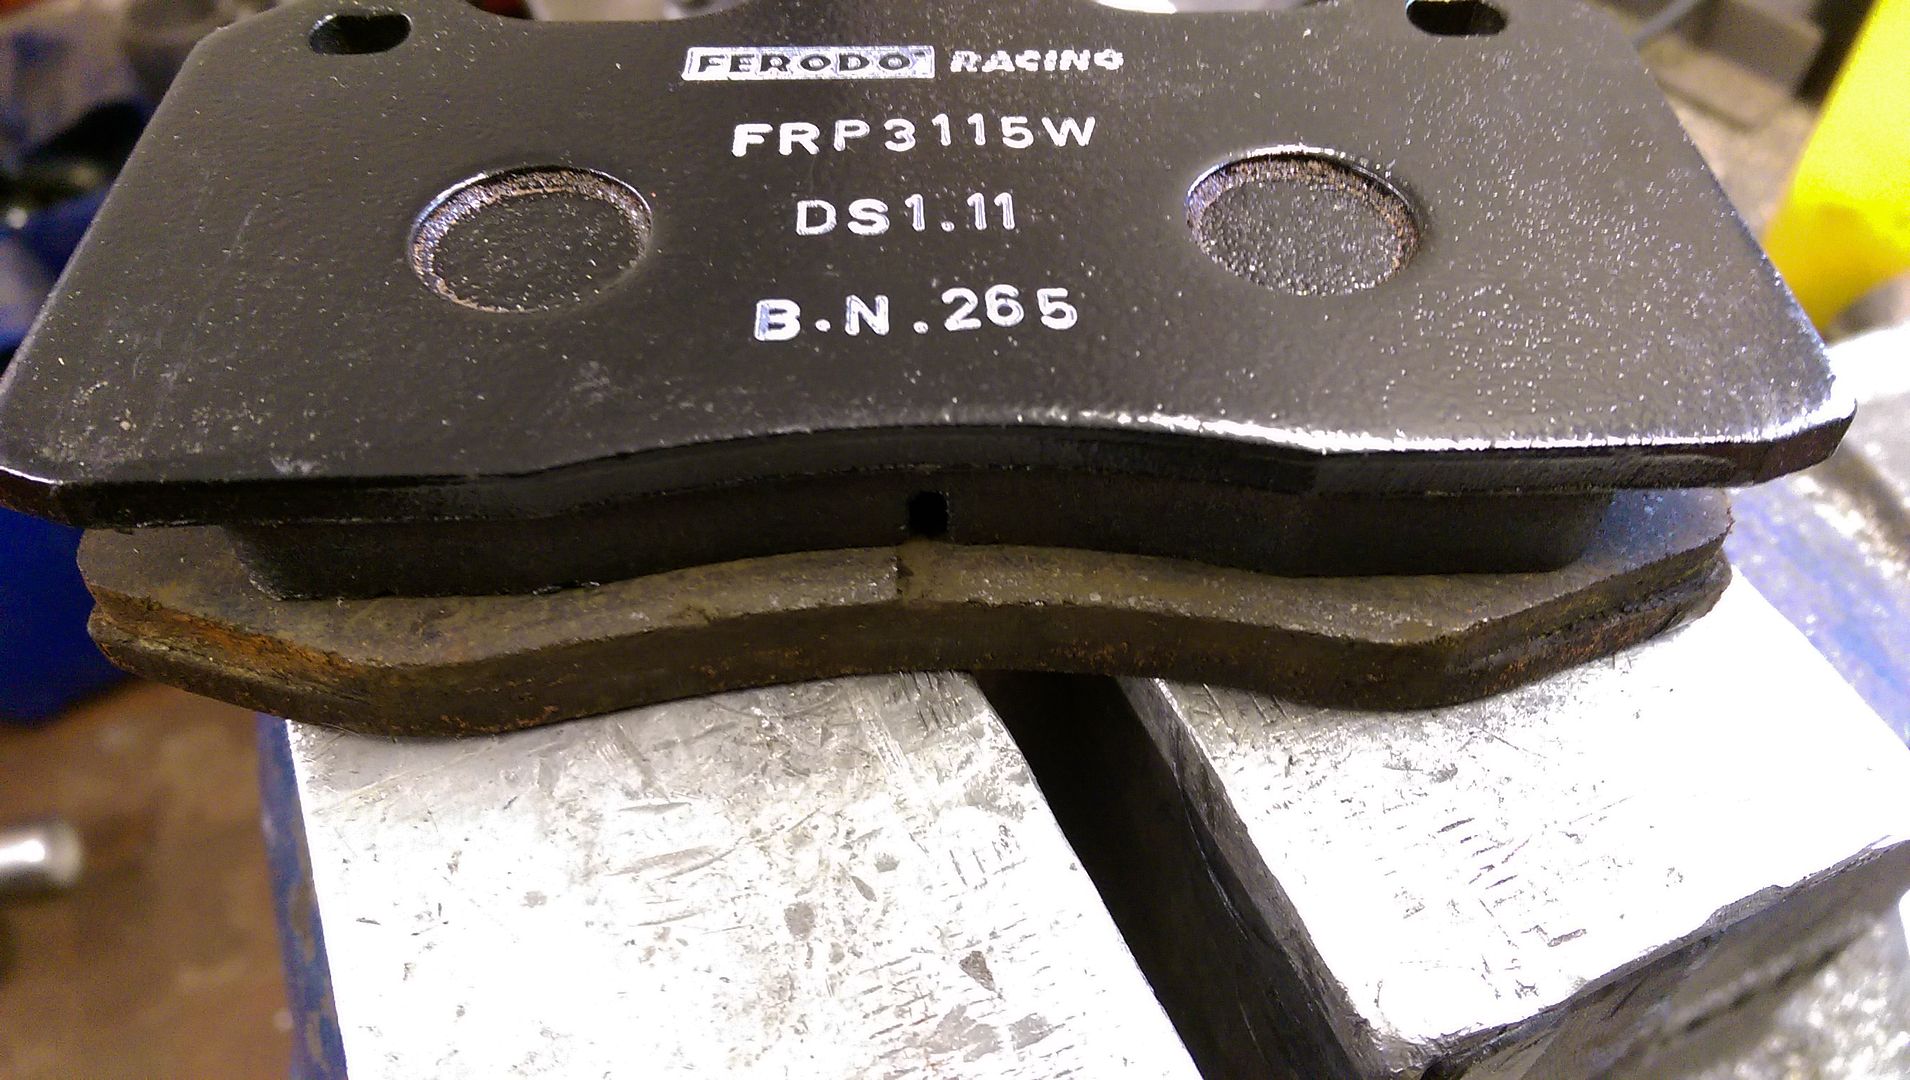
Ferodo list the FRP3083 as the front pad...
http://ecat.ferodoracing.com/car-racing/brake-pads/FRP3083

...and the FRP3115 for use for when the caliper is used as a rear...
http://ecat.ferodoracing.com/car-racing/brake-pads/FRP3115

When placed together the look very similar..
IMAG0712.jpg


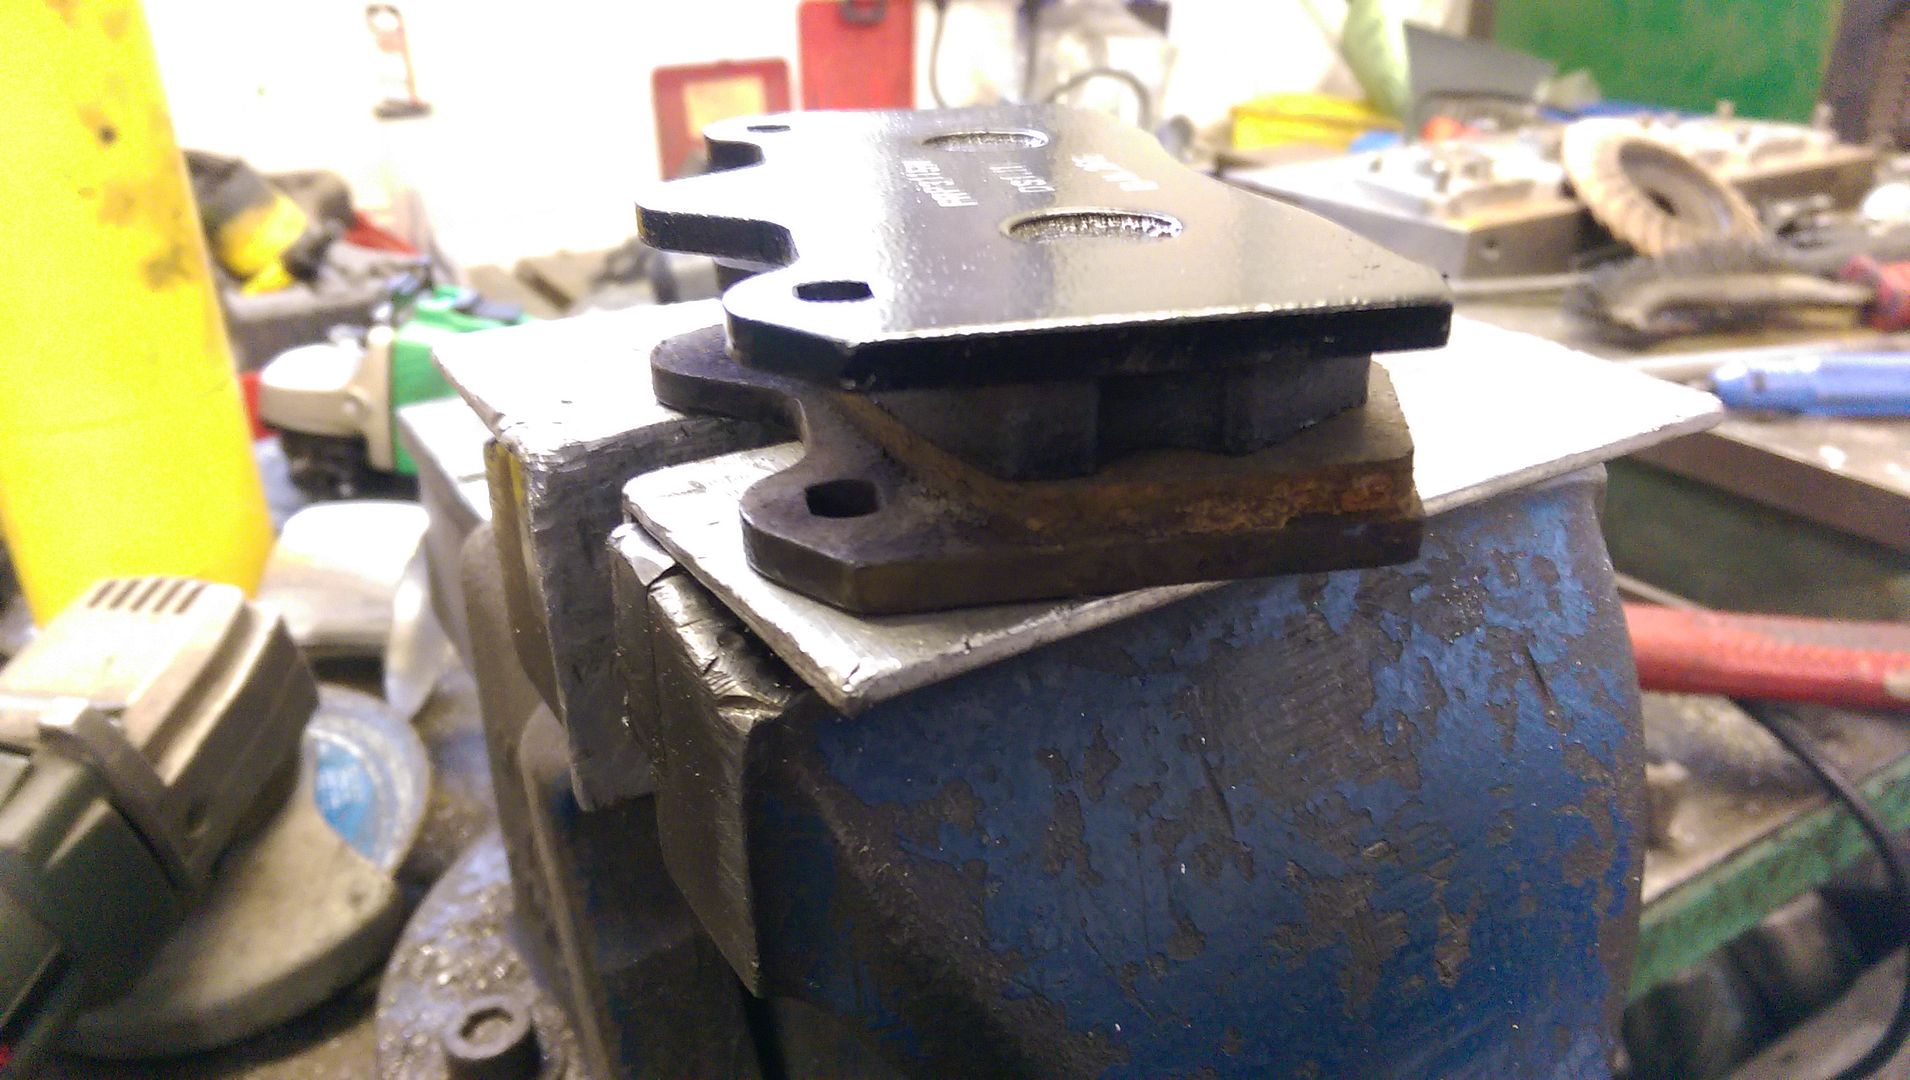
...however you can see they are not as deep (obviously)...
IMAG0714.jpg


..and a slight difference on the sides...
IMAG0713.jpg


Reality was I either tried to source a rotor that supported a 55mm pad depth (turned out to be an expensive venture if I decided to do that) or use the 50mm pad... biggest issue realistically is the rear pad has 2mm less material depth than the front pad so will wear out sooner... however it works perfectly as there is minimal loss of pad surface area and because I no longer had pad knock off or any of the other issues all was good..

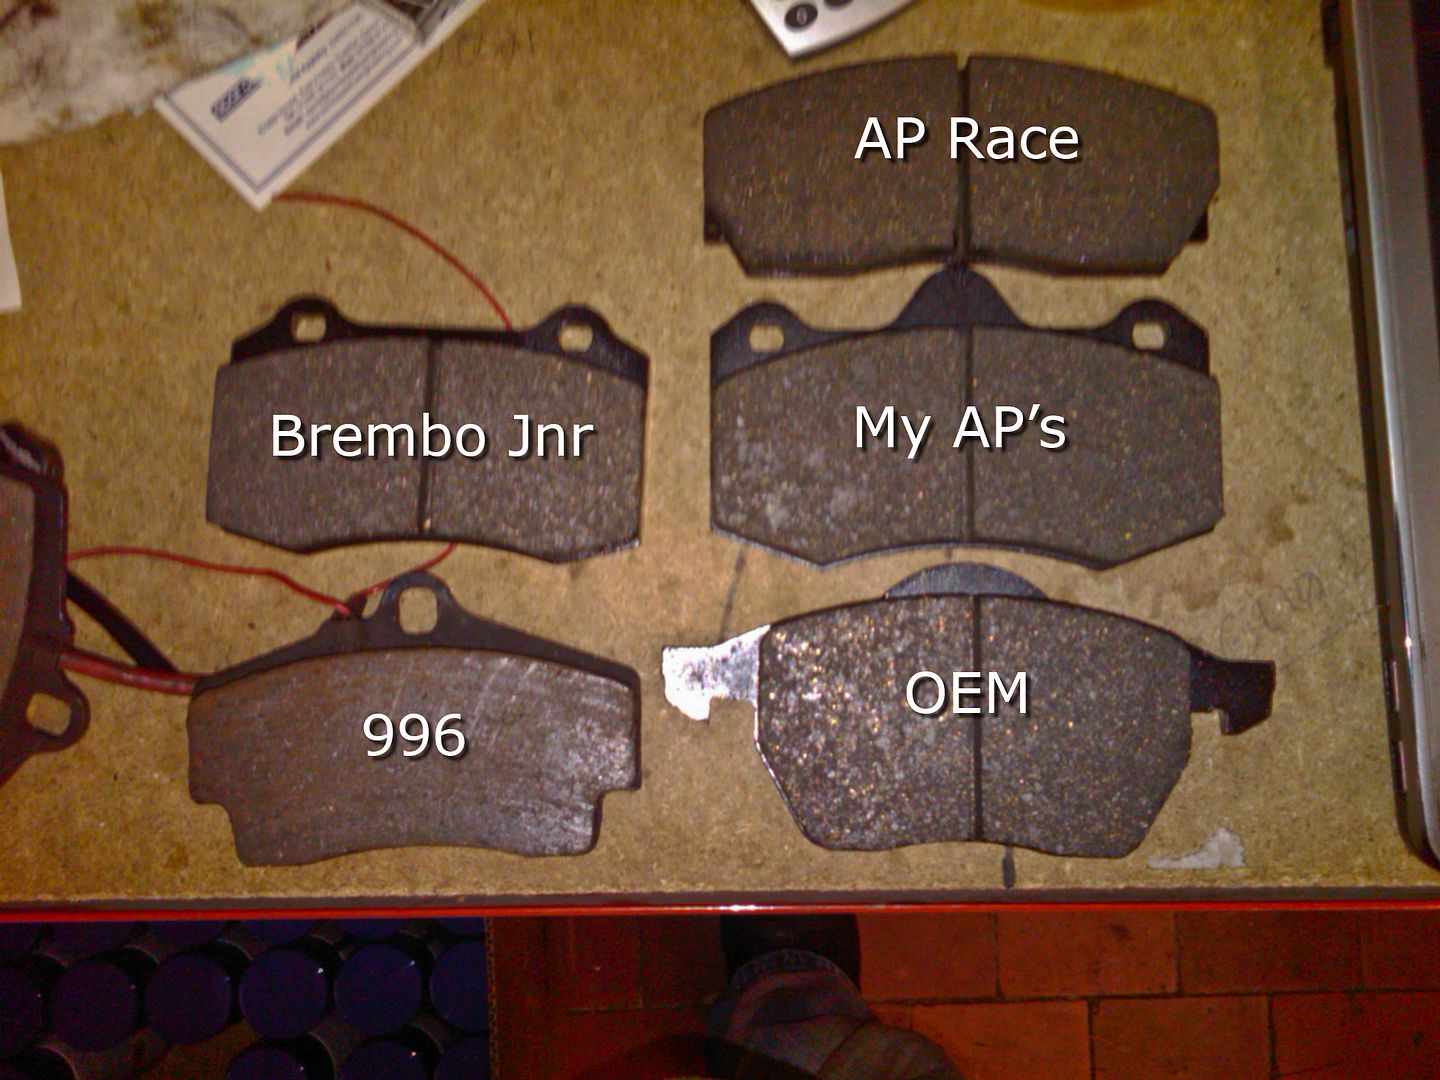
As a further comparison... here is an old pic I took showing off a few of the pads including LCR brembo... as you can see the Brembo pad while being 50mm deep is not quite as 'wide' as the AP pad...

20100412_IMG00040-20100412.jpg


What are they like? f00king actual amazing!!!... they just bite... I have done a minimal amount of bedding in and they are showing no signs of dropping off... little more to do I think before I try a higher speed/hard stop but I have done a fairly hefty pull up from road legal speeds and it near ripped my face off!! ABS was having a bit of a spaz as there wasn't much heat in the tyres and its a little damp out but the difference is epic!!...

I will have to learn how to drive again... I can brake much later now and have much more confidence in my brakes... :D

<tuffty/>
 
Last edited:
Progressive Parts, performance parts and tuning specialists