2017 Seat Leon ST 184 tdi (so facelift)
“Front Assist not available” came up after I changed from 18” to 17” wheels and added a full sized spare but around the same time I hit a pheasant at about 15 mph with no damage seen. Adding a full sized spare which on an estate is way behind the rear axle will misalign the radar sensor; the car now is 10mm or so lower at the rear. I tried going back to the skinny spare but it did nothing so it must be the pheasant. This implies it is not so sensitive to up/down alignment as otherwise a long road trip & fully loaded versus a driver only long trip would see a significant difference and create the error. This makes sense as the system is trying to “see” items to the side accurately while only roughly “seeing” items in front. It also means that ride height is not an issue (despite the warnings in the factory instructions!)
So reading around on the various posting on it… the radar is the square box at the front bumper under the number plate in the grille. The facelift cars have the new square radar sensor that is coded to the car by dealer with FEC (and Component Protection) and has a handy inbuilt calibration mirror. The original cars had the more expensive/accurate dome type which can be coded with Component Protection outside of dealer network. Both are mounted on a 3 point adjustable mounting with one screw for side/side and one screw for up/down. Sometimes the mounts pop out of their ball sockets so first thing is to see if it is wobbly and then push it back in. The facelift mount is upside down L and is not very rigid; I hand bent mine with a hooked tool to recalibrate. Facelift adjustment screws need a 3mm flexi socket .. which you will not find in any toolkit.
The radar sensor can self check itself while driving and if it is more than 0.8 degrees out it will disable and put the “Front Assist Not Available” warning on with the warning triangle. This is an MOT failure. It needs mounted vertically and aligned to the thrust line of the whole vehicle suspension. The factory align it to the thrust line of the rear wheels (so get it wrong, but good enough).. so they clamp on mirrors to rear wheels and find the mid point between the 2 projected lines.
There are 2 parts to the process. First is to align the radar sensor to the body of the car using wheel clamps and target board jigs. Second needs software to “tell the car” that it is in an aligned position. Most likely you only need to do the first part as the settings of the second part are remembered and it is likely if you get the first bit right then the second part does not need done; that is what worked for me. Early cars might need the 3 position front board for second part but I think the later cars do not.. we are not using the front board here anyway.
So to DIY align it.
Alternatives.
“Front Assist not available” came up after I changed from 18” to 17” wheels and added a full sized spare but around the same time I hit a pheasant at about 15 mph with no damage seen. Adding a full sized spare which on an estate is way behind the rear axle will misalign the radar sensor; the car now is 10mm or so lower at the rear. I tried going back to the skinny spare but it did nothing so it must be the pheasant. This implies it is not so sensitive to up/down alignment as otherwise a long road trip & fully loaded versus a driver only long trip would see a significant difference and create the error. This makes sense as the system is trying to “see” items to the side accurately while only roughly “seeing” items in front. It also means that ride height is not an issue (despite the warnings in the factory instructions!)
So reading around on the various posting on it… the radar is the square box at the front bumper under the number plate in the grille. The facelift cars have the new square radar sensor that is coded to the car by dealer with FEC (and Component Protection) and has a handy inbuilt calibration mirror. The original cars had the more expensive/accurate dome type which can be coded with Component Protection outside of dealer network. Both are mounted on a 3 point adjustable mounting with one screw for side/side and one screw for up/down. Sometimes the mounts pop out of their ball sockets so first thing is to see if it is wobbly and then push it back in. The facelift mount is upside down L and is not very rigid; I hand bent mine with a hooked tool to recalibrate. Facelift adjustment screws need a 3mm flexi socket .. which you will not find in any toolkit.
The radar sensor can self check itself while driving and if it is more than 0.8 degrees out it will disable and put the “Front Assist Not Available” warning on with the warning triangle. This is an MOT failure. It needs mounted vertically and aligned to the thrust line of the whole vehicle suspension. The factory align it to the thrust line of the rear wheels (so get it wrong, but good enough).. so they clamp on mirrors to rear wheels and find the mid point between the 2 projected lines.
There are 2 parts to the process. First is to align the radar sensor to the body of the car using wheel clamps and target board jigs. Second needs software to “tell the car” that it is in an aligned position. Most likely you only need to do the first part as the settings of the second part are remembered and it is likely if you get the first bit right then the second part does not need done; that is what worked for me. Early cars might need the 3 position front board for second part but I think the later cars do not.. we are not using the front board here anyway.
So to DIY align it.
- Find flat area the length of car plus about 1.5m
- Park car with back wheels at rear of area so front has about 1m clear
- Level the car, especially front to back.
- Mark with chalk on the tyres vertical marks where tyre meet ground so you can put the car back to the same spot
- Mark with chalk on ground parallel to side of tyre so you know where to put levelling material.
- Put a brick or similar at wheel centre where the chalk marks are
- Use straight bit of wood/steel to bridge between bricks
- Measure how out of level wood is with spirit level – pick up at the wood/brick interface and measure how much is required to get car level. I used a Vernier but a steel rule or different bits of packing you could measure could do.
- Roll car back/forwards off chalk marks
- Add packing material to level ground – I used couple of bits of hardboard plus some cardboard to do 5.5mm and 7.5mm. Getting it within 5mm is probably adequate as most garage alignment ramps are no better than that.
- Roll car back to original position as shown by chalk marks on the tyres.
- Side to side levelling is less important but should be within 10mm if possible – otherwise the side/side alignment will not be so good.
- Front to back levelling is likely not so important either going by my discussion above.
- Create 2 strings to show side/side alignment.
- 4 axle stands or similar
- Enough string to go length of car plus 1-1.5m on both sides
- Tape measure
- Put pair of axle stands at the rear bumper and 100mm out from tyre
- Tie string to rear axle stands (double roll hitch knot..)
- Put second pair about 1-1.5m in front of car and tie string to it
- Stretch string and align it so it is at the wheel centre height and 100mm (or same all around) from each wheel centre.
- Now you should have a string that is at wheel centre height and parallel to the 2 tyres on each side.
- There are other ways with more tools.. this is just a good enough method that worked.
- Remove the cap from the radar sensor.. facelift cars you pull out the sides to unclip.
- Double check the sensor is firmly in it’s 3 ball and sockets…. It can be stiff so inspect them all.
- Older cars with dome sensor will need a mirror added to them that is parallel to the main body of radar – the proper kit youtube clips show a clip on bridge device but a small 10mm square mirror with double sided tape could be put on the sides.. less than ideal as the body with have a draught angle so ideal is something that comes from the back surface or references 3-4 points on the front face. Sorry .. have to leave that to you. Facelift cars have built in mirror at the top.
- Roughly measure the height of the mirror from ground
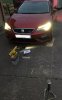
- Create a mount for a laser level some 500-1200mm in front of the radar. I used 4 bricks and a couple of bits of hardboard. The laser level was a 400mm spirit level within built laser accurate to 0.5mm in 1m from a cheap levelling kit with tripod. The laser needs to end up pointing at the mirror while being level.
- Align the laser to be in middle of the 2 strings. I used a tape measure and got it within 3mm or so. Note you need 4 measurements because it needs to be in the middle at the front and back of the level/laser body.
- Now examine the reflected dot from the mirror of the laser. I had my laser 550mm from the radar and the reflected dot was 65mm down and about 30mm sideway at the laser.
- Adjust the radar so the reflected dot is in the middle of the laser.. well within 5mm. It helps to use bits of board to see where the dot is and if you catch the edge of the original laser beam you can see how close it is.
- Facelift car needed a 3mm slim box spanner or ¼”socket on a ball joint. I have lots to tools, maybe 6 sets of ¼” sockets sets.. the smallest is 4mm so you will likely need to buy one. They will not adjust with needle nose pliers. You would have to remove the front bumper to get anything else in. I ended up with a drum brake spring tool which has a hook on the end and is about 9” long.. and I used this to pull the bracket to align sensor.. get the vertical right first and then the side to side. The bracket and mounts are in an upside down L so lower screw does up/down and upper screw does side/side.
- Drive the car on straight roads (at speed?) to allow radar to self check and clear the error message. I suspect it needs speed and straight road. I drove the following without restarting before it cleared;
- 6 miles on B road with high verges and winding road
- 6 miles on dual carriageway at 75mph
- Last ¼ mile was downhill straight.
Alternatives.
- Dealer wanted £340 and first slot was 2 weeks away
- Windscreen companies can do it as they need to calibrate Windscreen Cameras for adaptive cruise control. Ask for “ADAS Radar Alignment”. Most will not, some only do Cameras. National Windscreen quoted £218 and 2-3 days for a slot – I have not used them but they sound like they know what they are talking about.
- 4 wheel alignment shops might get into it as they have half the gear..
- Buy kit from various companies for £18k.. Hella CSC, Texa etc.. hard to find who locally has bought this kit. Again ask for ADAS.
- Software for second part;
- Facelift needs VAGCOM VCDS V2 or Hex-Net and does not now allow you to recalibrate – it did at one point but liability means they stopped it. You can look at the numbers but not alter them.
- OBDeleven does not now allow you to recalibrate
- ODIS-S which is factory software to allow recalibration. There are China clones/copies and folk doing it no doubt.