Removing heater vent?

tommy_a

Active Member
Nov 1, 2009
194
0
Salford
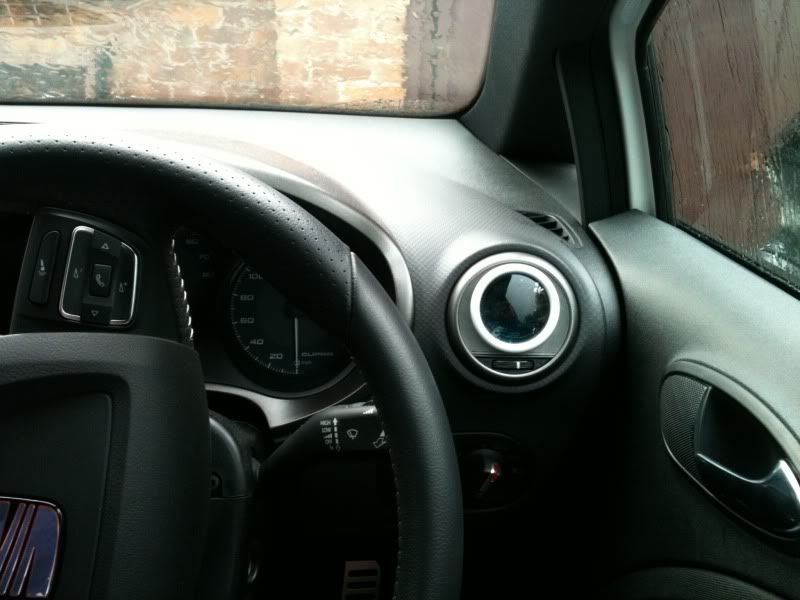
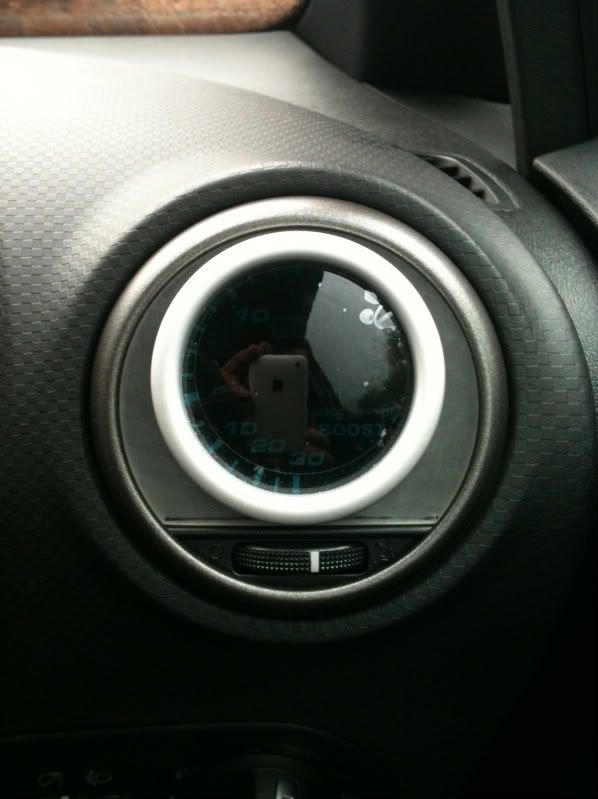
I'm trying to fit a boost gauge to my cupra and I want to fit it in the air vent like others have done! I'm having trouble removing the air vent so I can get it all made up!

Does anyone know how to remove the vent? or does anyone have any pictures of the vent removed so I can see where it mounts??

Cheers, Tom.
 

Cupra R

Active Member
Dec 5, 2001
2,215
4
UK.
Visit site
There a bit of a pig to remove mate, but after asking Hubbly_Bubbly I then tried his method,

Remove the fusebox cover from side of dash, you should then be able to see the vent mount and hose onto the back of it. Remove the hose, and with something substantial behind the vent mount start to push it out of the dashboard, until you can get it out with your finger's.

Like I say, bit of a pig, but if you start, I'm sure all will become clear.

If you break something though, it aint my fault :p
 

tommy_a

Active Member
Nov 1, 2009
194
0
Salford
Ah so it's just an interference fit then? I had the fuse cover off but I was looking for mounting points! I'll give it ago asap!
Cheers matey! :D
 

Donnyboy

The Candy Man
Mar 15, 2005
1,558
2
renfrewshire
Its my passenger one thats broke and I assumed it was a dash out job..........so never done anything about it incase I got it back with a rattley dash. :think:
 

Cupra R

Active Member
Dec 5, 2001
2,215
4
UK.
Visit site
Hopefully when it's out, you will see it's a little more than an interference fit lol. If you look down the vent with a torch you might just see four silver spring clip's. It's these you have to overcome, but you can't really release them. I ended up breaking mine in doing so.
 

tommy_a

Active Member
Nov 1, 2009
194
0
Salford
Once I'd pushed the tube from the back of the vent, it popped right out of the dash! :D just need to make a bezel then I can mount the gauge! Looking forward to it! :D
 

tommy_a

Active Member
Nov 1, 2009
194
0
Salford
I've tried about 10 times now! Each time I'm just about to finish, I break it! I've tried doing it different ways but I still keep messing up! Going to spend this weekend fabricating! :D hopefully I'll get it sorted!
Btw, cheers for all the help and info!
 

Cupra R

Active Member
Dec 5, 2001
2,215
4
UK.
Visit site
I've tried about 10 times now! Each time I'm just about to finish, I break it! I've tried doing it different ways but I still keep messing up! Going to spend this weekend fabricating! :D hopefully I'll get it sorted!
Btw, cheers for all the help and info!

It does require a bit of finesse lol. I drilled the 52mm hole first, marked and drilled then slotted for the air to pass, then cut it out relatively roughly. It's suprising how easy perspex will grind into final shape with a pedestal grinder into the final shape.

I have made two now and managed to not break one. TLC at all times lol.
 

Cupra R

Active Member
Dec 5, 2001
2,215
4
UK.
Visit site
Was it easy to fit and to route any hoses?

Yes, very easy mate. The fab for the gauge mount was the hardest :lol:

Pipe goes through bulk head under/behind battery into passenger footwell, then into an electric sender, then via electric cables upto gauge.
 

cila555

CiLA
Apr 2, 2010
234
0
Kosice - Slovakia
www.cila.sk
I put down this item a few times. For this is best to have special preparation. In Seat service have its. Other method is to use small screwdriver or something for plastic. In picture you can see lock. This item has their four. You must loosen its.
Now I dont have another photos buy I will put down its a short time, too.

krytka1_f.jpg


Good luck ...
 

tommy_a

Active Member
Nov 1, 2009
194
0
Salford
im done !! :D

Picture052-1.jpg

Picture051.jpg


it only took me about 20 mins to do aswell !! :D i got an old number plate, then using a 76mm hole saw i drilled the number plate to get the bezles rough shape. i then used a 50mm hole saw to drill the hole for the gauge. i then gave it a quick sand on both sides to give it an opaque look. i took the vent out the dash, popped off the silver trim part and popped out both sets of vent fins. i then placed the bezel in the hole, lined it up and marked across it where it needed to be cut level.
i then gave it all a nice sand down to smooth it over to get it looking good!! the thicknes of the number plate is perfect for this as its held in really tight by the silver trim. so theres no need for me to buy a second vent as mine can be put back to normal in about 2 mins !! also, i was planning on painting or vinyl wrapping the bezel but i think it looks pretty good as it is!!

i just need to take delivery of my forge fitting kit and i can get it all plumbed in and woking properly !! :D im loving it !!