
tobrien1
Guest
Here’s a guide on fixing the notoriously common slow-speed fan fault. It’s cheap and it works.
I followed the guide to fix the same problem with a Golf but thought I’d write up a guide specifically for the LCR as it’s slightly different.
Faulty fan symptoms:
• Coolant temperature goes above 90
• Fans only cut in intermittently (or 'pulse') on high speed - this is loud enough to be heard inside the car
• Fans don't come on when aircon is switched on
Reason:
The fans have two speeds, low and high. The resistor (which is built into the fan unit itself) for the slow speed burns itself out which causes the fans to 'pulse' and come on at a hotter temperature than they normally would.
Troubleshooting:
There's a quick and easy test to see if your fans are working correctly.
• Start the car with the heating and aircon switched off, open the bonnet, check that the fans are off (they should be at this point).
• Switch the aircon on (you should hear a little click as the aircon and fans switch on)
• Check under the bonnet again, if your fans are working correctly you will see one or both of the fans running nice and slowly.
• If they look like they're running on high speed (quite audible) stand and watch them for a couple of mins. You'll probably notice that they come on fast, then switch off, then 30 secs later they come on fast again, then switch off etc. If this is the case, you have faulty fans!
The fix:
As the fan unit is sealed you can't replace the faulty resistor (terrible design flaw) and SEAT suggest that you replace the whole fan unit for approx 400 of your hard earned pounds (and no doubt it will happen again at some point).
In this guide we effectively bypass the faulty resistor and add our own working ones into the wiring before the fan unit - for a fraction of the cost!
What I used:
10A cable – I got 4m but probably only used about a 1.5m
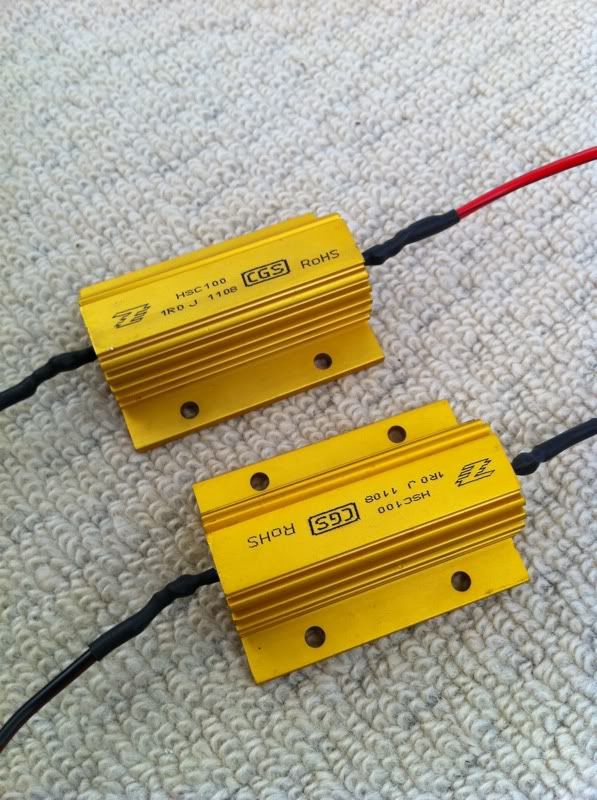
2x 1Ohm 100w ally clad resistors (Farnell order code 1174282)
Some heat shrink (Farnell order code 1259196)
Heatsink compound (Farnell order code 3821511)
Metal brackets (From Wickes, they were called ‘heavy duty angle brackets’)
Soldering iron and solder
8x M3 nuts and bolts
Electrical tape
Some cable ties
The most time consuming part was finding a place to mount the resistors as there’s hardly any room in the Leon’s engine bay. I tried following the guide to do this on the Golf but the Leon has a second intercooler mounted right where the guide tells you to put the resistors.
So here’s how I did it:
I started by removing all of the plastic that covers the battery and then taking the battery out.
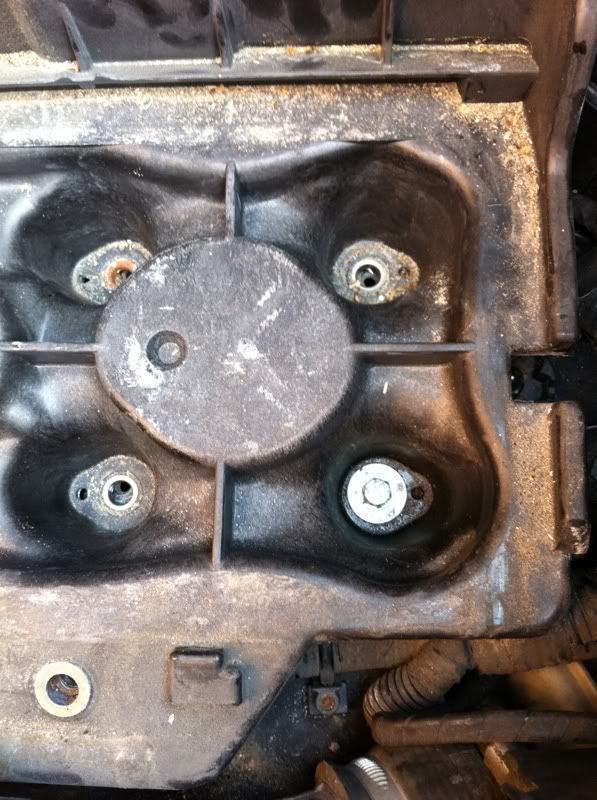
Remove the 4 bolts holding the battery tray in and remove that too:
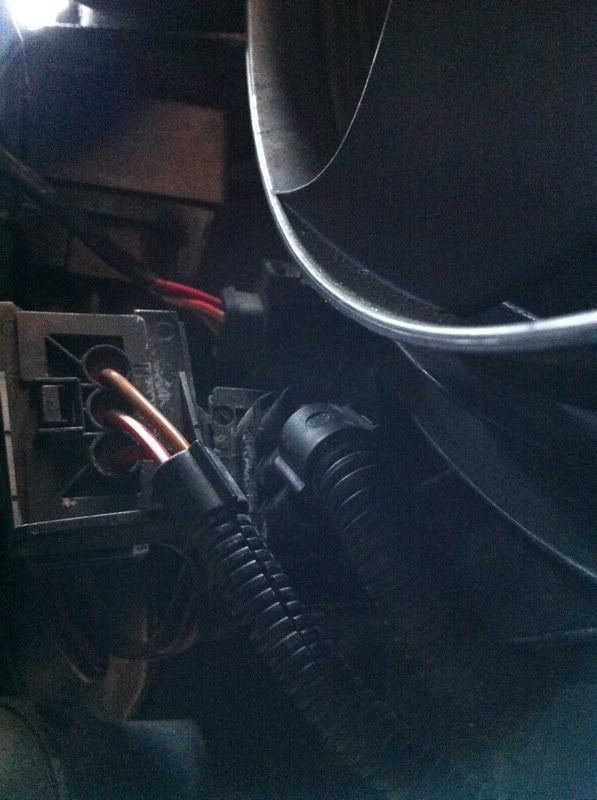
Drop the undertray off then when underneath the car facing forwards you’ll see to the left side of the fans, 2 sets of 3 wires (brown, white/red and black/red) going into a couple of plugs. This is the wiring for the fans that you will need to cut into for the resistors. I’ll come back to this:
Next, wire up the resistors with about 30-50cm of cable on each side:
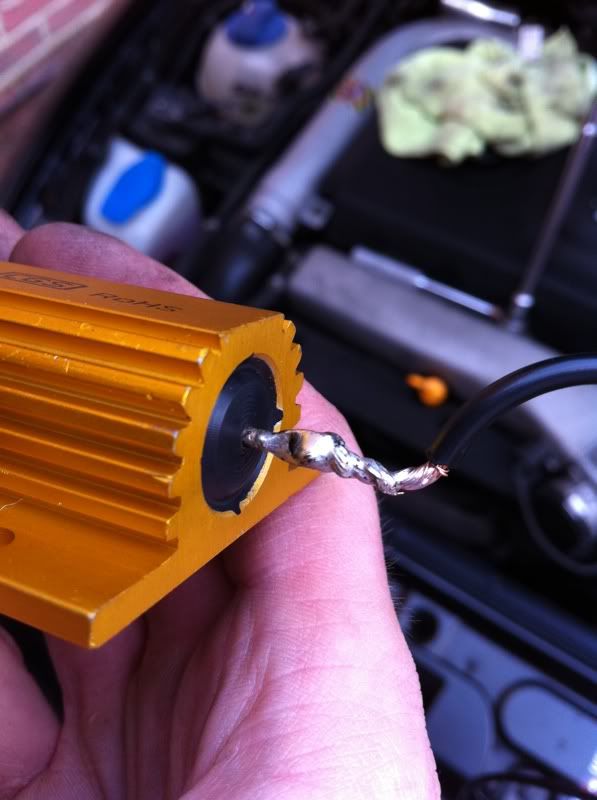
And heat shrink the ends of the resistors to help prevent any moisture/dirt getting onto the connections (I just used a hair-dryer):
Line up the resistors on the metal bracket and drill some holes to match those in the resistors:

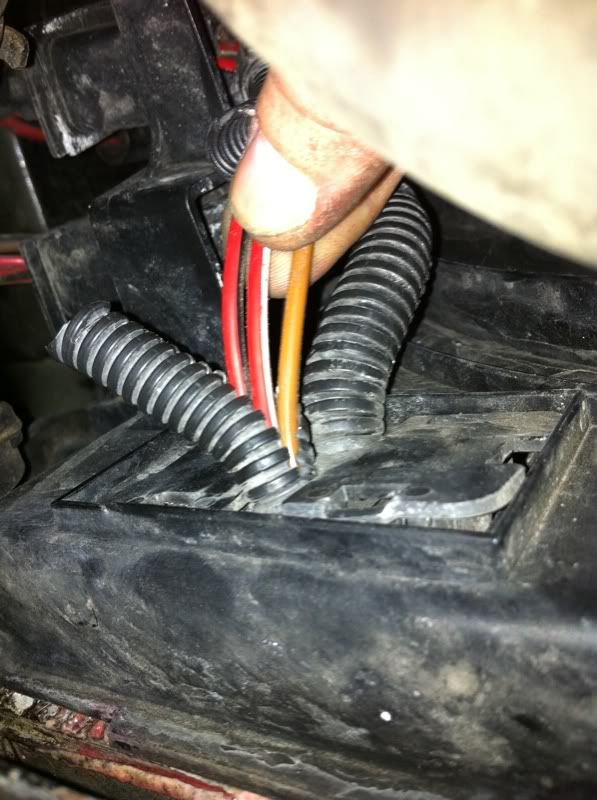
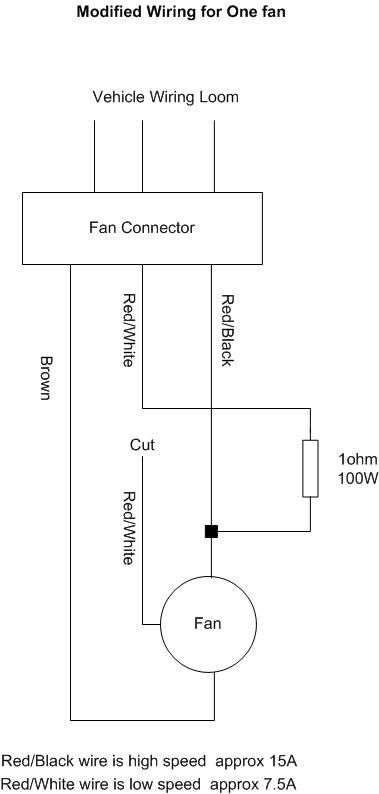
Next wire up the resistors (this is the fiddly bit so do one at a time). Choose one of the sets of wires and cut the red/white wire. Wire this into one side of the resistor, doesn’t matter which. Now splice the other side of the resistor into the red/black cable. So one side of the resistor replaced the red/white circuit and the other side joins into the red/black circuit. Electrical tape all of the connections.
Here’s a wiring diagram kindly borrowed from the Golf guide:
Test that it works by starting the car and turning on the air-con, the fans should come on slow speed.
Now do the same for the other plug – and test again.
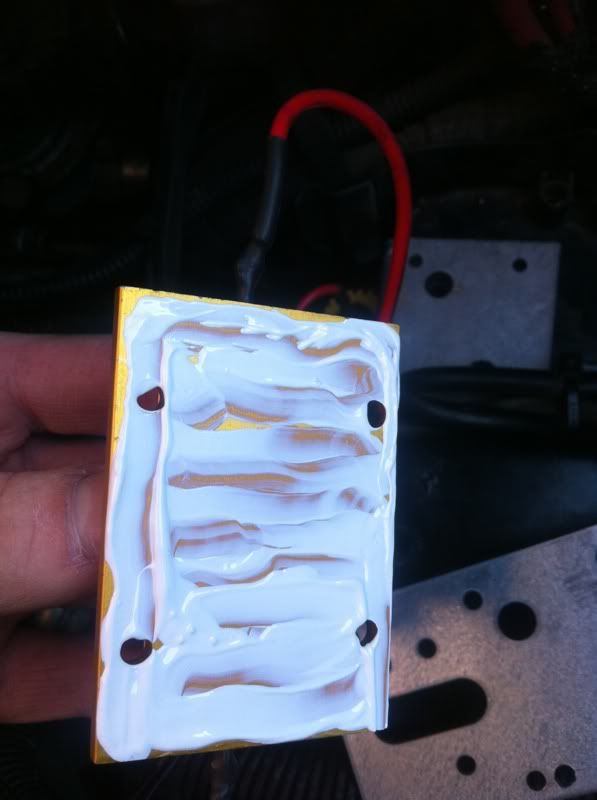
Next cover the back of the resistors with heatsink compound as this should help to dissipate the heat a bit better from the resistors (they get quite hot if the fan is on slow speed for a while):
And bolt them onto the metal brackets. Then you can mount the brackets so they hang over the side of the battery tray (using the screws for the battery tray to hold them in place). Sorry, this is where the pics get a bit sketchy, it was a bit hard to get my phone in the right place:
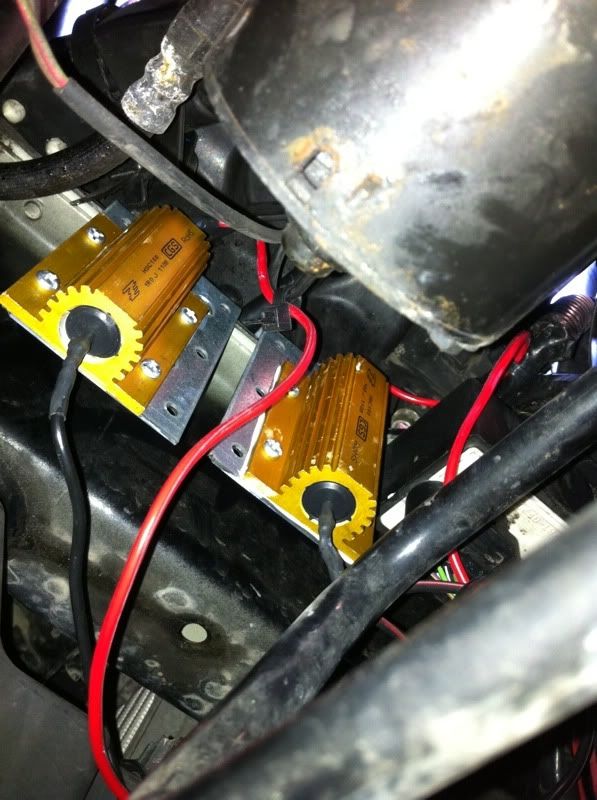
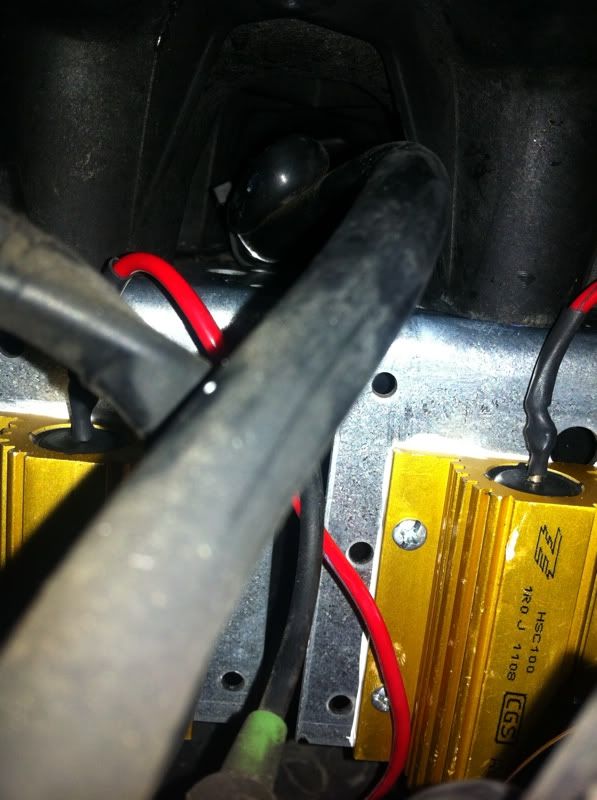
^ You can see the battery tray clamping them down.
Cable tie all of the wiring out of the way so that they don’t risk getting caught by the fans or touching the resistors.
I decided to mount them where they are, mainly because there’s almost no other room in the engine bay, but also because they sit behind the fans, so when they’re used and get hot, they are cooled by the fans being on.
Hope this guide helps, it was a bit of a pain to do, but probably cost about £25 to fix rather than £400 that SEAT wanted to replace the fan unit (which would inevitably break again).
I followed the guide to fix the same problem with a Golf but thought I’d write up a guide specifically for the LCR as it’s slightly different.
Faulty fan symptoms:
• Coolant temperature goes above 90
• Fans only cut in intermittently (or 'pulse') on high speed - this is loud enough to be heard inside the car
• Fans don't come on when aircon is switched on
Reason:
The fans have two speeds, low and high. The resistor (which is built into the fan unit itself) for the slow speed burns itself out which causes the fans to 'pulse' and come on at a hotter temperature than they normally would.
Troubleshooting:
There's a quick and easy test to see if your fans are working correctly.
• Start the car with the heating and aircon switched off, open the bonnet, check that the fans are off (they should be at this point).
• Switch the aircon on (you should hear a little click as the aircon and fans switch on)
• Check under the bonnet again, if your fans are working correctly you will see one or both of the fans running nice and slowly.
• If they look like they're running on high speed (quite audible) stand and watch them for a couple of mins. You'll probably notice that they come on fast, then switch off, then 30 secs later they come on fast again, then switch off etc. If this is the case, you have faulty fans!
The fix:
As the fan unit is sealed you can't replace the faulty resistor (terrible design flaw) and SEAT suggest that you replace the whole fan unit for approx 400 of your hard earned pounds (and no doubt it will happen again at some point).
In this guide we effectively bypass the faulty resistor and add our own working ones into the wiring before the fan unit - for a fraction of the cost!
What I used:
10A cable – I got 4m but probably only used about a 1.5m
2x 1Ohm 100w ally clad resistors (Farnell order code 1174282)
Some heat shrink (Farnell order code 1259196)
Heatsink compound (Farnell order code 3821511)
Metal brackets (From Wickes, they were called ‘heavy duty angle brackets’)
Soldering iron and solder
8x M3 nuts and bolts
Electrical tape
Some cable ties
The most time consuming part was finding a place to mount the resistors as there’s hardly any room in the Leon’s engine bay. I tried following the guide to do this on the Golf but the Leon has a second intercooler mounted right where the guide tells you to put the resistors.
So here’s how I did it:
I started by removing all of the plastic that covers the battery and then taking the battery out.
Remove the 4 bolts holding the battery tray in and remove that too:
Drop the undertray off then when underneath the car facing forwards you’ll see to the left side of the fans, 2 sets of 3 wires (brown, white/red and black/red) going into a couple of plugs. This is the wiring for the fans that you will need to cut into for the resistors. I’ll come back to this:
Next, wire up the resistors with about 30-50cm of cable on each side:
And heat shrink the ends of the resistors to help prevent any moisture/dirt getting onto the connections (I just used a hair-dryer):
Line up the resistors on the metal bracket and drill some holes to match those in the resistors:
Next wire up the resistors (this is the fiddly bit so do one at a time). Choose one of the sets of wires and cut the red/white wire. Wire this into one side of the resistor, doesn’t matter which. Now splice the other side of the resistor into the red/black cable. So one side of the resistor replaced the red/white circuit and the other side joins into the red/black circuit. Electrical tape all of the connections.
Here’s a wiring diagram kindly borrowed from the Golf guide:
Test that it works by starting the car and turning on the air-con, the fans should come on slow speed.
Now do the same for the other plug – and test again.
Next cover the back of the resistors with heatsink compound as this should help to dissipate the heat a bit better from the resistors (they get quite hot if the fan is on slow speed for a while):
And bolt them onto the metal brackets. Then you can mount the brackets so they hang over the side of the battery tray (using the screws for the battery tray to hold them in place). Sorry, this is where the pics get a bit sketchy, it was a bit hard to get my phone in the right place:
^ You can see the battery tray clamping them down.
Cable tie all of the wiring out of the way so that they don’t risk getting caught by the fans or touching the resistors.
I decided to mount them where they are, mainly because there’s almost no other room in the engine bay, but also because they sit behind the fans, so when they’re used and get hot, they are cooled by the fans being on.
Hope this guide helps, it was a bit of a pain to do, but probably cost about £25 to fix rather than £400 that SEAT wanted to replace the fan unit (which would inevitably break again).
Last edited by a moderator:
")
 and I have to do this on mine so thanks for taking the time to do the write up
 ![[B)]](/forums/styles/seatcupra/oldforumsmileys/shades.gif "Cool [B)]")
