Boot rubber cable guide

Holdup

Active Member
Aug 28, 2009
314
27
Kent
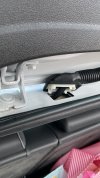
Unfortunately I don’t know the name of the part but have included a picture, does anyone know if it is easy to replace? It appears that I managed to break it when installing my rear dash cam about 5 months ago (even though I thought I was careful and hadn’t broken it) but its only just started leaking recently and my roof lining is soaked. I’ve put some instant gasket around it today but I’m not convinced its going to work. Thanks in advance
 

Attachments

  • 9BC5CBD6-FAA3-4FAF-BDC9-9898AA1C2DF1.jpeg
    9BC5CBD6-FAA3-4FAF-BDC9-9898AA1C2DF1.jpeg
    412.4 KB · Views: 293

Shrekker

Active Member
Jun 4, 2021
36
10
ITs the tail gate wiring harness connecter. you could seal it by using either clear silicon or tiger seal put under the plug that fits in to the square hole
I would think you would have to strip the tailgate to fit a new connecter/Harness
 

Holdup

Active Member
Aug 28, 2009
314
27
Kent
ITs the tail gate wiring harness connecter. you could seal it by using either clear silicon or tiger seal put under the plug that fits in to the square hole
I would think you would have to strip the tailgate to fit a new connecter/Harness
I ran some sealant between the white plug and the rubber part, even if it doesn’t seal it flush I’m hoping it at least acts as a barrier, I wasn’t sure if theres an easy way of exchanging it, might have to strip the panels off at the weekend and see how involved it is
 

SteveGSXR600K1

Active Member
May 6, 2017
600
200
From the pic I found below, you can see you've broken off the whole tab on the left-hand side. That's where you'll want to concentrate on sealing it. Do you think the broken tab is still in the recess and possibly glued back on?

1641370955912.png
 

SuperV8

Active Member
May 30, 2019
1,769
851
Tailgate grommet PN is 5G6971829B.
Doesn't look too expensive.
Would need to un-clip all the wiring harness connectors in the tailgate to feed the hardness through the new grommet.


1641376025859.png
 

Holdup

Active Member
Aug 28, 2009
314
27
Kent
From the pic I found below, you can see you've broken off the whole tab on the left-hand side. That's where you'll want to concentrate on sealing it. Do you think the broken tab is still in the recess and possibly glued back on?

View attachment 29133
I haven’t seen it anywhere, I sealed around the whole thing to be on the safe side, I’ve regularly checked the roof lining since doing the dash cam wiring and nothings shown up til now, I wash the car pretty much every 2 weeks as well.


Tailgate grommet PN is 5G6971829B.
Doesn't look too expensive.
Would need to un-clip all the wiring harness connectors in the tailgate to feed the hardness through the new grommet.


View attachment 29134
Thanks, do you know how difficult / time consuming it is? I was planning on taking the boot trim off at the weekend to try and work it out
 

SuperV8

Active Member
May 30, 2019
1,769
851
I haven’t seen it anywhere, I sealed around the whole thing to be on the safe side, I’ve regularly checked the roof lining since doing the dash cam wiring and nothings shown up til now, I wash the car pretty much every 2 weeks as well.


Thanks, do you know how difficult / time consuming it is? I was planning on taking the boot trim off at the weekend to try and work it out
Depends on how handy you are with a trim tool?
Never done it on the Leon, but on my Audi involved carefully prying off the tailgate trim, catching it on your face! and then unplug the various connectors, and then mopping up the blood split from your knuckles!!

Personally if it was me I would try gluing with silicone first.
You don't need to 'seal' it as such - you have only broken the plastic clip off. The clip just holds the rubber grommet snugly against the metal. Its the rubber which will be sealing - so you only need the glue to hold the grommet snugly against the metal at the broken end.
 

Holdup

Active Member
Aug 28, 2009
314
27
Kent
Depends on how handy you are with a trim tool?
Never done it on the Leon, but on my Audi involved carefully prying off the tailgate trim, catching it on your face! and then unplug the various connectors, and then mopping up the blood split from your knuckles!!

Personally if it was me I would try gluing with silicone first.
You don't need to 'seal' it as such - you have only broken the plastic clip off. The clip just holds the rubber grommet snugly against the metal. Its the rubber which will be sealing - so you only need the glue to hold the grommet snugly against the metal at the broken end.
It looks like the sealant I put on there may have worked, Its been raining all day and so far appears to be dry, I’ll keep an eye on it and pour some water round there one day
 
  • Like
Reactions: SuperV8

Fox1980

Active Member
Feb 14, 2025
10
3
Hi
Has anyone replaced the grommet, I want to do that rather than repair, I fitted a rear camera and broke the clips off.

I am wondering if the plugs have to be completely removed from each wire or do the individual plugs fit through the grommet.
 

LeylandVCDS

Active Member
Apr 20, 2015
499
288
Leyland, Lancashire
Hi
Has anyone replaced the grommet, I want to do that rather than repair, I fitted a rear camera and broke the clips off.

I am wondering if the plugs have to be completely removed from each wire or do the individual plugs fit through the grommet.
Have you actually broken the clips off, or have you just broken the white plastic clip frame? If this is the case you don't need to replace the whole grommet. That is unnecessary, and would mean disconnecting everything in the hatchback to get the wires through. It is a simple job to take the white clip out of the grommet and repair it. It may feel like the clips are broken and not clipping in because the white clip frame isn't secure because of a simple break

I broke mine on my last Leon whilst installing a rear camera. Remove the white clip from the rubber grommet. and hopefully you'll find a break in the frame - my break was on the longest side of the oblong frame. Superglue the break in the together, and then glue a short matchstick size length of hard plastic over the break on the side that sits uppermost. i used a piece cut from a plastic ruler. Make sure it is FULLY cured, gently replace in the rubber, and carefully click back into place. Silicon won't work, and looks a mess.
I repaired mine shortly after getting the car in 2019 and installing the camera, and it survived intact to when I sold it in 2023, when the repair was still strong enough to simply unclip it to remove the wiring before sale, and click back in place again
I did at first go down the silicon method, but it never sealed properly and I ended up with the storage well in the corner of the boot wet through. After repairing properly as above and removing all traces of the silicon, it was as dry as a bone from that day on.
 

Fox1980

Active Member
Feb 14, 2025
10
3
Have you actually broken the clips off, or have you just broken the white plastic clip frame? If this is the case you don't need to replace the whole grommet. That is unnecessary, and would mean disconnecting everything in the hatchback to get the wires through. It is a simple job to take the white clip out of the grommet and repair it. It may feel like the clips are broken and not clipping in because the white clip frame isn't secure because of a simple break

I broke mine on my last Leon whilst installing a rear camera. Remove the white clip from the rubber grommet. and hopefully you'll find a break in the frame - my break was on the longest side of the oblong frame. Superglue the break in the together, and then glue a short matchstick size length of hard plastic over the break on the side that sits uppermost. i used a piece cut from a plastic ruler. Make sure it is FULLY cured, gently replace in the rubber, and carefully click back into place. Silicon won't work, and looks a mess.
I repaired mine shortly after getting the car in 2019 and installing the camera, and it survived intact to when I sold it in 2023, when the repair was still strong enough to simply unclip it to remove the wiring before sale, and click back in place again
I did at first go down the silicon method, but it never sealed properly and I ended up with the storage well in the corner of the boot wet through. After repairing properly as above and removing all traces of the silicon, it was as dry as a bone from that day on.
Hi Leyland
I have broken the clips on the short sides of the grommet completely off.
I have ordered a new grommet, would I be able to swap the white frames over?, I would have to cut them to go around the wires however.
 

LeylandVCDS

Active Member
Apr 20, 2015
499
288
Leyland, Lancashire
Youll need to unplug the cables from within the hatchback then, then feed then through the grommet and then through the new one..... Unless you butcher the new plastic frame and repair as above. That's not a decision I would find easy to be honest.

Personally I'd try swapping over a plastic frame and trying to repair it before disturbing the wiring - it that doesn't work, then you've always got an undamaged frame at the other end of your existing grommet to swap to the new unit before changing the lot.

This might help - from ELSAWin - shows you where the wiring connectors are within the tailgate. Let us know how it goes please
 

Attachments

  • Exploded view - rear lid trim (top).pdf
    127.8 KB · Views: 40
  • Exploded view - rear lid trim (bottom).pdf
    129.8 KB · Views: 32
  • Removing and installing tailgate trim (top).pdf
    136.5 KB · Views: 36
  • Removing and installing rear tailgate trim (bottom).pdf
    164.1 KB · Views: 31
  • Removing and installing tailgate.pdf
    309.2 KB · Views: 32
Last edited:

Fox1980

Active Member
Feb 14, 2025
10
3
Youll need to unplug the cables from within the hatchback then, then feed then through the grommet and then through the new one..... Unless you butcher the new plastic frame and repair as above. That's not a decision I would find easy to be honest.

This might help - from ELSAWin - shows you where the wiring connectors are within the tailgate. Let us know how it goes please
Hi Leyland
Would I have to unpin the connectors to get through or are they small enough to fit through the grommet?

I am willing to do this as a proper repair, I just want to make sure I have all that is required before I start.

Many thanks for the help.
 

Fox1980

Active Member
Feb 14, 2025
10
3
Once they are unplugged they will go through the frame - they will have to go through to install in the factory
Will the actual connectors fit through the grommet or do the plugs need to be taken off the wires?
The hole in the bodywork is big enough but I was unsure if the connectors would go through the rubber tube.
 

Craig.

The artist formally known as ViperSlider
Mar 26, 2024
301
278
Cardiff, S.Wales
It will take literal minutes to swap out the broken part without needing to break the new part. Most of/all the wiring is plugged into a junction (item 3 in the pic below) just after the cable entry.

Earths and rear wash hose will be the only parts that will definitely need any attention and even that is so minimally difficult that considering any other way is just lazy lol.

You absolutely won't need to de-loom the entire tailgate lol.

Even if you did, there aren't many wires going into the tailgate when compared to something like a door or elsewhere. It will largely depend on which side you brought the wiring in through as to how much work it will be.

Take the trim off and have a look. The best way is the proper way. Take the time to do the repair correctly. Any other way is a bodge and carries a risk of failure. Not always but often.

Also, don't forget that this is a high risk entry point for water and the ends clipping in correctly ensure water resistance. Unless you really want a water feature in your boot/roof lining lol.

1740315093294.png
 

Fox1980

Active Member
Feb 14, 2025
10
3
It will take literal minutes to swap out the broken part without needing to break the new part. Most of/all the wiring is plugged into a junction (item 3 in the pic below) just after the cable entry.

Earths and rear wash hose will be the only parts that will definitely need any attention and even that is so minimally difficult that considering any other way is just lazy lol.

You absolutely won't need to de-loom the entire tailgate lol.

Even if you did, there aren't many wires going into the tailgate when compared to something like a door or elsewhere. It will largely depend on which side you brought the wiring in through as to how much work it will be.

Take the trim off and have a look. The best way is the proper way. Take the time to do the repair correctly. Any other way is a bodge and carries a risk of failure. Not always but often.

Also, don't forget that this is a high risk entry point for water and the ends clipping in correctly ensure water resistance. Unless you really want a water feature in your boot/roof lining lol.

View attachment 46839
Hi Viper
I also am going to replace the part as I want a proper repair.

My concern is once I unplug the cables from the connector in the tailgate will the connectors fit through the rubber tube or do I need to unpin the plugs to do this?

I know the main tailgate loom does bpt require removal.

I now have the replacement and was making sure I have all tools required before I start.

Regards
 

Fox1980

Active Member
Feb 14, 2025
10
3
Hi Viper
I also am going to replace the part as I want a proper repair.

My concern is once I unplug the cables from the connector in the tailgate will the connectors fit through the rubber tube or do I need to unpin the plugs to do this?

I know the main tailgate loom does bpt require removal.

I now have the replacement and was making sure I have all tools required before I start.

Regards
By the way it is the left hand grommet that is broken if that makes a difference.
 
  • Like
Reactions: Craig.

Craig.

The artist formally known as ViperSlider
Mar 26, 2024
301
278
Cardiff, S.Wales
Same side I used for my dash cam and my side of choice, loads of room. The side that will need to go through the rubber are the plugs so they're smaller and have plenty of length on them to bring them through 1 at a time.

1740316509561.jpeg


The 1 tool you will critically need are short thin rods, to help bring the plugs through.

1740316958902.jpeg
 
Last edited:
SEATCUPRA.NET Forum merchandise