Forum Model - SEAT Arosa (Darkside Development)

Jimbobcook

Moderator
Staff member
Moderator
Nov 24, 2012
6,149
2,531
So I fancied a nice challenge whilst on lockdown so contacted the fine people at Darkside Development with regards to copying their 1/4 Mile - 9.4611s @ 150.55mph SEAT Arosa... Here is a fine pic of it

Full spec can be found here - https://www.darksidedevelopments.co.uk/arosa-mk2-2-0-16v-common-rail/

Arosa Pre Santa Pod Testing_copy_1992x1328.jpg

New Record Santa Pod (1).jpg


As you can see it's got some minor modifications...

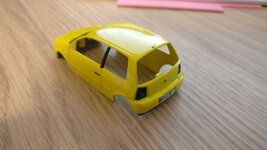
Darkside were even kind enough to send me their stock 1:43 Arosa for me to butcher...

IMG_20200307_125237_copy_1957x1100.jpg


So first thing first can I find wheels to match... nope... so off I went and found a 3D printer person and sent him the pictures I had... He then sent me a draft to say yes or no...

CustomWheels4.jpg


Once confirmed he sent a draft mould in gold so you can see the detail.

CustomWheels2.jpg


So wheels are now on the way...
Now I need to create a shopping list...

Rear springs and shocks
Rear wing
Tyres
Exhaust
Decals
Front Grill
Struts
Seat
NOS Canister
Cabling
Seat belt
Cage

Currently everything is on order bar the NOS and Decals which aren't that needed right now

Tried to get everything as close as possible to what's on the car but as you can imagine at 1:43 scale you cannot be that picky!

IMG_20200320_154934_copy_1957x3479.jpg


Next is colour... Luckily it's the same paint as i've previously used so that's all good, I need to work out how to file down the things that the DD version doesn't have like rear badge etc then get the bonnet cut for the vent and hole for exhaust as well...

I have all decals sent to my usual person but no quote as of yet but that was fun sorting out due to number and sizes, had to do some measuring
IMG_20200325_150739_copy_2320x1305.jpg


So now i've stripped the car to the metal to prep for paint removal, this has been the toughest one yet for trying not to get anything to snap as it's small haha but all good I think.
IMG_20200402_134959_copy_2320x1305.jpg


So before I start the interior I need to get the wheels here and cut in as the fronts are double the depth which should be fun.

I shall update this as and when something happens

Stay safe.
 

Attachments

  • IMG_20200402_135010_copy_2320x1305.jpg
    IMG_20200402_135010_copy_2320x1305.jpg
    308.8 KB · Views: 223

Jimbobcook

Moderator
Staff member
Moderator
Nov 24, 2012
6,149
2,531
Got the stock seats and gear stick out along with the tiny wheels stripped as the tyres may be re used for the rears.

Saved the rear axle in case that's needed instead of an easier to paint plastic one.

IMG_20200403_142755-2000x900.jpg


Also got some thin black plastic for the wing and front bumper so hopefully shouldn't be too hard to bend into place.

Also some darkening patches for lights etc so they still look like lights instead of painting them, better steering wheel and cables for inside.
IMG_20200403_143734-2000x900.jpg
 

Jimbobcook

Moderator
Staff member
Moderator
Nov 24, 2012
6,149
2,531
This is brilliant especially as it’s darksides arosa and the fact that I’m from Barnsley aswell best thing to come from Barnsley since kes :)
We aim to please lol its going to be a fun one considering it's missing most of the bumpers haha
 
  • Like
Reactions: Brad93

Jimbobcook

Moderator
Staff member
Moderator
Nov 24, 2012
6,149
2,531
So a few updates as work has been keeping me busy

Got the back seats out of the inside and mocked up a temp floor so it's smooth.
IMG_20200416_132143_copy_2000x900.jpg

IMG_20200416_132213_copy_2000x900.jpg


Then got a delivery of front tyres, gearstick, seat and bonnet fasteners
IMG_20200416_132204_copy_2000x900.jpg

IMG_20200416_132221_copy_2000x900.jpg

IMG_20200416_132157_copy_2000x900.jpg


Hoping to strip the paint this weekend, then I can get onto creating the internal cage and getting the tyres mock fitted on the front as I assume there will be some modifications needed as they're quite deep.
 
  • Like
Reactions: Jairm88

Jimbobcook

Moderator
Staff member
Moderator
Nov 24, 2012
6,149
2,531
So not much has happened as I'm struggling to get any paint stripper online as I'm assuming the world wants to decorate haha so may try the wife's acetone as that gets rid of fake nails so should do something for I hope...

Also today I got the diamond cutting discs for making the needed cuts on the bodywork as its quite thick so the dremel will be coming out this week at some point I hope.
IMG_20200427_130102_copy_2000x1500.jpg


Then this stuff is ready for primer and stripping... Lots of yellow!
IMG_20200427_130147_copy_2000x1500.jpg
 

Jimbobcook

Moderator
Staff member
Moderator
Nov 24, 2012
6,149
2,531
For those interested in what's involved with a build like this as its not just a bit of blu tac and luck lol

Got me a new box for the build
IMG_20200428_170325_copy_2000x1500.jpg


Then you need a dremel (or cheaper version like me haha) with drill bits
IMG_20200428_170644_copy_2000x2666.jpg


Then generic tools and plastics
IMG_20200428_170633_copy_2000x2666.jpg

IMG_20200428_170831_copy_2000x1500.jpg


Also thought about the exhaust for this car which pokes out the bonnet instead of the butt end of the car... As its a dirty diesel and its pretty dirty maybe black smoke out the exhaust...? Or not who knows.
IMG_20200428_165305_copy_2000x1500.jpg
 

Legojon

I only wanted a remap
Staff member
Moderator
Jul 7, 2015
5,284
2,713
How long did it take you to get that many curly black hairs for the smoke?
 
  • Haha
Reactions: Woody_72

AndrewJB

Friend to SEAT UK & Cupra Racing
Aug 16, 2007
11,211
484
Maranello
Jimbob who makes your decals? waterslides im guessing? my SEAT WTCC/BTCC supplier is a pain in the rear end need a new supplier. Also need a MK2 Sueprcopa splitter and top air intake making for next project.
 

Jimbobcook

Moderator
Staff member
Moderator
Nov 24, 2012
6,149
2,531
Jimbob who makes your decals? waterslides im guessing? my SEAT WTCC/BTCC supplier is a pain in the rear end need a new supplier. Also need a MK2 Sueprcopa splitter and top air intake making for next project.
I use whoever is willing to do them for me, normally just a hobbyist but getting them done is slow and mildly painful. My current one is in the states so not a lot is happening haha If he comes good on these ones i'll drop you a link. Just make everything from scratch it's easier haha
 

Jimbobcook

Moderator
Staff member
Moderator
Nov 24, 2012
6,149
2,531
Well today was time to try something new with some diamond coated discs for my rotary tool. As this model needs alot of body work taking off I decided to try the big bits whilst testing out my skills...

So needed to take off everything below the rear lights and the bottom of the rear bumper. It needs tidying up for sure but it looks OK to me. I also took down the rear SEAT badge as the original doesn't have it.

IMG_20200502_202810_copy_1500x1125.jpg

IMG_20200502_202832_copy_1500x2000.jpg
 
  • Like
Reactions: Sharpy

Jimbobcook

Moderator
Staff member
Moderator
Nov 24, 2012
6,149
2,531
I know it's been forever in updating this thread it's been a busy lock down, myself and the wife sold and got another car, I got another job, re did the whole garden and still worked as normal haha

So managed to get some stuff done over the past few days with a completion in sight now i'm off for the week.

Managed to strip the current paint off


Then made some mock rear wing and boot floor


Just finished the hole for the exhaust (mocked up with tube) and vent in the back left of the bonnet, both need tidying up


Then filled in the holes from the Ariel and wing mirrors


Now most things have been primed in white ready for either black or yellow base coat before assembly of bits, while everything drys etc i'll get on with the roll cage and interior bits, also need to work out a way to paint a rear shock and spring thats about 5mm tall...

More bits to come!
 
SEATCUPRA.NET Forum merchandise