Hi guys and gals,
I recently fitted a BlackVue dashcam to my pride and joy, figured I'd show you how I did it in case someone needs any help.
Depending on what kind of kit you've brought, you can skip some of this guide. I purchased a BlackVue DR900 series which comes with both a front and rear camera, so I will be detailing how I fitted both to my car.
If you only need to know how to fit a front camera, then scroll down to the appropriate section.
Rear Cam
To begin with, I started with the rear cam as this is the longest part as you have to route the wires along the car to the front window screen. I also opted to wire the cam in through the cable routing for the boot lid, so that when the boot is opened, the cam stays attached to the boot and moves out the way. I've had a cam fitted to the roof lining before with a previous car and found it got in the way whenever I need to put the seats down and fill the car with stuff.
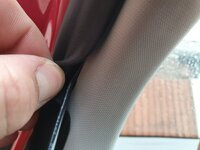
First off, I un-clipped the rubber boot that routes the cables between the chassis and the boot lid. These are held in place with a plastic clip on the inside. Be careful not to damage the tabs on the sides of this clip, as the pressure it holds the rubber down which prevents water ingress into the roof lining. I used the nearside (Passenger) one to feed my cables through. I used a flat bladed screwdriver to pop the clip up and out of the recess it sits in:

Next, I pulled down the rear of the roof lining so I could insert my cable. It tucks in under the seal for the boot and easily pulls away. You don't need to put it way down, just enough to be able to get the cable into the hole underneath:

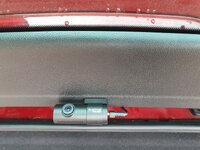
Then, you need to feed the cable through this hole, and out of the hole you uncovered when you un-clipped the rubber boot housing the boot lid cables:

Now you can un-clip the rubber boot from the boot lid. It's the same process as the end attached to the car body. Again a flat bladed screwdriver can be used to do this:

Next, you have to feed the cable into the rubber boot. At first this can be tricky as it is a tight fit and takes some time and patience, but it can be done, trust me. I found it helpful to grip the cable from the outside of the rubber boot and slide it up, stretching the rubber as I did it, while pushing the cable in from the outside. Let go and repeat until it pop out the other end:

Once you have managed to get the cable through, un-clip the plastic trim around the top of the rear window. It is just held on with clips that require a good tug to encourage them free. Once you've done this, you will have access to where you can feed the camera cable. This is another tricky part as you have to guide the cable through the hole below into the hole above. I found rotating the cable helped me guide it into position:

The cable is in the top left of the hole here:

Once this is done, feed the cable out to where you want to position the camera, mount the camera to the plastic trim and refit the trim, hiding the cable beneath it. The trim will simply push back into place; you may need to bang it to get it to clip back in fully; I did:

The next task is to route the cables from the rear to the front. To do this I used a trim removal tool provided with the dashcam kit, but a clean flat blade screwdriver with also suffice. You can see I have already begun to route it along the edge of the roof lining:

Now you just need to basically push the cable into the gap along the roof lining and other trim parts. You can use the trim tool or screwdriver to help push it into the gap, but be careful not to damage the cable. When you get to the rear door, you can again pry the lining down from the door seal and push the cable underneath to tuck it neatly away:


Do this all the way to the front A pillar next to the window screen. Once here, it is time to mount the front camera and power cabling. Leave the cable here at this point as you now need to route the power cable in the same area.
Front Camera
Now it is time to mount the front camera and route the required cables. I mounted mine behind the rear view mirror and routed the cables under the plastic trim for the rain sensor. This trim just pulls off, starting from the wider part at the edge of the roof lining, and slides out and off the mirror mounting area:

Next, route the power cable under the edge of the roof lining towards the A pillar on the passenger side. If you fitted a rear cam, now is the time to route the rear cable along this same edge and towards the cam, effectively working backwards from the power cable from the front cam. From where you left the cable after routing it along the front door, you can push it under the roof lining towards the front window until it comes out the other side, then pull any excess cable through.
The roof lining along the window screen edge again just pulls away, so make sure to tuck the cable in fairly deep to enable it to push back into position without any wires protruding from the edge. If you have excess cable from the rear cam, you can either cut it out and rejoin if you choose to, or tuck it away under the roof lining here. I didn't have much excess left, so I simply tucked it out of sight under the roof lining. Another option would be to feed the excess cable down the A pillar and back up if you have alot of excess and don't to cut it out or want to have loads of cable stuffed under the roof lining - the choice is upto you.
Once you have done this, you need to feed the power cable under the A pillar:

You can un-clip the A pillar trim if you wish, however I managed quite easily to just push it under down the length of the trim where the door seal sits:

Once done, you now need to remove the side panel from the dash, it pulls away. Route your cable until it reaches this area:

Now this part depends on how you are going to wire in your camera; there are 3 ways you can do this:
1. I hardwired mine in using a power magic pro box, which monitors the car's battery voltage and cuts power should it get low. This allows the cam to operate in parking mode if it has this feature. If you are going to do this too, then you need to wire the magic pro box into a switched ignition feed, a perm live feed, and an earth. Under the passenger foot well you can find a main perm feed to tap into, you will have to remove the lower trim to do this. It is held on with a couple of torx screws and just pulls away once these are removed. You'll see a thick red cable to the left. I cut away the plastic sheathing and soldered my feed onto it, then recovered the cable using electrical tape. If you choose to do this, be careful as this is a permanently live cable. If you wish, you can disconnect the battery before doing so.
You can use fuse number 40 for a switched ignition live. The fuse box can be found behind the glove box compartment, which can be accessed by pushing in the sides of the glove box when it's opened. It will drop down, giving you access to the fuses. Fuse socket 40 is circle in red:

I used a piggy back fuse holder such as this one:

For a ground feed, there is a bolt behind the side panel that earths to the car body. I haven't got a picture of this, but you'll be able to see a bolt anchored to the metal frame of the dash. This will suffice.
2. This method is the same as above, but omits the use of a voltage switch. This will turn the cam on and off with the ignition. How you do this depends on how the dash cam came. If it has a cigarette socket attached, you need to get an adaptor to wire it in with. Something like this would work and can be found on ebay:

If it came with a hard wiring kit, then you should have 2 wires you need to connect, a live feed and a ground. The process is the same as above, ground the cable to a bolt that connects to the body shell, and the live feed to fuse 40 behind the glovebox.
3. If your cam comes with a cigarette socket attachment, you can just feed it behind the lower passenger foot well and out to the cabin, allowing you to plug it into the centre cig socket. Personally I feel this would be a bad way to do it, as the cable will always be around the foot well area. You could hide it away behind the dash and feed it along the centre console to the cig socket. This would require a fair amount of work to remove the required trim however, and is out of scope for the purpose of this guide.
Once all this is done, you just need to replace and trim parts/panels you removed, and setup your new camera. Also check that all door seals are properly aligned & seated when you replaced and trim.
Now you can admire your hard work, all done!

Any questions, don't hesitate to ask or PM me.
Best of luck,
Lozzy.
I recently fitted a BlackVue dashcam to my pride and joy, figured I'd show you how I did it in case someone needs any help.
Depending on what kind of kit you've brought, you can skip some of this guide. I purchased a BlackVue DR900 series which comes with both a front and rear camera, so I will be detailing how I fitted both to my car.
If you only need to know how to fit a front camera, then scroll down to the appropriate section.
Rear Cam
To begin with, I started with the rear cam as this is the longest part as you have to route the wires along the car to the front window screen. I also opted to wire the cam in through the cable routing for the boot lid, so that when the boot is opened, the cam stays attached to the boot and moves out the way. I've had a cam fitted to the roof lining before with a previous car and found it got in the way whenever I need to put the seats down and fill the car with stuff.
First off, I un-clipped the rubber boot that routes the cables between the chassis and the boot lid. These are held in place with a plastic clip on the inside. Be careful not to damage the tabs on the sides of this clip, as the pressure it holds the rubber down which prevents water ingress into the roof lining. I used the nearside (Passenger) one to feed my cables through. I used a flat bladed screwdriver to pop the clip up and out of the recess it sits in:
Next, I pulled down the rear of the roof lining so I could insert my cable. It tucks in under the seal for the boot and easily pulls away. You don't need to put it way down, just enough to be able to get the cable into the hole underneath:
Then, you need to feed the cable through this hole, and out of the hole you uncovered when you un-clipped the rubber boot housing the boot lid cables:
Now you can un-clip the rubber boot from the boot lid. It's the same process as the end attached to the car body. Again a flat bladed screwdriver can be used to do this:
Next, you have to feed the cable into the rubber boot. At first this can be tricky as it is a tight fit and takes some time and patience, but it can be done, trust me. I found it helpful to grip the cable from the outside of the rubber boot and slide it up, stretching the rubber as I did it, while pushing the cable in from the outside. Let go and repeat until it pop out the other end:
Once you have managed to get the cable through, un-clip the plastic trim around the top of the rear window. It is just held on with clips that require a good tug to encourage them free. Once you've done this, you will have access to where you can feed the camera cable. This is another tricky part as you have to guide the cable through the hole below into the hole above. I found rotating the cable helped me guide it into position:
The cable is in the top left of the hole here:
Once this is done, feed the cable out to where you want to position the camera, mount the camera to the plastic trim and refit the trim, hiding the cable beneath it. The trim will simply push back into place; you may need to bang it to get it to clip back in fully; I did:
The next task is to route the cables from the rear to the front. To do this I used a trim removal tool provided with the dashcam kit, but a clean flat blade screwdriver with also suffice. You can see I have already begun to route it along the edge of the roof lining:
Now you just need to basically push the cable into the gap along the roof lining and other trim parts. You can use the trim tool or screwdriver to help push it into the gap, but be careful not to damage the cable. When you get to the rear door, you can again pry the lining down from the door seal and push the cable underneath to tuck it neatly away:
Do this all the way to the front A pillar next to the window screen. Once here, it is time to mount the front camera and power cabling. Leave the cable here at this point as you now need to route the power cable in the same area.
Front Camera
Now it is time to mount the front camera and route the required cables. I mounted mine behind the rear view mirror and routed the cables under the plastic trim for the rain sensor. This trim just pulls off, starting from the wider part at the edge of the roof lining, and slides out and off the mirror mounting area:
Next, route the power cable under the edge of the roof lining towards the A pillar on the passenger side. If you fitted a rear cam, now is the time to route the rear cable along this same edge and towards the cam, effectively working backwards from the power cable from the front cam. From where you left the cable after routing it along the front door, you can push it under the roof lining towards the front window until it comes out the other side, then pull any excess cable through.
The roof lining along the window screen edge again just pulls away, so make sure to tuck the cable in fairly deep to enable it to push back into position without any wires protruding from the edge. If you have excess cable from the rear cam, you can either cut it out and rejoin if you choose to, or tuck it away under the roof lining here. I didn't have much excess left, so I simply tucked it out of sight under the roof lining. Another option would be to feed the excess cable down the A pillar and back up if you have alot of excess and don't to cut it out or want to have loads of cable stuffed under the roof lining - the choice is upto you.
Once you have done this, you need to feed the power cable under the A pillar:
You can un-clip the A pillar trim if you wish, however I managed quite easily to just push it under down the length of the trim where the door seal sits:
Once done, you now need to remove the side panel from the dash, it pulls away. Route your cable until it reaches this area:
Now this part depends on how you are going to wire in your camera; there are 3 ways you can do this:
1. I hardwired mine in using a power magic pro box, which monitors the car's battery voltage and cuts power should it get low. This allows the cam to operate in parking mode if it has this feature. If you are going to do this too, then you need to wire the magic pro box into a switched ignition feed, a perm live feed, and an earth. Under the passenger foot well you can find a main perm feed to tap into, you will have to remove the lower trim to do this. It is held on with a couple of torx screws and just pulls away once these are removed. You'll see a thick red cable to the left. I cut away the plastic sheathing and soldered my feed onto it, then recovered the cable using electrical tape. If you choose to do this, be careful as this is a permanently live cable. If you wish, you can disconnect the battery before doing so.
You can use fuse number 40 for a switched ignition live. The fuse box can be found behind the glove box compartment, which can be accessed by pushing in the sides of the glove box when it's opened. It will drop down, giving you access to the fuses. Fuse socket 40 is circle in red:
I used a piggy back fuse holder such as this one:
For a ground feed, there is a bolt behind the side panel that earths to the car body. I haven't got a picture of this, but you'll be able to see a bolt anchored to the metal frame of the dash. This will suffice.
2. This method is the same as above, but omits the use of a voltage switch. This will turn the cam on and off with the ignition. How you do this depends on how the dash cam came. If it has a cigarette socket attached, you need to get an adaptor to wire it in with. Something like this would work and can be found on ebay:
If it came with a hard wiring kit, then you should have 2 wires you need to connect, a live feed and a ground. The process is the same as above, ground the cable to a bolt that connects to the body shell, and the live feed to fuse 40 behind the glovebox.
3. If your cam comes with a cigarette socket attachment, you can just feed it behind the lower passenger foot well and out to the cabin, allowing you to plug it into the centre cig socket. Personally I feel this would be a bad way to do it, as the cable will always be around the foot well area. You could hide it away behind the dash and feed it along the centre console to the cig socket. This would require a fair amount of work to remove the required trim however, and is out of scope for the purpose of this guide.
Once all this is done, you just need to replace and trim parts/panels you removed, and setup your new camera. Also check that all door seals are properly aligned & seated when you replaced and trim.
Now you can admire your hard work, all done!
Any questions, don't hesitate to ask or PM me.
Best of luck,
Lozzy.