
-
Hey Guest👍👎 We're looking for reviews of your local CUPRA or SEAT Dealership - it's quick and easy to do: Leave a review now
Manifold Vacuum Actuator...Car is now repaired!
- Thread starter LukeFR
- Start date
You are using an out of date browser. It may not display this or other websites correctly.
You should upgrade or use an alternative browser.
You should upgrade or use an alternative browser.
Well, I just finished changing it. The biggest problem with our FR's is taking off the EGR valve because of one stupid bolt which you can see here:


After that it's few manifold bolts which are quite easy to take off. It's good to know that one of the bolts is in the intake itself and with all the black stuff in it, you have to dig it out. It took me a while to find it to be honest.
When manifold is off, it is piss easy to change the actuator. It is held on two bolts.
To change the actuator you will need:
- actuator
- manifold gasket
- 2 Egr gaskets
and some cleaning stuff. Use rubber gloves when you clean the EGR.
If you want I can get all the part numbers you need when I get the invoice for last gasket.
I'm not sure if it helped yet because I have to wait for one EGR gasket.
TPS should have it tomorrow so will get on it early.
I will also be changing N75 valve but I didn't put it on yet. Want to see if the actuator changes anything.
BTW. what issues do you have with the car?
Last edited:
Thanks for the informative post mate, hopefully you are getting same issues as me.
I have had the car hit limp mode a few times and glow plug light flashing. Upon checking VCDs, I got the following code
000665 - Boost Pressure Regulation
P0299 - 006 - Control Range Not Reached - Intermittent
From reading on Pistonheads, a technician put that the 90% of cases it's the actuator. The car feels completely dead and no boost until 2,500rpm sometimes in 5th, at 2,000rpm it's completely dead no power and then limp mode hits.
Same issue as you?
Luke
TIt is difficult to accelerate smoothly in 1st and 2nd gear and overall car feels "jerky. Couple of days ago it went to limp mode when I floored it. Scanned it with vcds and it has exactly the same error as yours
--------------
Address 01: Engine Labels: 03G-906-018-BMN.clb
Part No SW: 03G 906 018 DT HW: 03G 906 018 DT
Component: R4 2.0l PPD1.2 G 0431
Revision: --H42--- Serial number: SEZ7Z0G3824196
Coding: 0050072
Shop #: WSC 04941 785 00200
VCID: 7AF103AB357F40C86EF
1 Fault Found:
000665 - Boost Pressure Regulation
P0299 - 006 - Control Range Not Reached - Intermittent
Freeze Frame:
Fault Status: 00000001
Fault Priority: 5
Fault Frequency: 1
Reset counter: 39
Date: 2000.00.00
Time: 05:44:48
Freeze Frame:
RPM: 2944 /min
Torque: 344.0 Nm
Speed: 101.0 km/h
92.04 %
Voltage: 14.46 V
Pressure: 2449.5 mbar
Pressure: 1959.6 mbar
Readiness: N/A
I checked all the hoses going from/to N75 valve and cant find anything wrong with them. Pressure actuator seems to move smoothly but feels a bit sticky. There is a valve/sensor just before the pressure actuator which I will have a look at if it isn't better.
Well I guess that is good news we have both got the exact same error, so that's put my mind at rest that somebody else is having same issues!
Did you say you'll test tomorrow? I may hang on until you have reported back to how yours is. All my pipes look OK too, no leaks. If you read this thread http://www.pistonheads.com/gassing/topic.asp?t=1050614 it makes it sound like that issue too.
Did you say you'll test tomorrow? I may hang on until you have reported back to how yours is. All my pipes look OK too, no leaks. If you read this thread http://www.pistonheads.com/gassing/topic.asp?t=1050614 it makes it sound like that issue too.
Yes, hopefully I will get the ordered gasket tomorrow so that I can fit EGR back on (which will take me a while with this stupid bolt). Will take it for a drive straight after and see if there is a change. That obviously if I haven't screwed anything up and my car starts at all 
Sure it will be fine, please let me know if you don't mind?
Were you finding boost wasn't kicking in as normal.
Were you finding boost wasn't kicking in as normal.
Yeah mine plays up when putting down smoothly too, does seem like same issue.
Yeah apparently you can tell if they kaput!
Yeah apparently you can tell if they kaput!
Well, finished with the egr valve today.
Been driving it for close to an hour with different speeds and both smooth and rapid acceleration. I can actually move the car in first gear smoothly without it trying to die. It does feel slightly jerky once in a while but it is a huge improvement on what it was. I am now going to have it scanned again and then change the n75 valve and see if it improves further. I am happy with how it is already.
Sent from my GT-I9505 using Tapatalk 2
Great thread.
I'll get mine changed too (got p0299 code too), although symptoms are a bit different, i'll get a look at the egr + it sounds like its cheep fix to try.
How easy would you say it is to change for a hobbisit? I'm happy doing brakes etc, have changed burried flap motors on an a4 and replaced a snapped clutch pedal on a TT, so not a complete novice, but far from competant. The list of parts numbers would be great.
Hi. It is pretty straight forward. The only problem is one bolt on egr valve. There really is no access to it. I have undone the remaining bolts first and started moving egr so that the last bolt loosens up and you can undo it with your hand. Screwing it back on is another issue. Mine isnt tighten enough so will need to have a look at it and try to do it somehow.
Manifold is very easy to take off and actuator itself is held on 2 screwes.
You will need spline set as well. I will post all part numbers tomorrow evening.
Also changed the N75 and just done 120 miles after. Car runs like new
Sent from my GT-I9505 using Tapatalk 2
Manifold is very easy to take off and actuator itself is held on 2 screwes.
You will need spline set as well. I will post all part numbers tomorrow evening.
Also changed the N75 and just done 120 miles after. Car runs like new
Sent from my GT-I9505 using Tapatalk 2
Thanks for all the information then mate, seems like that has cured your issue.
Do you think it was a mixture of both then? How much was the N75 valve?
Do you think it was a mixture of both then? How much was the N75 valve?
Update Gentleman.
After a fail yesterday with all the issues coming back after getting from MK to Sheffield, I had a look at my engine today and found that stupid EGR bolt being undone.
I've decided that it has to be sorted out before I go back to MK but first needed to find a way to get access to the bolt.
Started stripping engine from some parts (in the middle of Sheffield centre) and about 30 minutes later found the solution!
Fitted everything back, also changed back my N75 to the old one (just for few days) and went for a drive in Sheffield. All ok, so decided to go home.
120 miles later with a lot of start/stop traffic and additional test drive in MK and all seems fine!
I will report back again in few days if it still work how it should.
For the time being here is a little write up on how to remove EGR valve, inlet manifold and replace the actuator on a SEAT LEON 2.0 TDI PD 170 .
Parts needed :
- Actuator part no. 03G 129 061C £9.95 + VAT
- Manifold to engine gasket part no. 03G 129 717C £8.85 + VAT
- EGR to manifold gasket part no. 03G 131 547C £4.59 + VAT
- EGR to pipe gasket part no. 069 131 547D £2.58 + VAT
Plus if you decide to split the EGR from ASV (don't see the point) you will need:
- seal ASV to EGR part no. N90978701 £3.09 + VAT
Tools needed:
- 11mm socket on an extension (20 cm extension should do)
- Spline bit set
- Torx bit set
- Heavy duty rubber gloves
- EGR cleaner
This is for guidance only. I am not a mechanic and am not responsible for any car damages or injuries during and as a result of this operation.
Please work on a cool engine to avoid burns.
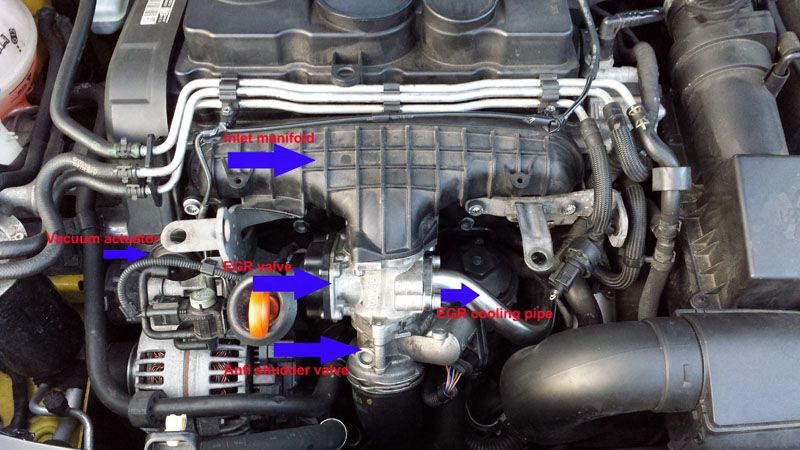
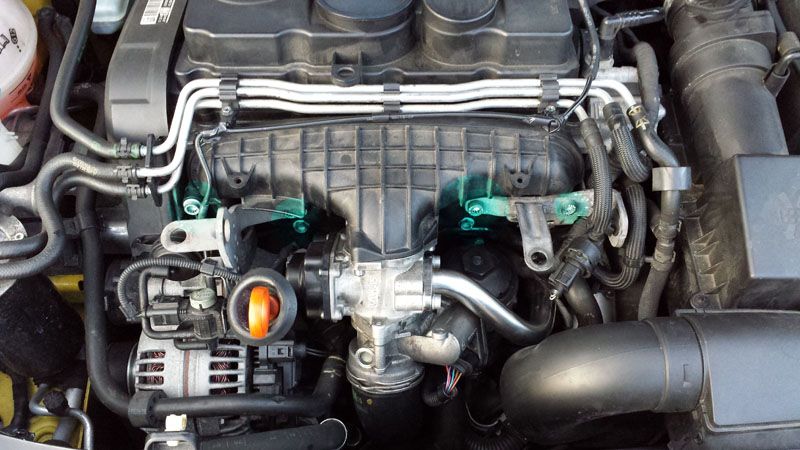
First step is to take the engine cover off. When you do that, you should see something like this:
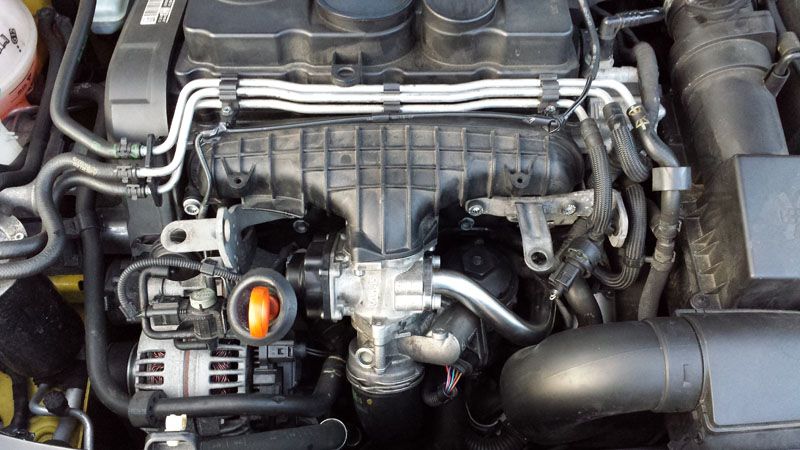
For total newbies (just like me) here are items of interest:
Second step is to remove the air intake box and pipe. It is a simple click in/out operation. No screws. You need to remove 3 parts in total. The pipe itself has clicks on both sides at the bottom of it.
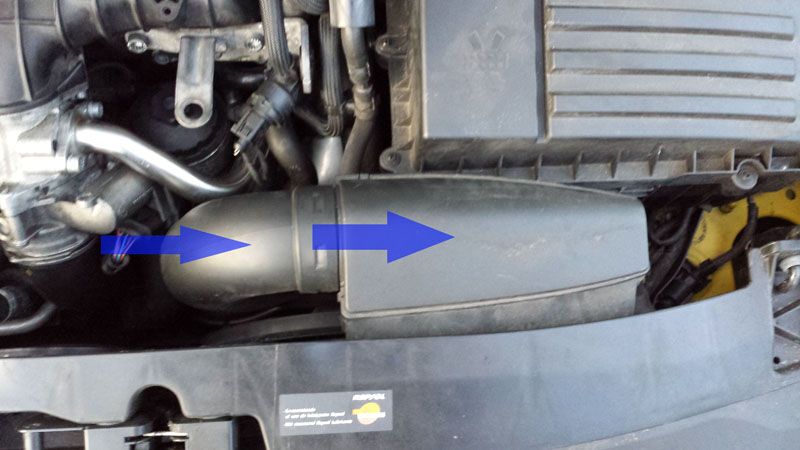
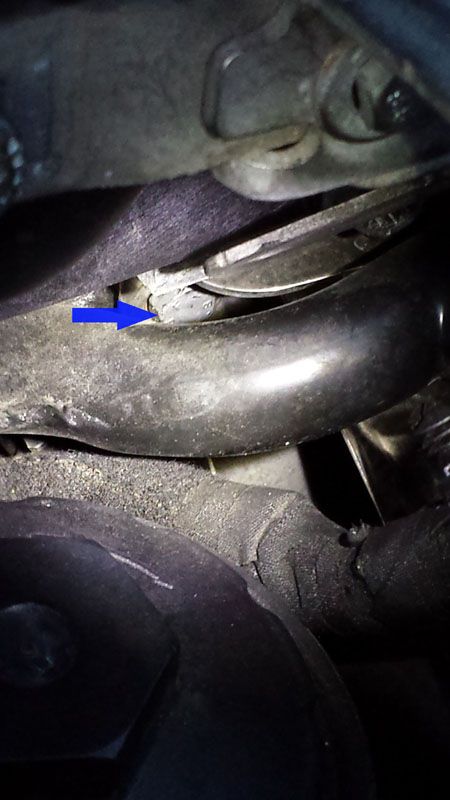
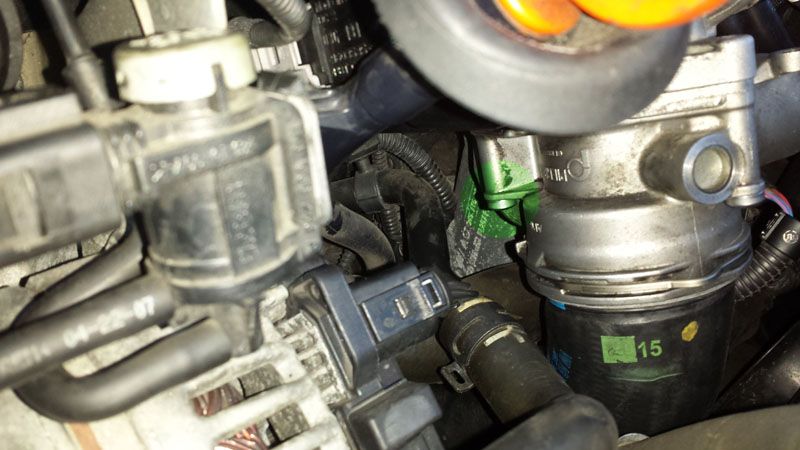
When removed, you need to locate one 11mm bolt which attaches the cooling pipe to engine block. It is just a mount so that the pipe doesn't move. This bolt is crucial to remove and put back on the EGR valve. It is hard to find but easy to get out if you have a 11mm socket on extension. You will need to go between the rubber pipes and make sure your engine is cold, otherwise you will burn your hand on oil filter.
Here is a picture of the bolt. (couldn't get better one). On the next picture I marked the area to look for it with a yellow arrow. If you follow the cooling pipe you should locate it. Using small torch advisable.
Next move is to remove the EGR valve. I chose to remove it together with ASV and cleaned both of them.
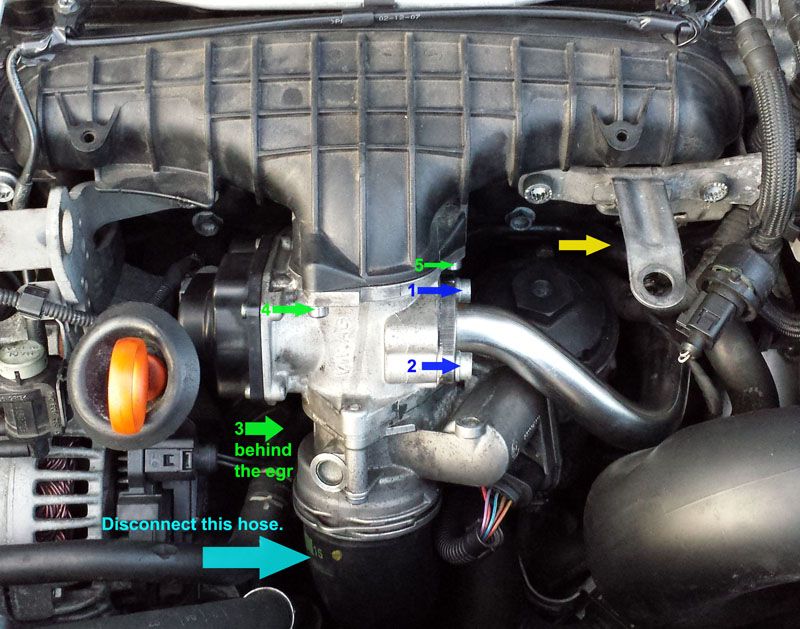
First, disconnect the hose. It is held on a clip which you need to pull out.
Use a flat head screwdriver to do it. Also, I advise to cover the pipe for the time of remaining work, so that you don't drop a spline bit inside Yes, you guessed it, I did!
Unplug 2 plugs from the EGR. One on the left and one on the right. Use a flathead screwdriver again.
When done, remove spline bolts 1 & 2 which attach cooling pipe to EGR.
There is a gasket between, so make sure you take it off (you should have new one to replace it with later).
Next, remove bolts 3, 4 and 5. Do the 3rd one behind the EGR valve first to make your life easier. Here is a pic of where it is exactly. Marked with green:
Now you can remove the EGR together with ASV. It's time to put your gloves on and get it cleaned. When finished, leave it somewhere where isn't dusty (inside the car?) and move on to removing the inlet manifold.
It is held by 2 small star screws on top(sorry, didn't mark them on the pic) and a total of 10 large spline bolts.
9 of them are easily visible. The 10th one is located inside the manifold intake itself. You will have to dig it out with your finger because it will be covered in soot. It is located at the bottom of the inlet pipe.
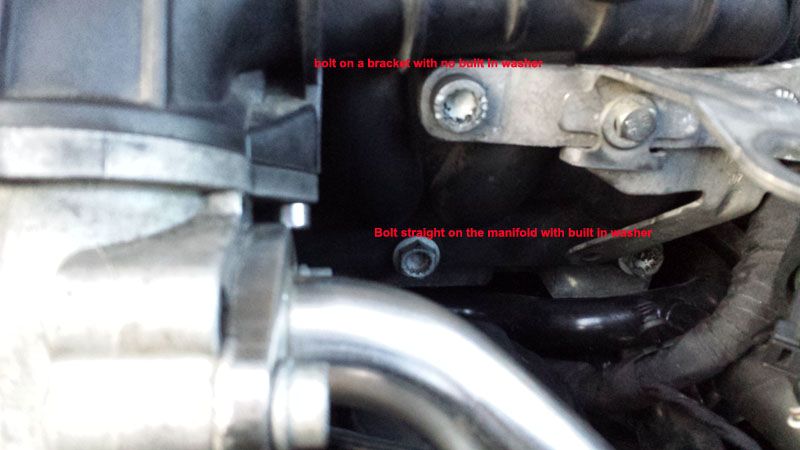
Bottom bolts are short and top ones long.
There are also two different types of bolts. The difference is in bolt head. If there is a bracket between the bolt head and manifold, there will be "no built in washer".
If there is no bracket it will have additional "built in washer".
Here is a pic of what I mean.
When putting back together, if bolt doesn't go fully in easily, it means that it shouldn't be there! Easiest thing is to arrange bolts in the same order as they are on the manifold.
Now, your manifold comes off easily when all bolts are removed.
Together with it, comes the actuator which you want to replace.
It is attached to the manifold by 2 bolts. Before you remove them, have a good look how it all sits together. One of the bolts holds a small metal plate which (i think) works as a stop point to the actuator. You will need to put it in the same way on the new actuator.
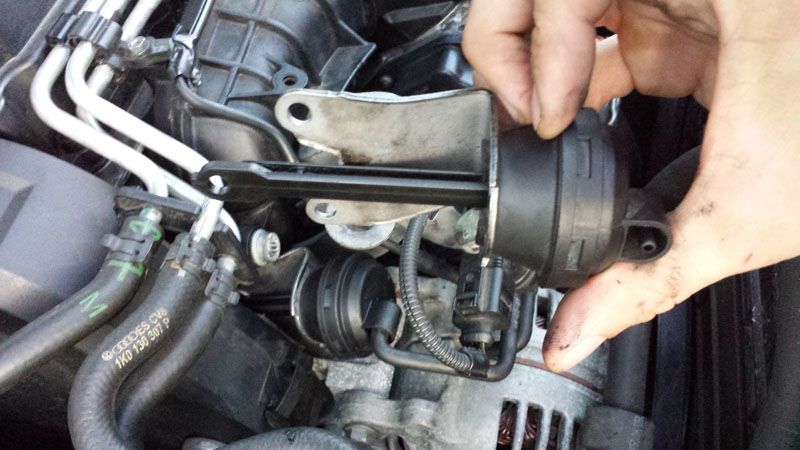
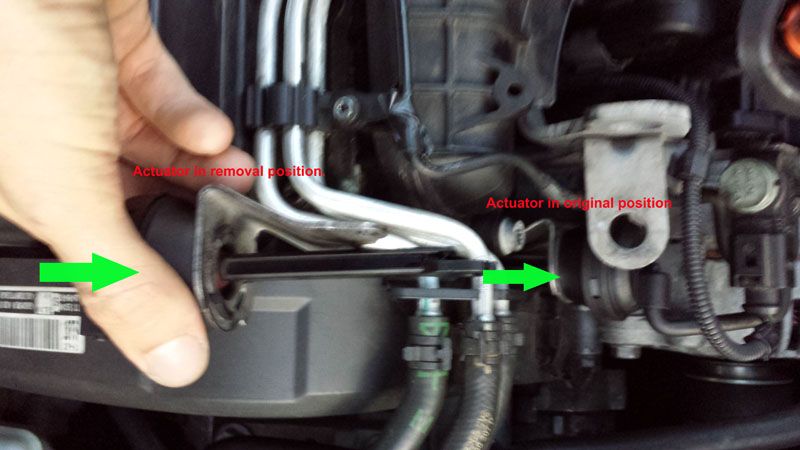
When you undo the bolts, you will need to rotate the actuator 180 degrees to remove it.
Don't bend it or force it in any way. It will come off easily. Then you put the new actuator on in the same position and rotate it 180 degrees to it's original position.
See this pic to see what I mean:
Now when all is done, you attach the actuator to the manifold. Change the manifold gasket (red one) and bolt it back on to the engine.
Next step is to put EGR and ASV back on. Make sure you change the gasket between them and manifold. Fit the bolts 3, 4 & 5 which hold EGR in place.
Connect both plugs and the pipe at the bottom.
Now, before you fit the bolts 1&2 which hold cooling pipe on EGR, fit the 11mm bolt which holds the cooling pipe bracket to the engine block. Stick some insulation tape in the socket so that you don't drop the bolt while moving between the rubber pipes.
When done, do the bolts 1&2 and remember to put new gasket on.
All is left is to fit the air inlet and you're done.
Your car should run like new.
GOOD LUCK
After a fail yesterday with all the issues coming back after getting from MK to Sheffield, I had a look at my engine today and found that stupid EGR bolt being undone.
I've decided that it has to be sorted out before I go back to MK but first needed to find a way to get access to the bolt.
Started stripping engine from some parts (in the middle of Sheffield centre) and about 30 minutes later found the solution!
Fitted everything back, also changed back my N75 to the old one (just for few days) and went for a drive in Sheffield. All ok, so decided to go home.
120 miles later with a lot of start/stop traffic and additional test drive in MK and all seems fine!
I will report back again in few days if it still work how it should.
For the time being here is a little write up on how to remove EGR valve, inlet manifold and replace the actuator on a SEAT LEON 2.0 TDI PD 170 .
Parts needed :
- Actuator part no. 03G 129 061C £9.95 + VAT
- Manifold to engine gasket part no. 03G 129 717C £8.85 + VAT
- EGR to manifold gasket part no. 03G 131 547C £4.59 + VAT
- EGR to pipe gasket part no. 069 131 547D £2.58 + VAT
Plus if you decide to split the EGR from ASV (don't see the point) you will need:
- seal ASV to EGR part no. N90978701 £3.09 + VAT
Tools needed:
- 11mm socket on an extension (20 cm extension should do)
- Spline bit set
- Torx bit set
- Heavy duty rubber gloves
- EGR cleaner
This is for guidance only. I am not a mechanic and am not responsible for any car damages or injuries during and as a result of this operation.
Please work on a cool engine to avoid burns.
First step is to take the engine cover off. When you do that, you should see something like this:
For total newbies (just like me) here are items of interest:
Second step is to remove the air intake box and pipe. It is a simple click in/out operation. No screws. You need to remove 3 parts in total. The pipe itself has clicks on both sides at the bottom of it.
When removed, you need to locate one 11mm bolt which attaches the cooling pipe to engine block. It is just a mount so that the pipe doesn't move. This bolt is crucial to remove and put back on the EGR valve. It is hard to find but easy to get out if you have a 11mm socket on extension. You will need to go between the rubber pipes and make sure your engine is cold, otherwise you will burn your hand on oil filter.
Here is a picture of the bolt. (couldn't get better one). On the next picture I marked the area to look for it with a yellow arrow. If you follow the cooling pipe you should locate it. Using small torch advisable.
Next move is to remove the EGR valve. I chose to remove it together with ASV and cleaned both of them.
First, disconnect the hose. It is held on a clip which you need to pull out.
Use a flat head screwdriver to do it. Also, I advise to cover the pipe for the time of remaining work, so that you don't drop a spline bit inside
Yes, you guessed it, I did!Unplug 2 plugs from the EGR. One on the left and one on the right. Use a flathead screwdriver again.
When done, remove spline bolts 1 & 2 which attach cooling pipe to EGR.
There is a gasket between, so make sure you take it off (you should have new one to replace it with later).
Next, remove bolts 3, 4 and 5. Do the 3rd one behind the EGR valve first to make your life easier. Here is a pic of where it is exactly. Marked with green:
Now you can remove the EGR together with ASV. It's time to put your gloves on and get it cleaned. When finished, leave it somewhere where isn't dusty (inside the car?) and move on to removing the inlet manifold.
It is held by 2 small star screws on top(sorry, didn't mark them on the pic) and a total of 10 large spline bolts.
9 of them are easily visible. The 10th one is located inside the manifold intake itself. You will have to dig it out with your finger because it will be covered in soot. It is located at the bottom of the inlet pipe.
Bottom bolts are short and top ones long.
There are also two different types of bolts. The difference is in bolt head. If there is a bracket between the bolt head and manifold, there will be "no built in washer".
If there is no bracket it will have additional "built in washer".
Here is a pic of what I mean.
When putting back together, if bolt doesn't go fully in easily, it means that it shouldn't be there! Easiest thing is to arrange bolts in the same order as they are on the manifold.
Now, your manifold comes off easily when all bolts are removed.
Together with it, comes the actuator which you want to replace.
It is attached to the manifold by 2 bolts. Before you remove them, have a good look how it all sits together. One of the bolts holds a small metal plate which (i think) works as a stop point to the actuator. You will need to put it in the same way on the new actuator.
When you undo the bolts, you will need to rotate the actuator 180 degrees to remove it.
Don't bend it or force it in any way. It will come off easily. Then you put the new actuator on in the same position and rotate it 180 degrees to it's original position.
See this pic to see what I mean:
Now when all is done, you attach the actuator to the manifold. Change the manifold gasket (red one) and bolt it back on to the engine.
Next step is to put EGR and ASV back on. Make sure you change the gasket between them and manifold. Fit the bolts 3, 4 & 5 which hold EGR in place.
Connect both plugs and the pipe at the bottom.
Now, before you fit the bolts 1&2 which hold cooling pipe on EGR, fit the 11mm bolt which holds the cooling pipe bracket to the engine block. Stick some insulation tape in the socket so that you don't drop the bolt while moving between the rubber pipes.
When done, do the bolts 1&2 and remember to put new gasket on.
All is left is to fit the air inlet and you're done.
Your car should run like new.
GOOD LUCK
Last edited:
Thanks for the information mate, I'm really glad yours seems to be OK now so I'm taking the risk and getting mine sorted tomorrow. I have just spoken to a VAG specialist locally and they have changed a few of these, so seems a common issue.
Similar threads
- Replies
- 0
- Views
- 1K
