
-
Hey Guest👍👎 We're looking for reviews of your local CUPRA or SEAT Dealership - it's quick and easy to do: Leave a review now
Nextbase dashcam fitting
- Thread starter Chemical Matt
- Start date
You are using an out of date browser. It may not display this or other websites correctly.
You should upgrade or use an alternative browser.
You should upgrade or use an alternative browser.
thanks for the guide, this is just what I was looking for!
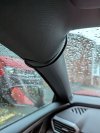
I collected my new Leon hatchback on Friday, and really need to get a dashcam connected up.
I struggled to pull the door seal back, but I managed to pull the edge away and tucked the cable in behind the seal and the edge of the trim.
I'm really struggling getting the cable across the top of the A-pillar though.
Any advice on how to unclip the A pillar slightly so I can feed it under?
Thanks so much!
J
Attachments
There's an airbag under that trim. You need to run the wire behind it, otherwise you run the risk of interference during an accident that could result in the airbag not deploying correctly.
And disconnect the battery before you start. Don't unplug leads around the air bag else you'll have to clear an airbag fault report. It may say that in the resource but plenty of people trigger airbag warnings by pulling fuses at random or pulling out leads.There's an airbag under that trim. You need to run the wire behind it, otherwise you run the risk of interference during an accident that could result in the airbag not deploying correctly.
I did set the airbag light off myself on an Altea years ago when I was searching for a blown fuse under the bonnet when the car wouldn't start. One of those pesky electrical problems you get with Alteas - didnt know that.
The car started fine in the morning but with airbag light on. They dont take too kindly to half the circuit being disconnected. Lesson learnt. The dealer cleared it for free but was unable to determine why the car refused to have any power going to the starter the day before... but fixed itself the next day. Lesson don't pull fuses if you dont know what they are. Fuse pulling is what people start on when fitting cameras.
The car started fine in the morning but with airbag light on. They dont take too kindly to half the circuit being disconnected. Lesson learnt. The dealer cleared it for free but was unable to determine why the car refused to have any power going to the starter the day before... but fixed itself the next day. Lesson don't pull fuses if you dont know what they are. Fuse pulling is what people start on when fitting cameras.
I definitely don't want to mess with the airbag, I was hoping to do this by removing as little as possible. In my previous car I was able to pull the door seals away and simply tuck the wires through there, but I can't seem to budge these seals. Possibly they need the trim removing first.
I still haven't been able to get back to complete this due to the bad weather and the short daylight hours in the UK at this time of year, so I'm still searching for the best ways of doing this.
I found the following youtube vid which seems to show removing the A-Pillar trim is fairly easy:
youtube vid but this is on a LHD car. I'm hoping they haven't done anything different in RHD after seeing where the fusebox is! Does removing this way look correct for RHD and safe? It would be much easier to feed cable behind any airbag systems with the trim off.
I reckon the main electrical wiring is kept down in relation to where they put the fuse box in LHD and RHD. It wont go up and over. Just the cabling terminates left or right.
Those are spring panels that must bounce off when the side airbag is deployed. People do take that trim of to deploy the cable behind the airbag. I've seen that. Mind you never have taken the trim off myself. Those Halford boys are probably doing it all the time. Probably leaving a mess behind them. They scratched my DSG gear leaver when fitting a minidisc controller box behind the Altea infotainment unit back in the day and practiced deception to point something else out so you didnt look down at their handywork.
Those are spring panels that must bounce off when the side airbag is deployed. People do take that trim of to deploy the cable behind the airbag. I've seen that. Mind you never have taken the trim off myself. Those Halford boys are probably doing it all the time. Probably leaving a mess behind them. They scratched my DSG gear leaver when fitting a minidisc controller box behind the Altea infotainment unit back in the day and practiced deception to point something else out so you didnt look down at their handywork.
Hi, a bit off topic but I notice you have a black roofliner. Did you choose this as an option?thanks for the guide, this is just what I was looking for!
I collected my new Leon hatchback on Friday, and really need to get a dashcam connected up.
I struggled to pull the door seal back, but I managed to pull the edge away and tucked the cable in behind the seal and the edge of the trim.
I'm really struggling getting the cable across the top of the A-pillar though.
Any advice on how to unclip the A pillar slightly so I can feed it under?
Thanks so much!
J
It's the ex-demonstrator car from the local dealer, so I wasn't able to choose any options. It is an FR Black Edition, so that might account for the black liner?Hi, a bit off topic but I notice you have a black roofliner. Did you choose this as an option?
I was just in the car, and I actually looked at the headlining. It's actually a dark grey colour, not really black. I've obviously not been paying it much attention!aha, yes that is propably the reason. Thanks for the information
Similar threads
- Replies
- 5
- Views
- 697
- Replies
- 6
- Views
- 712
- Replies
- 8
- Views
- 847
