We wouldn't charge VAT on the sale, however it may be charged at customs on import. The price on the website is supplied and fitted - You'd need to contact us for a kit. Bare in mind it requires plastic weldingEast yorkshire retrofits sells the complete kit needed for the retrofit.
![]()
Leon 5F Wireless Charging retrofit
Our wireless charging retrofit is available for Seat Leon mk3 facelift models only (2017-) The kit includes all the parts and wiring necessary to fit wireless charging and will result in a factory like install.eastyorkshireretrofits.co.uk
As UK are no longer part of EU, you might be able to buy ex VAT.
Hey @mcspook – i've got the unit and wiring but I'm new to this wiring diagram business. Could you share more info on WHERE you connected things like the ground / 12v and the other connections like canbus? I bought this cable to go with the OEM charger. https://es.aliexpress.com/item/1005...t_main.11.3cf718021ecZGx&gatewayAdapt=glo2esp
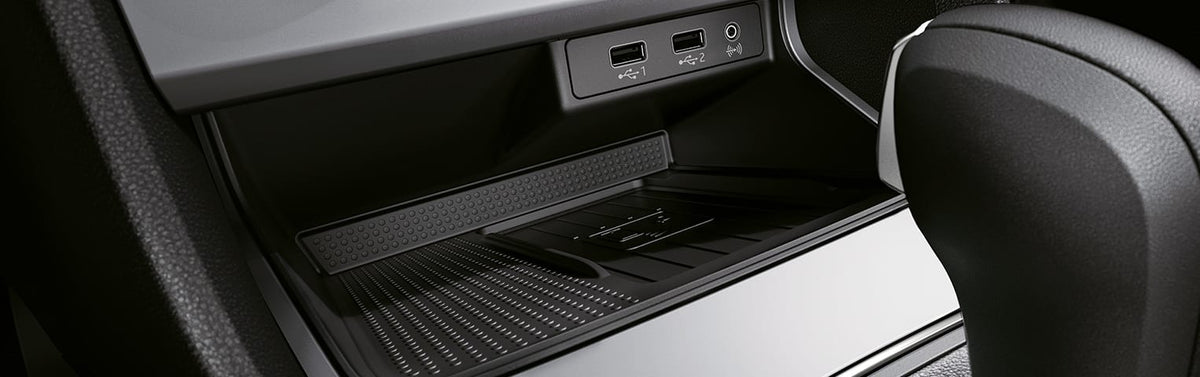
Well. After some time I pulled the trigger and purchased the console as a whole from ebay and with a very quick and simple long coding (5f byte 15 bite 0 and 5) i have wireless charging. The only downside is that I didn't find a glossy one, so i had to put vinyl and it doesn't look as smooth as the original.
There is also this tutorial if someone else is looking to retrofit.
![]()
Докидываем опции: установка оригинальной беспроводной зарядки
Доброго времени, Ещё в самом начале я рассказывал, что моя машина сошла с конвеера практически со всеми возможными опциями. Однако все таки парочка галочек в конфигураторе отсутствует, но это дело по…www.drive2.ru
![]()
![]()
![]()
![]()
![]()
Edit: in long coding if you install only the charger, activate only bit 5. I had a fault for baseplate and i had to uncheck bit 0 in 5f byte 15
Well, not the easiest mod you could start with. Everything is explained in the link with google translate. 12v from the fuse box. The easiest is a fuse splitter. Then ground is the car chassis, anywhere there is a bolt to a metal part connected to the chassis will do. Then the rest of the connection is to the back of the MIB in the glovebox. Every connector has numbers on it (usually the first and the last off each side) and in the diagram they show the number of the connector, the number of the pins and color of the cable with a color "code" (rt=red, bl=blue rt/bl=red/blue and so on). Sometimes the color of the connector can change from one car to another.Hey @mcspook – i've got the unit and wiring but I'm new to this wiring diagram business. Could you share more info on WHERE you connected things like the ground / 12v and the other connections like canbus? I bought this cable to go with the OEM charger. https://es.aliexpress.com/item/1005...t_main.11.3cf718021ecZGx&gatewayAdapt=glo2esp
Thanks for the layman's explanation! V helpful. I've already plastic welded the new frame/charger in place in my current centre console and familiar with taking everything out to access things.. To be honest, I did try and install it by tapping into the cigarette lighter for the positive/ground but I think I blew the fuse for that somehow... So going to official route for this which I should have done in the first place.Well, not the easiest mod you could start with. Everything is explained in the link with google translate. 12v from the fuse box. The easiest is a fuse splitter. Then ground is the car chassis, anywhere there is a bolt to a metal part connected to the chassis will do. Then the rest of the connection is to the back of the MIB in the glovebox. Every connector has numbers on it (usually the first and the last off each side) and in the diagram they show the number of the connector, the number of the pins and color of the cable with a color "code" (rt=red, bl=blue rt/bl=red/blue and so on). Sometimes the color of the connector can change from one car to another.
Pin1 of the charger to positive 12V
Pin2 of the charger to pin5 of the gray connector of the MIB2 unit.
Pin3 of the charger to pin11 of the gray connector of the MIB2 unit.
Pin4 of the charger to a ground point of the car.
Pin5 of the charger to pin14 of connector C of the BCM which i personally did not put.
If you're not comfortable with the diagram, it's better to give it to someone with the knowledge to do it properly. It will save you a lot of time to diagnose if something goes wrong.
Sent from my Pixel 5 using Tapatalk