ryancboyo

Active Member
Sep 6, 2018
14
0
Scarborough
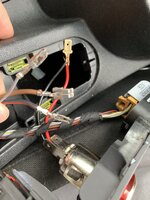
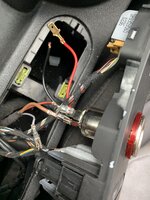
So basically my cigarette lighter socket is absolutely knackared so had to break it out..

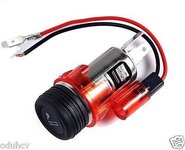
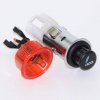
I bought a 12v socket from eBay and the connections are completely different...

the original socket had an actual connection block on the bottom, with three metal prongs, which the connection block just clips in to...

Where as the new aftermarket sockets only have 2 metal prongs, and then two loose wires (positive and negative) for the sockets light...

any help on wiring up the socket or getting hold of an original new part? Cheers
 

Attachments

  • CE1BF383-574E-4E89-944F-8E6CAA24256B.jpeg
    CE1BF383-574E-4E89-944F-8E6CAA24256B.jpeg
    30.6 KB · Views: 229
  • 5AF57D44-7C4E-49EB-A7CF-654D712A65C6.jpeg
    5AF57D44-7C4E-49EB-A7CF-654D712A65C6.jpeg
    31.5 KB · Views: 311

RADIOTWO

Active Member
Mar 6, 2018
486
93
North Derbyshire
Sorry cannot help with a original part, but the wiring is easy! on original you will have three wires, 1 for the positive, one for the negative, and the third is the positive for the light, so put the black from the light to the negative and connect to the negative on the socket, put the live for the lighter on the other terminal on the lighter and lastly connect the red on the lamp to the light circuit
 
  • Like
Reactions: ryancboyo

ryancboyo

Active Member
Sep 6, 2018
14
0
Scarborough
Sorry cannot help with a original part, but the wiring is easy! on original you will have three wires, 1 for the positive, one for the negative, and the third is the positive for the light, so put the black from the light to the negative and connect to the negative on the socket, put the live for the lighter on the other terminal on the lighter and lastly connect the red on the lamp to the light circuit

Ahh brilliant thanks mate, that’s a great help!! I’ll give it a crack tomorrow. Thank you
 

ryancboyo

Active Member
Sep 6, 2018
14
0
Scarborough
Sorry cannot help with a original part, but the wiring is easy! on original you will have three wires, 1 for the positive, one for the negative, and the third is the positive for the light, so put the black from the light to the negative and connect to the negative on the socket, put the live for the lighter on the other terminal on the lighter and lastly connect the red on the lamp to the light circuit

hiya mate so I’m doing it now, and it seems to be okay so far, although the light doesn’t seem to light up much and is only giving out 4.3 volts? Should I just wire the light upto the socket circuit or? Cheers
 

RADIOTWO

Active Member
Mar 6, 2018
486
93
North Derbyshire
hiya mate so I’m doing it now, and it seems to be okay so far, although the light doesn’t seem to light up much and is only giving out 4.3 volts? Should I just wire the light upto the socket circuit or? Cheers
Can you take a picture of the original wiring and show on here, and a picture of what you have done now?
 

ryancboyo

Active Member
Sep 6, 2018
14
0
Scarborough
Can you take a picture of the original wiring and show on here, and a picture of what you have done now?

Okay, here’s pics.. obviously I will solder and wrap each wire with insulated electrical tape once Iv figured the lights wiring out... to be honest though I might just sack the light off and not wire up at all as it doesn’t seem very good even when running through the 12v anyway
 

Attachments

  • 4609DF97-169C-46AC-8774-9C1C43B0FFA4.jpeg
    4609DF97-169C-46AC-8774-9C1C43B0FFA4.jpeg
    1.5 MB · Views: 920
  • 2A08C868-E210-412B-A3D0-7FF73FBF4619.jpeg
    2A08C868-E210-412B-A3D0-7FF73FBF4619.jpeg
    1.6 MB · Views: 782

Rusty2k

Active Member
May 12, 2013
709
131
Crikey. That's a horrible bodge job. Was that you or had someone done that already?

Can get new genuine sockets on eBay for under a tenner.
 

RADIOTWO

Active Member
Mar 6, 2018
486
93
North Derbyshire
Okay, here’s pics.. obviously I will solder and wrap each wire with insulated electrical tape once Iv figured the lights wiring out... to be honest though I might just sack the light off and not wire up at all as it doesn’t seem very good even when running through the 12v anyway
Ok from the later picture you have connect the wires for the socket, but you have not show where the light wires are going !first show where you are wiring the light to? also bit worried to how you are only getting 4.3 volts, how are you measuring that?
 

ryancboyo

Active Member
Sep 6, 2018
14
0
Scarborough
Ok from the later picture you have connect the wires for the socket, but you have not show where the light wires are going !first show where you are wiring the light to? also bit worried to how you are only getting 4.3 volts, how are you measuring that?

Iv just wired it up with the main positive & negative and ignored the light for now as I don’t need it anyways. Just needed the socket to work really which it does now... as for the 4.3v it was measured with a multimeter, between the small grey wire (lights positive) and negative on the terminal
 

RADIOTWO

Active Member
Mar 6, 2018
486
93
North Derbyshire
Iv just wired it up with the main positive & negative and ignored the light for now as I don’t need it anyways. Just needed the socket to work really which it does now... as for the 4.3v it was measured with a multimeter, between the small grey wire (lights positive) and negative on the terminal
Ok I still would have liked to get to the bottom of the4.3v problem, but just to clarify you put the Multimeter red lead on the gray wire and where did you put the (mm) black lead? also as the other guy said tidy the connections up, and all you need is to crimp a couple of (insulated) spade connectors on the wire
 

ryancboyo

Active Member
Sep 6, 2018
14
0
Scarborough
Crikey. That's a horrible bodge job. Was that you or had someone done that already?

Can get new genuine sockets on eBay for under a tenner.
Ok I still would have liked to get to the bottom of the4.3v problem, but just to clarify you put the Multimeter red lead on the gray wire and where did you put the (mm) black lead? also as the other guy said tidy the connections up, and all you need is to crimp a couple of (insulated) spade connectors on the wire

yeah so from the multimeter, red lead on grey wire (positive), then black lead on black/red wire (negative)... shows as 4.3v... the grey wire is only a very small wire compared to the other two
 

RADIOTWO

Active Member
Mar 6, 2018
486
93
North Derbyshire
yeah so from the multimeter, red lead on grey wire (positive), then black lead on black/red wire (negative)... shows as 4.3v... the grey wire is only a very small wire compared to the other two
Well there your problem, at this stage the red and black on the bulb is not connected to any thing, the black from the MM need to go to the negative on the lighter socket
So to recap, The red/black wire goes to the center of the socket, the brown goes to the outer of the socket(and also wire the black from the lamp) then the red on the lamp goes to the gray wire
 
Nimbus hosting - Based solely in the UK.