Hi. Did you get a chance to look at the HW and SW versions of your MIB2 unit? Mine's also an early unit from May 2016.I'll check the version mine is running, but it's a 2016 so an early mib2, and mine works fine.

Installation - MIB2 Stereo Sat Nav DAB UNIT
- Thread starter Teebster
- Start date
-
- Tags
- mib2 dab nav instal
You are using an out of date browser. It may not display this or other websites correctly.
You should upgrade or use an alternative browser.
You should upgrade or use an alternative browser.
Hi. Did you get a chance to look at the HW and SW versions of your MIB2 unit? Mine's also an early unit from May 2016.
Hi Steve, just had a look at mine and it's h30 sw 0351.
Thanks for checking. Yours is newer than mine and is on the correct/minimum SW version for the screen.. Mine's on HW:24 and SW:0241.....Hi Steve, just had a look at mine and it's h30 sw 0351.
Hi,
I would like to ask if any coding is required and do it comes with build in GPS ?
If I have a 2018 MMI, would it work with the unit ? Does it need a GPS antenna too
Apologies for the noobie questions.
I would like to ask if any coding is required and do it comes with build in GPS ?
If I have a 2018 MMI, would it work with the unit ? Does it need a GPS antenna too
Apologies for the noobie questions.
View attachment 4574 Hello all,
I have a 2013 - 63 plate Seat Leon 1.6tdi.
It originally has SAT NAV DAB RADIO etc and is the technology pack.
I bought this car with bits of damage - and unfortunately the stereo screen was broken.
I had a look around for some screens etc and ultimately decided that the original screen in the car is too small and I want something bigger.
Now I don’t like going aftermarket etc so bought a genuine Seat stereo Unit that has the 8 inch screen - part number: 5F0 919 606
This is from a 2018 Seat Leon MK3.5
I also got the SEAT EASYCONNECT MMI in the glove box to go with the screen - MIB2 as far as I understand.
The fitting was pretty straight forward - took the old bits out, and everything was plug and play - except one of the wires that connect to the rear of the screen. I had to modify the connector slightly - very easy - and it was all up and running. CP WAS REMOVED BY THE SELLER. Happy days!
Now the issue I have is that the cage that the new screen sits in is slightly different to the original one.
I can’t seem to figure out how to take the new screen out of the cage?? Any ideas?
The full heater cage sticks out quite a bit.
Or should I just modify the new cage?
If anyone is interested in the full installation, once I have completed it, I will make a video with step by step instructions.
I’ve finally managed to do the full thing, I initially gave up after the costs being so high with hacking the unit to get the Bluetooth etc to work but finally got it all done.
£355 for the unit and display
£80 cp removal
£150 hack the unit for Bluetooth Nav AirPlay etc to work
Any tips on how to retrofit the USB port? My car doesn’t originally have a USB port
Sent from my iPhone using Tapatalk
£355 for the unit and display
£80 cp removal
£150 hack the unit for Bluetooth Nav AirPlay etc to work
Any tips on how to retrofit the USB port? My car doesn’t originally have a USB port
Sent from my iPhone using Tapatalk
I’ve finally managed to do the full thing, I initially gave up after the costs being so high with hacking the unit to get the Bluetooth etc to work but finally got it all done.
£355 for the unit and display
£80 cp removal
£150 hack the unit for Bluetooth Nav AirPlay etc to work
Any tips on how to retrofit the USB port? My car doesn’t originally have a USB port
Sent from my iPhone using Tapatalk
You’ll need the lower tray that has the USB slot in it. Message some breakers, they’ll be able to get you one for cheap.
You’ll then need the USB port which I ended up buying from Seat and you’ll also need a Media Harness. Got mine off eBay for about £40. Item number was 392845408835 on eBay. I brought this harness originally from AliExpress but it was faulty (buy cheap, buy twice).
Sent from my iPhone using Tapatalk

Ps here’s mine all finished from a few months ago.
Sent from my iPhone using Tapatalk
Do you know anywhere that can resolve the CP issues and hack the unit for the GPS/BT etc?
Ps here’s mine all finished from a few months ago.
Sent from my iPhone using Tapatalk
I want to upgrade my 2015 unit, found some parts online but dont think they have CP removed etc.
Just a quick update -
I’ve managed to fit the 8inch screen in to the original mk3 housing. Pictures are attached. I used a multi tool to remove the plastic ‘lip’ on the heater housing.
The hardest bit of it is getting the MIB 2 to fit back into the glovebox compartment


If anyone ever wants to do the conversion and needs any help let me know and I’ll be happy to help.
Sent from my iPhone using Tapatalk


How do you remove the display again if its attached on the panel and there are no clips for easy removal?When I changed my screen from 6.5 inch to 8 inch I also purchased it with the heater vents etc and then found like you that it wouldn't fit so I had to modify the existing screen aperture to enable the 8 inch screen to fit.
Unlike the 6.5 screen the 8 inch screen does not have the slots to enable easy removal, you have to release the it from the rear of the screen, if you look at the photo you can see the four tabs that have to be pushed inwards to release, I found that I could do one at a time.
View attachment 4576
You have to remove the whole vent assembly with the screen attached then release the 4 push-in clips, as shown in the picture on your quoted post, then push the screen out.How do you remove the display again if its attached on the panel and there are no clips for easy removal?
In my case I'm only able to remove three out of five bolts that hold the vent assy (the one next to the steering wheel and two above the screen). The ones below the screen are blocked by the screen itself.You have to remove the whole vent assembly with the screen attached then release the 4 push-in clips, as shown in the picture on your quoted post, then push the screen out.
Do you have a hint on how to remove these?
I have not had to remove the centre vents with the 8" screen fitted, so I don't know of any difficulty accessing the bolts.In my case I'm only able to remove three out of five bolts that hold the vent assy (the one next to the steering wheel and two above the screen). The ones below the screen are blocked by the screen itself.
Do you have a hint on how to remove these?
When I originally removed it, it had the 6.5" screen which I removed with the extractor tools before undoing the bolts, when I refitted it I put the 8" screen in place after fitting the vent bolts.
You may need to use a 1/4" drive socket set to reach the bolts.
I did the same during install. After placement one corner was a tiny bit too deep. My OCD wants to improve this and then I faced the issue of removal.I have not had to remove the centre vents with the 8" screen fitted, so I don't know of any difficulty accessing the bolts.
When I originally removed it, it had the 6.5" screen which I removed with the extractor tools before undoing the bolts, when I refitted it I put the 8" screen in place after fitting the vent bolts.
You may need to use a 1/4" drive socket set to reach the bolts.
")
The facelift vents has it's bolts a bit deeper resulting in better access and, I assume, no need to remove the screws after releasing.
I've tried to access the screws with a Torx key (something like this), which I think is the most narrow option. For now it's a good excersize to turn down the OCD.
Hello all, i've also changed the unit in glovebox for 5QA035824 and display 5F0919606, the protection was removed and all other stuff was activated fulllink etc.
But the unit was from 1.4TSI car Hatchback is it possible to change the picture or the vehicle using vcds or its in the firmware?
I have a ST with 1.6 tdi without START STOP (ecomotive version)

But the unit was from 1.4TSI car Hatchback is it possible to change the picture or the vehicle using vcds or its in the firmware?
I have a ST with 1.6 tdi without START STOP (ecomotive version)

yeah there is just few of them on ebay right now and the price is 400-500e which is quite LOT! but try this and contact them but the problem is i think the brexit you will have to pay duties https://www.proxyparts.com/car-part...919606/part/interior-display/partid/16457795/
Last edited:
Yes, it can be done with VCDS, I did it on my unit, but I cannot remember how at the moment. If I can find my notes I will let you know.Hello all, i've also changed the unit in glovebox for 5QA035824 and display 5F0919606, the protection was removed and all other stuff was activated fulllink etc.
But the unit was from 1.4TSI car Hatchback is it possible to change the picture or the vehicle using vcds or its in the firmware?
I have a ST with 1.6 tdi without START STOP (ecomotive version)
View attachment 30020
Edit, I think it's 5F controller, byte 18, value 3 = Ecomotive, not sure how to get the ST version.
Last edited:
Thank you @Walone i will have a look on that,
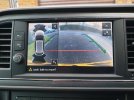
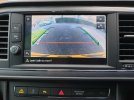
maybe one more question to you, when i had the old unit there was displayed the car with rear sensors (obstacles) now on the 8 inch screen i have just picture from the RVC, what can be the problem? is it because of the old pdc module or why its not showing?

maybe one more question to you, when i had the old unit there was displayed the car with rear sensors (obstacles) now on the 8 inch screen i have just picture from the RVC, what can be the problem? is it because of the old pdc module or why its not showing?
I'm not sure to be honest, perhaps the sensors need to be 'activated' (with VCDS?).Thank you @Walone i will have a look on that,
maybe one more question to you, when i had the old unit there was displayed the car with rear sensors (obstacles) now on the 8 inch screen i have just picture from the RVC, what can be the problem? is it because of the old pdc module or why its not showing?
View attachment 30054
Here are the views of my screen when in reverse;-
Attachments
Similar threads
