-
Guest, 🚨New Stock alert: Premium CUPRA valve caps now available in the store 👉 Order now from the merchandise store
Manifold Vacuum Actuator...Car is now repaired!
- Thread starter LukeFR
- Start date
You are using an out of date browser. It may not display this or other websites correctly.
You should upgrade or use an alternative browser.
You should upgrade or use an alternative browser.
Right - disconnected N75 and no noises, however then turned engine over and tried again and the right most hose / bottom made a clear pssst noise.
So I imagine that's normal.
Does yours pssst even if the cars been sitting a while? mine was sitting for a day.
Getting any further? Sorry it took so long to get this done
So I imagine that's normal.
Does yours pssst even if the cars been sitting a while? mine was sitting for a day.
Getting any further? Sorry it took so long to get this done
Time to get rid? Shame mate, but these engines when they go wrong, they do go wrong and cost a fortune!
Yeap, it's gone. Cheaper than should but had enough of problems. Just managed to take milltek and sparcos off and it went. I have no idea what to buy next. Ideally focus st but these are stupidly expensive. If not an st, I might go for a convertible.
Sent from my GT-I9505 using Tapatalk 2
Sent from my GT-I9505 using Tapatalk 2
Back on topic - changed my actuator today. Couple things popped up.
My manifold is a silver metal one, not the black one, so some slight differences.
My manifold gasket is a slim metal one, not a silicon one - part number as in the guide but without the C revision on the end. I assume I can get the one I need of Seat (find out tomorrow).
A lot of my manifold bolts were 6mm hex, the one inside the manifold was a torx, think t30, maybe t40.
EGR wasn't too dirty and seems to operate smoothly.
My manifold gasket has been leaking:

My actuator has a tear in the diaphragm so hopefully this will solve some if not all of my issues, figures crossed. If not I needed a new gasket and actuator anyway.

Its not too hard if you fancy doing it yourself, but I've yet to reassemble + it does require some competence.
Cheers guys, and big thanks to Slepy for the guide.
My manifold is a silver metal one, not the black one, so some slight differences.
My manifold gasket is a slim metal one, not a silicon one - part number as in the guide but without the C revision on the end. I assume I can get the one I need of Seat (find out tomorrow).
A lot of my manifold bolts were 6mm hex, the one inside the manifold was a torx, think t30, maybe t40.
EGR wasn't too dirty and seems to operate smoothly.
My manifold gasket has been leaking:

My actuator has a tear in the diaphragm so hopefully this will solve some if not all of my issues, figures crossed. If not I needed a new gasket and actuator anyway.

Its not too hard if you fancy doing it yourself, but I've yet to reassemble + it does require some competence.
Cheers guys, and big thanks to Slepy for the guide.
Last edited:
Hello
Have to say the below is an excellent guide.
Unfortunately, mine needs the complete inlet manifold so will get it changed soon with new revised part.
Having the guide made it a quick job.
I put the new parts mentioned in anyway since I have them now anyway and cleaned the egr out so seems to be driving better for now.
Will get the inlet shortly. Best price I can find is £400 posted does anyone know if it can be bought for less?
Thanks
Taz
Update Gentleman.
After a fail yesterday with all the issues coming back after getting from MK to Sheffield, I had a look at my engine today and found that stupid EGR bolt being undone.
I've decided that it has to be sorted out before I go back to MK but first needed to find a way to get access to the bolt.
Started stripping engine from some parts (in the middle of Sheffield centre) and about 30 minutes later found the solution!
Fitted everything back, also changed back my N75 to the old one (just for few days) and went for a drive in Sheffield. All ok, so decided to go home.
120 miles later with a lot of start/stop traffic and additional test drive in MK and all seems fine!
I will report back again in few days if it still work how it should.
For the time being here is a little write up on how to remove EGR valve, inlet manifold and replace the actuator on a SEAT LEON 2.0 TDI PD 170 .
Parts needed :
- Actuator part no. 03G 129 061C £9.95 + VAT
- Manifold to engine gasket part no. 03G 129 717C £8.85 + VAT
- EGR to manifold gasket part no. 03G 131 547C £4.59 + VAT
- EGR to pipe gasket part no. 069 131 547D £2.58 + VAT
Plus if you decide to split the EGR from ASV (don't see the point) you will need:
- seal ASV to EGR part no. N90978701 £3.09 + VAT
Tools needed:
- 11mm socket on an extension (20 cm extension should do)
- Spline bit set
- Torx bit set
- Heavy duty rubber gloves
- EGR cleaner
This is for guidance only. I am not a mechanic and am not responsible for any car damages or injuries during and as a result of this operation.
Please work on a cool engine to avoid burns.
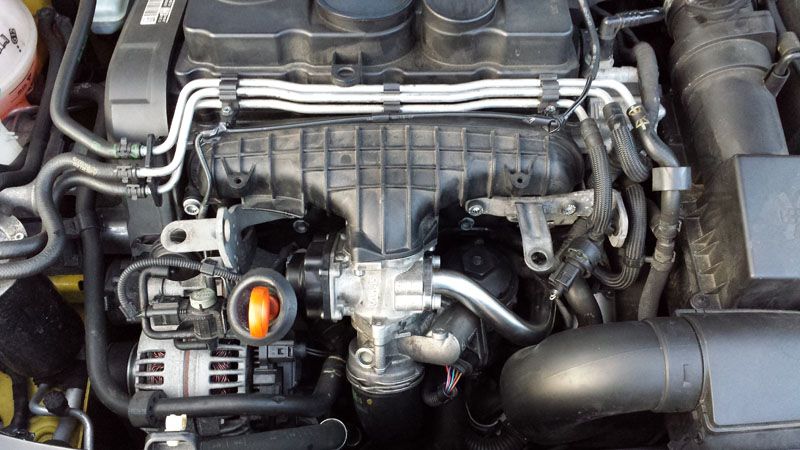
First step is to take the engine cover off. When you do that, you should see something like this:
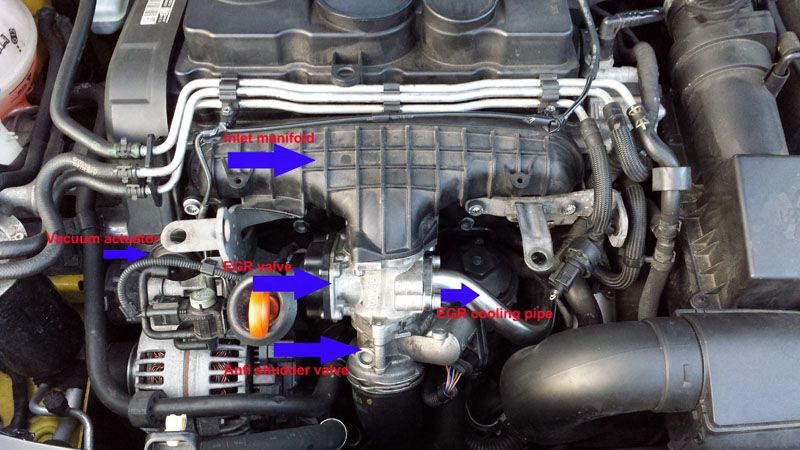
For total newbies (just like me) here are items of interest:
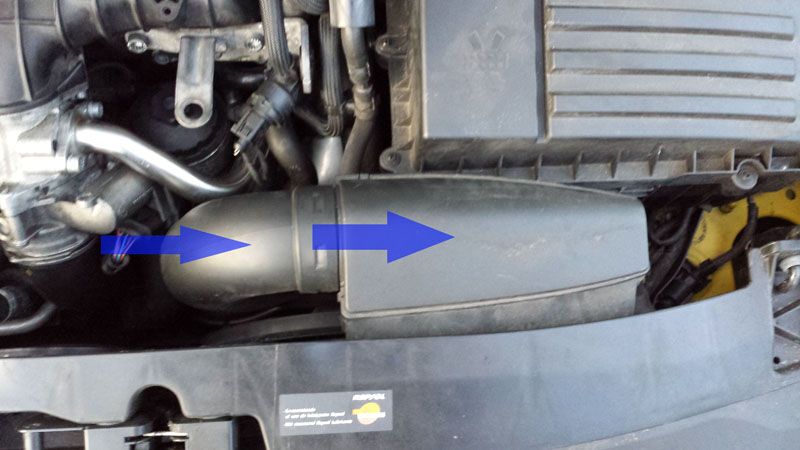
Second step is to remove the air intake box and pipe. It is a simple click in/out operation. No screws. You need to remove 3 parts in total. The pipe itself has clicks on both sides at the bottom of it.
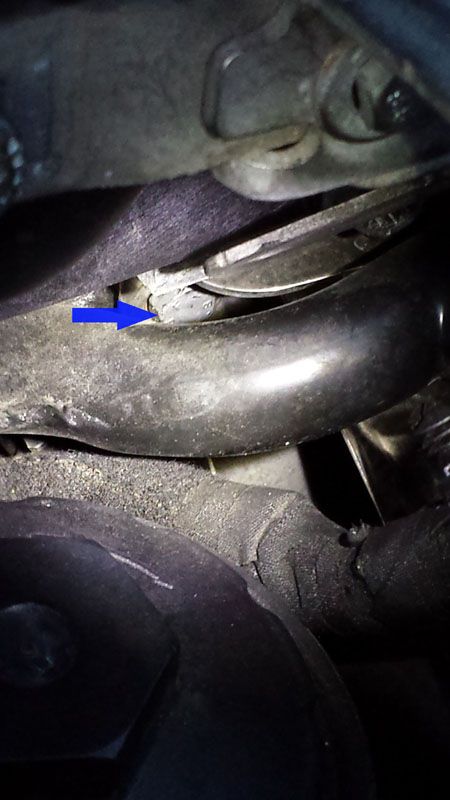
When removed, you need to locate one 11mm bolt which attaches the cooling pipe to engine block. It is just a mount so that the pipe doesn't move. This bolt is crucial to remove and put back on the EGR valve. It is hard to find but easy to get out if you have a 11mm socket on extension. You will need to go between the rubber pipes and make sure your engine is cold, otherwise you will burn your hand on oil filter.
Here is a picture of the bolt. (couldn't get better one). On the next picture I marked the area to look for it with a yellow arrow. If you follow the cooling pipe you should locate it. Using small torch advisable.
Next move is to remove the EGR valve. I chose to remove it together with ASV and cleaned both of them.
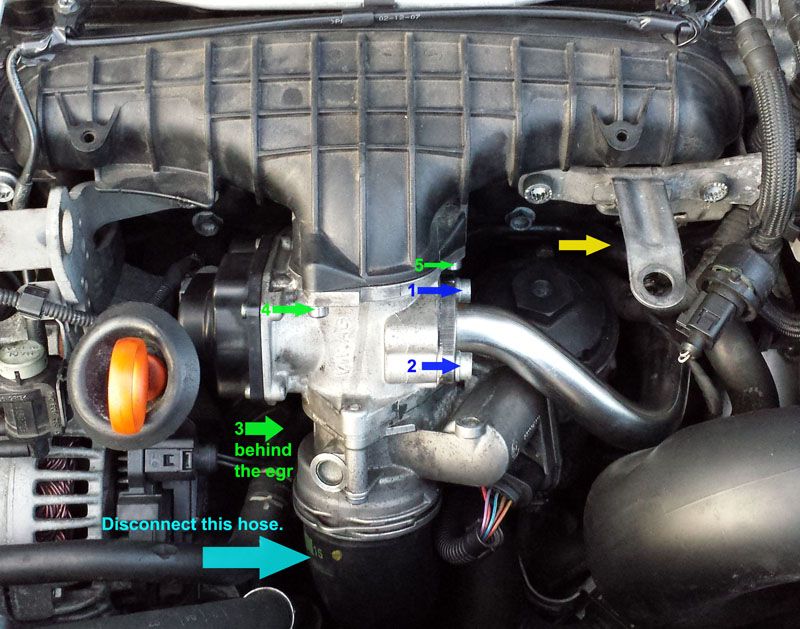
First, disconnect the hose. It is held on a clip which you need to pull out.
Use a flat head screwdriver to do it. Also, I advise to cover the pipe for the time of remaining work, so that you don't drop a spline bit insideYes, you guessed it, I did!
Unplug 2 plugs from the EGR. One on the left and one on the right. Use a flathead screwdriver again.
When done, remove spline bolts 1 & 2 which attach cooling pipe to EGR.
There is a gasket between, so make sure you take it off (you should have new one to replace it with later).
Next, remove bolts 3, 4 and 5. Do the 3rd one behind the EGR valve first to make your life easier. Here is a pic of where it is exactly. Marked with green:
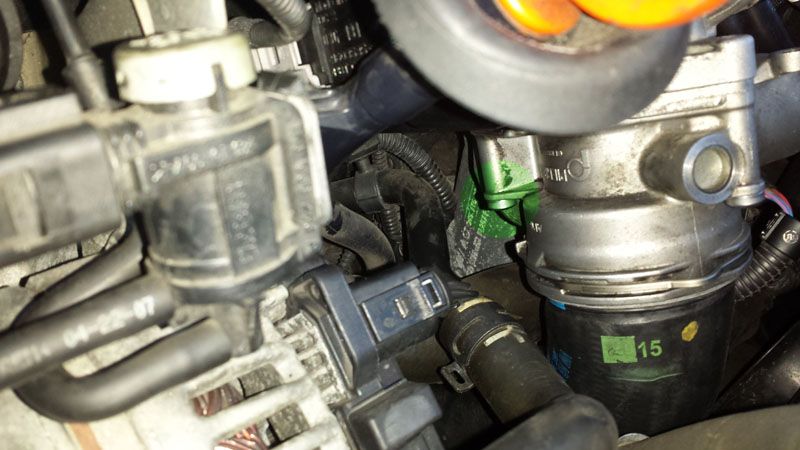
Now you can remove the EGR together with ASV. It's time to put your gloves on and get it cleaned. When finished, leave it somewhere where isn't dusty (inside the car?) and move on to removing the inlet manifold.
It is held by 2 small star screws on top(sorry, didn't mark them on the pic) and a total of 10 large spline bolts.
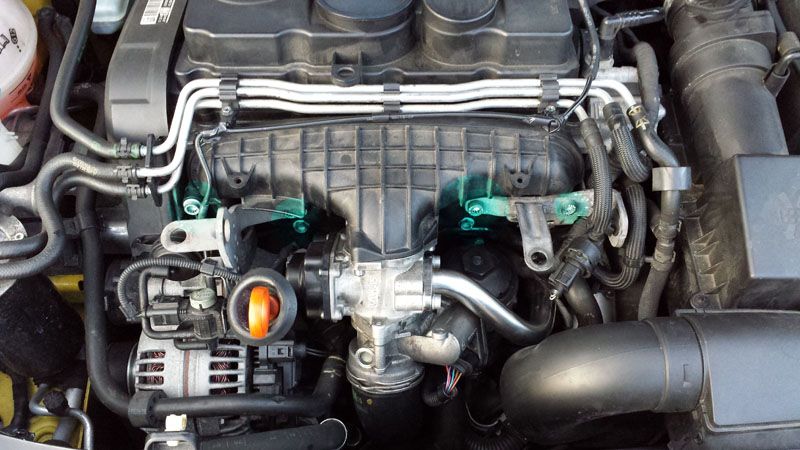
9 of them are easily visible. The 10th one is located inside the manifold intake itself. You will have to dig it out with your finger because it will be covered in soot. It is located at the bottom of the inlet pipe.
Bottom bolts are short and top ones long.
There are also two different types of bolts. The difference is in bolt head. If there is a bracket between the bolt head and manifold, there will be "no built in washer".
If there is no bracket it will have additional "built in washer".
Here is a pic of what I mean.
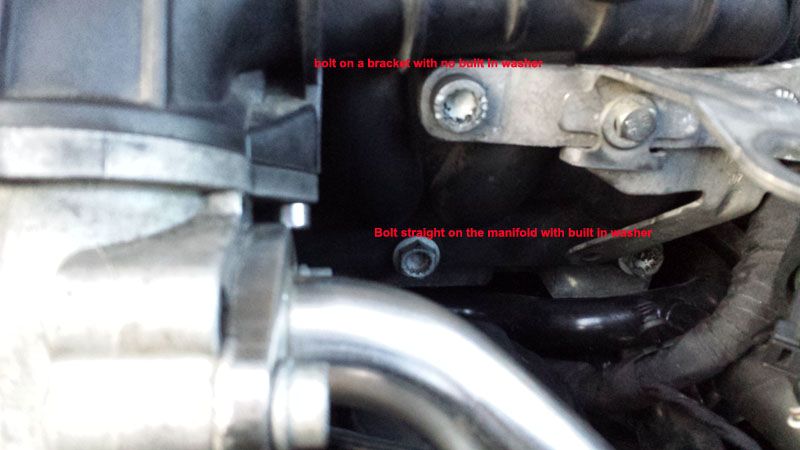
When putting back together, if bolt doesn't go fully in easily, it means that it shouldn't be there! Easiest thing is to arrange bolts in the same order as they are on the manifold.
Now, your manifold comes off easily when all bolts are removed.
Together with it, comes the actuator which you want to replace.
It is attached to the manifold by 2 bolts. Before you remove them, have a good look how it all sits together. One of the bolts holds a small metal plate which (i think) works as a stop point to the actuator. You will need to put it in the same way on the new actuator.
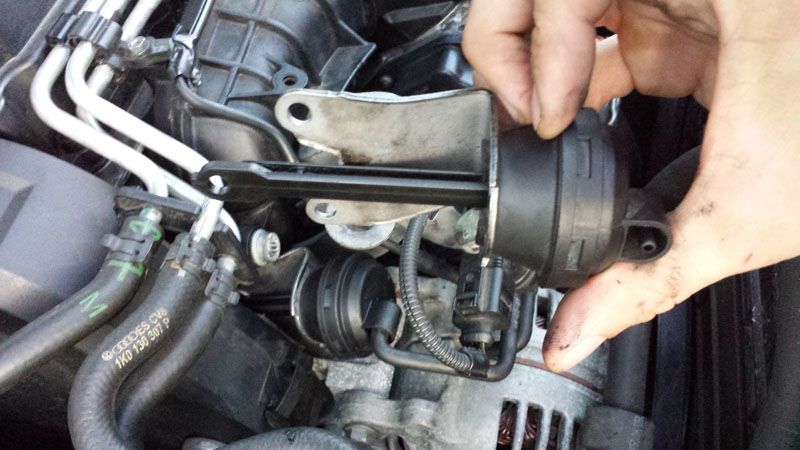
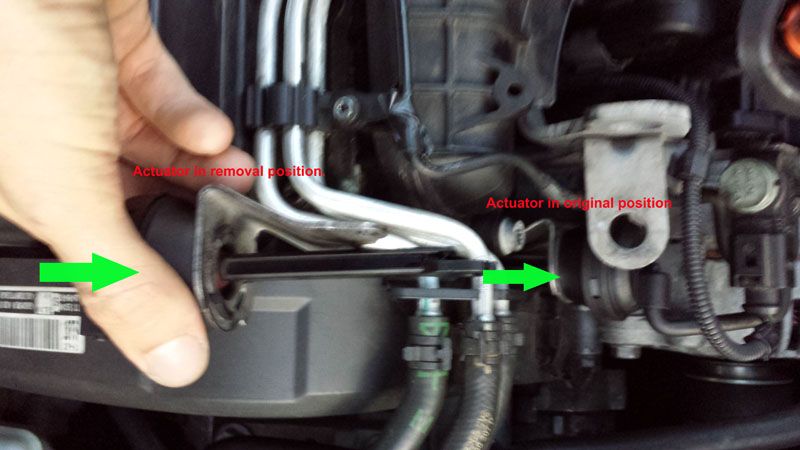
When you undo the bolts, you will need to rotate the actuator 180 degrees to remove it.
Don't bend it or force it in any way. It will come off easily. Then you put the new actuator on in the same position and rotate it 180 degrees to it's original position.
See this pic to see what I mean:
Now when all is done, you attach the actuator to the manifold. Change the manifold gasket (red one) and bolt it back on to the engine.
Next step is to put EGR and ASV back on. Make sure you change the gasket between them and manifold. Fit the bolts 3, 4 & 5 which hold EGR in place.
Connect both plugs and the pipe at the bottom.
Now, before you fit the bolts 1&2 which hold cooling pipe on EGR, fit the 11mm bolt which holds the cooling pipe bracket to the engine block. Stick some insulation tape in the socket so that you don't drop the bolt while moving between the rubber pipes.
When done, do the bolts 1&2 and remember to put new gasket on.
All is left is to fit the air inlet and you're done.
Your car should run like new.
GOOD LUCK
Update Gentleman.
After a fail yesterday with all the issues coming back after getting from MK to Sheffield, I had a look at my engine today and found that stupid EGR bolt being undone.
I've decided that it has to be sorted out before I go back to MK but first needed to find a way to get access to the bolt.
Started stripping engine from some parts (in the middle of Sheffield centre) and about 30 minutes later found the solution!
Fitted everything back, also changed back my N75 to the old one (just for few days) and went for a drive in Sheffield. All ok, so decided to go home.
120 miles later with a lot of start/stop traffic and additional test drive in MK and all seems fine!
I will report back again in few days if it still work how it should.
For the time being here is a little write up on how to remove EGR valve, inlet manifold and replace the actuator on a SEAT LEON 2.0 TDI PD 170 .
Parts needed :
- Actuator part no. 03G 129 061C £9.95 + VAT
- Manifold to engine gasket part no. 03G 129 717C £8.85 + VAT
- EGR to manifold gasket part no. 03G 131 547C £4.59 + VAT
- EGR to pipe gasket part no. 069 131 547D £2.58 + VAT
Plus if you decide to split the EGR from ASV (don't see the point) you will need:
- seal ASV to EGR part no. N90978701 £3.09 + VAT
Tools needed:
- 11mm socket on an extension (20 cm extension should do)
- Spline bit set
- Torx bit set
- Heavy duty rubber gloves
- EGR cleaner
This is for guidance only. I am not a mechanic and am not responsible for any car damages or injuries during and as a result of this operation.
Please work on a cool engine to avoid burns.
First step is to take the engine cover off. When you do that, you should see something like this:
http://i571.photobucket.com/albums/ss156/slepy200x/asnnet/1_zpsd2e1f2a6.jpg
For total newbies (just like me) here are items of interest:
http://i571.photobucket.com/albums/ss156/slepy200x/asnnet/11_zps25641761.jpg
Second step is to remove the air intake box and pipe. It is a simple click in/out operation. No screws. You need to remove 3 parts in total. The pipe itself has clicks on both sides at the bottom of it.
http://i571.photobucket.com/albums/ss156/slepy200x/asnnet/2_zps2243af89.jpg
When removed, you need to locate one 11mm bolt which attaches the cooling pipe to engine block. It is just a mount so that the pipe doesn't move. This bolt is crucial to remove and put back on the EGR valve. It is hard to find but easy to get out if you have a 11mm socket on extension. You will need to go between the rubber pipes and make sure your engine is cold, otherwise you will burn your hand on oil filter.
Here is a picture of the bolt. (couldn't get better one). On the next picture I marked the area to look for it with a yellow arrow. If you follow the cooling pipe you should locate it. Using small torch advisable.
http://i571.photobucket.com/albums/ss156/slepy200x/asnnet/3_zpsdbb8d34e.jpg
Next move is to remove the EGR valve. I chose to remove it together with ASV and cleaned both of them.
http://i571.photobucket.com/albums/ss156/slepy200x/asnnet/4_zps8a2aee91.jpg
First, disconnect the hose. It is held on a clip which you need to pull out.
Use a flat head screwdriver to do it. Also, I advise to cover the pipe for the time of remaining work, so that you don't drop a spline bit insideYes, you guessed it, I did!
Unplug 2 plugs from the EGR. One on the left and one on the right. Use a flathead screwdriver again.
When done, remove spline bolts 1 & 2 which attach cooling pipe to EGR.
There is a gasket between, so make sure you take it off (you should have new one to replace it with later).
Next, remove bolts 3, 4 and 5. Do the 3rd one behind the EGR valve first to make your life easier. Here is a pic of where it is exactly. Marked with green:
http://i571.photobucket.com/albums/ss156/slepy200x/asnnet/44_zps06c0b152.jpg
Now you can remove the EGR together with ASV. It's time to put your gloves on and get it cleaned. When finished, leave it somewhere where isn't dusty (inside the car?) and move on to removing the inlet manifold.
It is held by 2 small star screws on top(sorry, didn't mark them on the pic) and a total of 10 large spline bolts.
http://i571.photobucket.com/albums/ss156/slepy200x/asnnet/5_zps652c53f6.jpg
9 of them are easily visible. The 10th one is located inside the manifold intake itself. You will have to dig it out with your finger because it will be covered in soot. It is located at the bottom of the inlet pipe.
Bottom bolts are short and top ones long.
There are also two different types of bolts. The difference is in bolt head. If there is a bracket between the bolt head and manifold, there will be "no built in washer".
If there is no bracket it will have additional "built in washer".
Here is a pic of what I mean.
http://i571.photobucket.com/albums/ss156/slepy200x/asnnet/9_zpse73da7e8.jpg
When putting back together, if bolt doesn't go fully in easily, it means that it shouldn't be there! Easiest thing is to arrange bolts in the same order as they are on the manifold.
Now, your manifold comes off easily when all bolts are removed.
Together with it, comes the actuator which you want to replace.
It is attached to the manifold by 2 bolts. Before you remove them, have a good look how it all sits together. One of the bolts holds a small metal plate which (i think) works as a stop point to the actuator. You will need to put it in the same way on the new actuator.
http://i571.photobucket.com/albums/ss156/slepy200x/asnnet/20130728_204150_zpsc1d6e329.jpg
When you undo the bolts, you will need to rotate the actuator 180 degrees to remove it.
Don't bend it or force it in any way. It will come off easily. Then you put the new actuator on in the same position and rotate it 180 degrees to it's original position.
See this pic to see what I mean:
http://i571.photobucket.com/albums/ss156/slepy200x/asnnet/6_zpsfebd693e.jpg
Now when all is done, you attach the actuator to the manifold. Change the manifold gasket (red one) and bolt it back on to the engine.
Next step is to put EGR and ASV back on. Make sure you change the gasket between them and manifold. Fit the bolts 3, 4 & 5 which hold EGR in place.
Connect both plugs and the pipe at the bottom.
Now, before you fit the bolts 1&2 which hold cooling pipe on EGR, fit the 11mm bolt which holds the cooling pipe bracket to the engine block. Stick some insulation tape in the socket so that you don't drop the bolt while moving between the rubber pipes.
When done, do the bolts 1&2 and remember to put new gasket on.
All is left is to fit the air inlet and you're done.
Your car should run like new.
GOOD LUCK
thanks
my car P0299 fault gives failure
The same problem happened to me in my
I changed turbochargers
I changed the air flow meter
I changed almost all sensor and solenoid valves
you change the car came to him the latest vacuum tube
I had never seen this subject

Last edited:
Similar threads
- Replies
- 8
- Views
- 912
- Replies
- 0
- Views
- 727


