SEAT Ateca Variable Boot Floor kit DIY installation guide applicable to Pre-Facelift (2016-2020) & Facelift (2020-present).
This guide has been written to help people who have or are intending to purchase the variable boot floor kit that Seat Direct Parts have put together. Here’s the link https://seatdirectparts.co.uk/parts...teca/seat-ateca-2017-2020-double-floor-option
When I purchased this kit, I searched all the threads on the forums and the Facebook groups for a installation guide. I also emailed the supplier asking for a guide however they did not have one. The installation process is fairly straightforward but does mean cutting the carpet in the boot.
In this kit, you would have received the following:
Variable floor
2 x Side supports
2 x Union nuts
2 x Torx bolts
A few covers
Tools I used:
Utility knife (Stanley knife)
Cordless drill
40mm hole saw
25mm hole saw
Pen/chalk
Jigsaw
Superglue
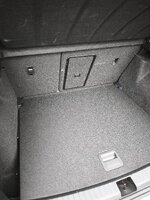
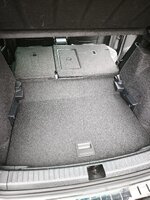
Step 1: Fold down rear seats and remove boot floor.
Step 2: Offer up one of the side supports to the boot wall where the anchor point is, as the support will clip on to the anchorage point in the end. This will make the side anchor points redundant.


Step 3: You can now see whereabouts the holes will need to be cut. Mark the hole nearest to the rear of the car with chalk.

Step 4: Move the support out of the way. Lift up the carpet and get your fingers in, you should be able to feel a bolt sticking out of the wall. You need this bolt to come through the carpet and into the hole nearest to the rear of the car on the support.
Step 5: The hole will need to be about 40mm in diameter (I used a hole saw in a drill). This is to allow the plastic of the support to go through the carpet. Offer the support up again. You may need to cut some more carpet of to make it fit nicely. The bolt should be coming through the hole in the support.

Step 6: Once you’re happy with how the support sits, you can push the support on to the anchorage point until it clips in. Hold it here as it will unclip. Mark the other hole. Again remove the side support and cut the carpet. This will need to be about 25mm in diameter. Again adjustments may be needed.
Step 7: After you have cut the 2nd hole there will be a hex shaped hole in the chassis which will be revealed. Now install one of the union nuts. These go in tube end first so the lip rests on the face of hole. If the union nut goes in and is a perfectly tight fit and you cannot remove it then great. If it is loose then I would advise to remove it and put some glue (I used superglue) on the hex part of the nut and then put it back in the hole and wait the recommended dry time.

Step 8: Now you are ready to screw it in. I found the supplied bolts to be too short. I don’t know if this was a mistake from the supplier. It has nothing to do with the carpet as I checked before proceeding with the installation. Fortunately I have a van with a range of bolts spare. I found a couple of 6mm bolts with washers that are about 8-10mm longer than the original bolts. These were perfect. Offer up the support and start screwing the bolt in. Once you’ve put a few threads in, you can take one of the supplied covers and push it onto the bolt from Step 4. Push the cover on as far as you can and fold the cap over until it clips on.

Step 9: Now clip the support to the anchorage point and hold there whilst tightening the bolt up. Take your hands away and repeat on the other side.


Step 10: Both supports should now be installed. Test them with your new floor.


Step 11: Now the variable floor is done, we need to reinstall the original boot floor so that A) you have a second floor to allow for storage under the new raised floor and B) so that no items or objects fall from the raised floor down the sides into the wheel well. The original floor may not fit now due to the supports being in the way. I measured the depth of the protruding part of the support to be 2” x 2.5”. Mark this with the chalk and cut (using a saw of some kind) making sure to do it at an angle just like the support. The floor should now fit around the supports.


This is the end of guide. I hope people find this helpful. It’s not perfect but it works. I do not work in the motor trade and cannot advise on legalities with this modification when it comes to PCP or Lease cars. I know that at some point I’ll probably have to replace the carpets in the boot before my car goes back. To me this was a worthwhile modification for a car I will now have for 4 years.
Sent from my iPad using Tapatalk
This guide has been written to help people who have or are intending to purchase the variable boot floor kit that Seat Direct Parts have put together. Here’s the link https://seatdirectparts.co.uk/parts...teca/seat-ateca-2017-2020-double-floor-option
When I purchased this kit, I searched all the threads on the forums and the Facebook groups for a installation guide. I also emailed the supplier asking for a guide however they did not have one. The installation process is fairly straightforward but does mean cutting the carpet in the boot.
In this kit, you would have received the following:
Variable floor
2 x Side supports
2 x Union nuts
2 x Torx bolts
A few covers
Tools I used:
Utility knife (Stanley knife)
Cordless drill
40mm hole saw
25mm hole saw
Pen/chalk
Jigsaw
Superglue
Step 1: Fold down rear seats and remove boot floor.
Step 2: Offer up one of the side supports to the boot wall where the anchor point is, as the support will clip on to the anchorage point in the end. This will make the side anchor points redundant.


Step 3: You can now see whereabouts the holes will need to be cut. Mark the hole nearest to the rear of the car with chalk.

Step 4: Move the support out of the way. Lift up the carpet and get your fingers in, you should be able to feel a bolt sticking out of the wall. You need this bolt to come through the carpet and into the hole nearest to the rear of the car on the support.
Step 5: The hole will need to be about 40mm in diameter (I used a hole saw in a drill). This is to allow the plastic of the support to go through the carpet. Offer the support up again. You may need to cut some more carpet of to make it fit nicely. The bolt should be coming through the hole in the support.

Step 6: Once you’re happy with how the support sits, you can push the support on to the anchorage point until it clips in. Hold it here as it will unclip. Mark the other hole. Again remove the side support and cut the carpet. This will need to be about 25mm in diameter. Again adjustments may be needed.
Step 7: After you have cut the 2nd hole there will be a hex shaped hole in the chassis which will be revealed. Now install one of the union nuts. These go in tube end first so the lip rests on the face of hole. If the union nut goes in and is a perfectly tight fit and you cannot remove it then great. If it is loose then I would advise to remove it and put some glue (I used superglue) on the hex part of the nut and then put it back in the hole and wait the recommended dry time.

Step 8: Now you are ready to screw it in. I found the supplied bolts to be too short. I don’t know if this was a mistake from the supplier. It has nothing to do with the carpet as I checked before proceeding with the installation. Fortunately I have a van with a range of bolts spare. I found a couple of 6mm bolts with washers that are about 8-10mm longer than the original bolts. These were perfect. Offer up the support and start screwing the bolt in. Once you’ve put a few threads in, you can take one of the supplied covers and push it onto the bolt from Step 4. Push the cover on as far as you can and fold the cap over until it clips on.

Step 9: Now clip the support to the anchorage point and hold there whilst tightening the bolt up. Take your hands away and repeat on the other side.


Step 10: Both supports should now be installed. Test them with your new floor.


Step 11: Now the variable floor is done, we need to reinstall the original boot floor so that A) you have a second floor to allow for storage under the new raised floor and B) so that no items or objects fall from the raised floor down the sides into the wheel well. The original floor may not fit now due to the supports being in the way. I measured the depth of the protruding part of the support to be 2” x 2.5”. Mark this with the chalk and cut (using a saw of some kind) making sure to do it at an angle just like the support. The floor should now fit around the supports.


This is the end of guide. I hope people find this helpful. It’s not perfect but it works. I do not work in the motor trade and cannot advise on legalities with this modification when it comes to PCP or Lease cars. I know that at some point I’ll probably have to replace the carpets in the boot before my car goes back. To me this was a worthwhile modification for a car I will now have for 4 years.
Sent from my iPad using Tapatalk