Going to build a race 1m

Manic172

https://m.facebook.com/ManicMotorsport1
Dec 4, 2018
1,257
1,276
Hemel hempstead
www.seatcupra.net

Just ordered my control panel.... now to make a panel to hold it.
Summit raceing make lots of nice stuff for road race and track. https://www.summittech.co.uk
 
Last edited:
  • Like
Reactions: Yellow fr

Manic172

https://m.facebook.com/ManicMotorsport1
Dec 4, 2018
1,257
1,276
Hemel hempstead
www.seatcupra.net
Due to covid..... my work furlowed 3 people. I stayed at work.and carried on as normal. 14 hours aday 5 and a half days a week. and so by the end of the year i still had 15 days holiday . I am classed as the 2nd fitter so they offered to buy them back from me all in 1 go ...... all I could think is ooooooo what can I buy for the race car.. next is the Intercooler. But am in talks with airtec to try to do a deal on multi buying ...
 
Last edited:

Manic172

https://m.facebook.com/ManicMotorsport1
Dec 4, 2018
1,257
1,276
Hemel hempstead
www.seatcupra.net
Well been really busy at work so had no time to get to the workshop. But how ever there is always ebay.... thanks to Matt Lewis at http://www.mattlewisracing.co.uk
I have these very nice oil coolers
some very nice boxes
20210105_160459.jpg

That have inside them ...sweet coolers
20210105_160851.jpg


The 13 row is going to be used for power steering cooling and the 19 row for the engine oil. I will mount them sort of where the standard Intercoolers would be. Then make up my own pipes to run where I want them too.
 

anni25pd

Active Member
Jul 23, 2012
130
11
glasgow/ayrshire

Just ordered my control panel.... now to make a panel to hold it.
Summit raceing make lots of nice stuff for road race and track. https://www.summittech.co.uk
Very trick looking bit of kit....

As this build is in general, keep up the sterling work
 
  • Like
Reactions: Manic172

Manic172

https://m.facebook.com/ManicMotorsport1
Dec 4, 2018
1,257
1,276
Hemel hempstead
www.seatcupra.net
A few years ago......like 4or 5 the leon broke down and I never fixed it... so it got moved about a few times. Then I got all excites and started findling and buying stuff. I bought an ally rad and loads of other bits and bobs... its only now about 3 years afterburner the rad I now find out its wrong.
20210109_142536.jpg
instead of having lugs on the side its got 8mm holes .... so the company didn't wanna know so I had to make some thing else for the car. I started with some 50 x 50mm 1 mm ally angle
20210109_152816.jpg
cut one side to 25mm and using the holes where the original rad mouns go I went to them for a location. Drilled them out to 9mm and put in m6 nut serts
20210109_145509.jpg
place the ally in position and marked the holes where its going to mount. And drilled them out and bolted in position with Allen bolts.
then spaced the rad with some cardboard on the bottom to get a position I then marked the mounting holes on the ally.
20210109_152816.jpg
then cut down so size... but hold on.. there is excess weight.... look at all that extra material... so I marked out for some holes . Drilled 10mm holes then used a hole cutter
20210109_153940.jpg
makes nice round holes . Put 1 bit 1 side and the other bit the other side then do up the Allen key and it cuts a nice round hole.. came from ebay and they sell loads of different sizes.

Then for that professional look I sumped the holes too
20210109_154427.jpg
again 2 peice jobbie put it either side and do it and there you have it
20210109_154505.jpg
then undo it
20210109_154524.jpg
and repeat.....
20210109_160446.jpg
so the mounts all done . But .. rads are never solid mounted. So I got some anti vibration mounts with m8 threads. But like every thing they where not quite right
20210109_160932.jpg
the rubber section was to big so out with the grinder
20210109_160937.jpg
and made them more oval.... cut of both sides..
Them bolted them to the mounts and screwed the mounts in to position
20210109_162149.jpg
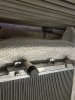
then slid the rad In and done it up..
20210109_162455.jpg
not to bad..looks nice from the sides
20210109_162450.jpg
20210109_162446.jpg
20210109_162532.jpg
looks a professional job.... and we all know it wasn't tho..
Gonna tray to get back to the workshop tomorrow to mount the intercooler.....
Sorry for the boring speech on fitting a radiator.. but nothing.. absolutely nothing has been a bolt on part.. every blo0dy thing had needed modifying of some sort
 

Attachments

  • 20210109_142536.jpg
    20210109_142536.jpg
    664.3 KB · Views: 105
Last edited:

Manic172

https://m.facebook.com/ManicMotorsport1
Dec 4, 2018
1,257
1,276
Hemel hempstead
www.seatcupra.net
Had another delivery today..
20210113_160041.jpg
20210113_160045.jpg

Some purple kevlar and black carbon weaved fabric. Not sure where this is going to go. Was thinking of doing the boot floor where I have cut out the spare wheel well.
Just need some big sheets of glass to lay it on then doing the resin and laying it
 
  • Like
Reactions: e_cupra

e_cupra

Active Member
Apr 19, 2020
62
27
Had another delivery today..
View attachment 21236 View attachment 21235
Some purple kevlar and black carbon weaved fabric. Not sure where this is going to go. Was thinking of doing the boot floor where I have cut out the spare wheel well.
Just need some big sheets of glass to lay it on then doing the resin and laying it

Similar delivery to me as well mine is just the usual 2x2 weave though.

Personally I think the colour in the weave looks amazing, I know there are some carbon fibre purists that hate it but it’s your build so do what you want.

Looking forward to seeing how it turns out.


Sent from my iPhone using Tapatalk
 
  • Like
Reactions: Manic172

Manic172

https://m.facebook.com/ManicMotorsport1
Dec 4, 2018
1,257
1,276
Hemel hempstead
www.seatcupra.net
Similar delivery to me as well mine is just the usual 2x2 weave though.

Personally I think the colour in the weave looks amazing, I know there are some carbon fibre purists that hate it but it’s your build so do what you want.

Looking forward to seeing how it turns out.


Sent from my iPhone using Tapatalk


I have done fibreglassing but never carbonfibre yet. So this is gonna be fun
 

Manic172

https://m.facebook.com/ManicMotorsport1
Dec 4, 2018
1,257
1,276
Hemel hempstead
www.seatcupra.net
Not got any pics. But have spent the day making brackets. Some for the lower mounting of the intercooler. Then rear covers for the coolers. Where the normal side intercooler used to live , the drivers side is going to be the power steering coolerand then the passengerside is going to be engine oil cooler as they are in front of the front wheels I have made covers to help protect them.
But one small problem I want to increase increase air flow over them. I am looking for some one who can make some panels for me with louvres in them
Screenshot_20210130-175843_eBay.jpg


Some thing like these but need them in different size. Any body able to help.
Also made some supports to hold the dash binical to the steering column
BTCC_Brands_Hatch_2012-069.jpg

So hopefully looks some thing like this when done..
 

MATT RILEY

Oil burner
May 9, 2004
402
74
Looking good mate!

On a side note from the bottom pic I always wondered how different it would feel when you change the driving position of a street car, ie the seat and steering wheel much further back? Must feel odd when cornering hard?

This is the most entertaining thread on the forum period.
 
  • Like
Reactions: Manic172

Manic172

https://m.facebook.com/ManicMotorsport1
Dec 4, 2018
1,257
1,276
Hemel hempstead
www.seatcupra.net
In my race saxo the seat in right down and back a bit. the steering column is lengthened a bit too. But the pedals are in the original position. And that's amazing to drive. Even tho it's just a 1.6 n/a engine
 

Manic172

https://m.facebook.com/ManicMotorsport1
Dec 4, 2018
1,257
1,276
Hemel hempstead
www.seatcupra.net
Evening all. After 2 clutches and a water leak for jobs to do this morning.(was at work at 2am....... we made the trip to the workshop to play race cars. Righty , we are planing on racing the beast in some sort of endurance racing 45 mins right the way threw to 12 hrs with pit stop and driver changes.. so every thing is going to get hot very very very hot. On thinking of this we have thought about fitting some extra coolers.
Yep the bigger intercooler is a must. But with steering being abused and the engine going to be driven hard for hours they will both need extra cooling .
So it was out with the crayons and I designed some bracers and covers.
So you have the normal mocal style mountings that are all well and good
20210206_154353.jpg

20210206_161228.jpg

But being in the wheel arch with out any liners they are going to get destroyed pretty quickly... I get some 1.5mm aluminum and done a quick design for a rear cover. Leaving space being the cooler to let the air out. But I am also going to fit louver vents to help even more.
I bent these so it would hold the coolers on their side in the position as the old intercooler would have been in the wheel arch.
20210206_154414.jpg
20210206_154427.jpg


So lined up and marked the chassis leg. Then 9mm holes and m6 nut serts to screw in too. The cooler looks pretty well at home
20210206_163654.jpg

The of side is the 13 row for the power steering then the near side is 19 row and will be for the engine oil cooler.
Then some stainless steel m6 rod to help hold them a but stuffer. They don't look to shabby
20210206_165835.jpg


I need to readjust the mounts about to pull the bottom edges in as they are a bit close to the bumper when I held it in position
But other than that... all can't be to bad.
Now home and waiting for all this snow and thinking I really should have done this project 4wd
 
  • Like
Reactions: Gokiwi64
Genuine SEAT Parts and Accessories.