PD150 Leon FR - S3 Intercooler FMIC fitment project

S10EAT

Active Member
Jul 31, 2010
407
8
Eastbourne
I'll be posting up a few details soon on how I recently faired with installing an S3 (8P) intercooler to my 2005 Seat Leon Fr PD150.

Having had an almost identical car in the past and forked out over £500 for a darkside developments modified one I wanted to see really how difficult it was to fit and modify myself to go in the Leon...

Photos and notes to follow for anyone interested!

I will post these photos and some details tonight - apologies for the delays!
 
  • Like
Reactions: Yellow fr

S10EAT

Active Member
Jul 31, 2010
407
8
Eastbourne
So I will do my best to explain these steps in short form, I haven't got a full how to guide but it should give you an idea of how to achieve installing the S3 Intercooler.

Extra tools required: Angle Grinder, Stepped Drill bit is helpful for brackets, M6 x 16 Bolts, washers and nuts. I got a 20 pack of these and 10 brackets in total - you can get these from anywhere like screwfix or your local hardware stores.

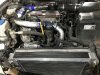
1. Remove Bumper, headlights and crash bar

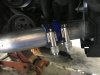
2. Remove front section of car onto a high enough level support for the sandwich of Radiator, Intercooler and aircon condensor to rest on, I used an old truck/van chair and for me this was the correct height. Important: along with the frame bolts that hold the front frame to the car - the bonnet catch cable will need to be disconnected To get the length needed to move the lump - remember to connect this again on reassembly otherwise you won’t be able to open your bonnet!

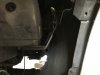
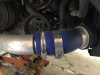
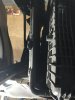
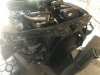
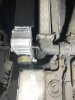
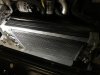
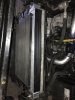
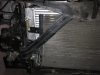
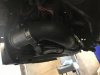
Once the frame is supported go ahead and remove the screws that secure the intercooler to the frame, start by removing the mounting points on each side - 4 in total and this will allow the whole sandwich Intercooler/radiator/ air con to separate from the frame - it has to be jiggled a little to separate - two people at this point can be easier. Remove all torx screws that secure the radiator and air con to the intercooler.

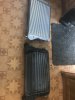
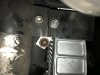
3. Measure up brackets for front of intercooler to match the four mounting holes for air con condensor, there is also one mounting on the inlet side where the aircon condenser is supported and wraps round to the front - so five in total.

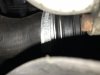
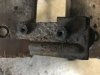
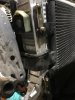
4. Cut off top radiator mounting brackets that used to connect to original PD150 intercooler (These get in the way of install).

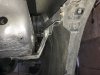
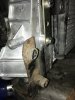
5. Create two brackets for the lower back mounting points on the intercooler - one above the inlet side and same on the outlet side which secure the intercooler to the radiator. In my experience I had to angle/bend one bracket for the inlet side and the outlet side was just a straight bracket.

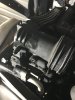
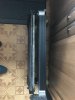
6. There is a mounting point on the side of the intercooler that is not used it is level with the inlet and has to be angle grinded off, otherwise the intercooler will not fit with the frame.

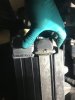
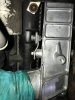
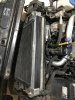
7. The Intercooler support brackets which slide onto both the bottom of each side of the intercooler must have a corner cut out so that they fit in with the lower mounting points for the air con conderser.

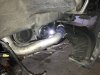
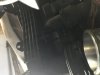
8. Once the sandwich of radiator, intercooler and air con unit is back together, now comes the next part, when moving the pack into the frame you will find that it's a tight fitment, the brackets will get in the way of some of the frame as you try to move it forward to it's final resting position and you can line up the side mounting plates for each side of the intercooler. Using some common sense and patience I moved the pack in and out, hammering and angle grinding sections at a time until the pack slide fully forward.

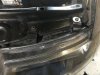
Notes: When trying to get the pack lined up with the mounting points each side I was only able to get 3 out of 4 screws back into both sides, with a bit more time I'm sure all 4 could be achieved and to be honest the pack didn't move an inch once everything was in place so I didn't personal worry about this.

I'm going to upload as many photos as I can to help visualise this but as I said because this was the first time I had attempted these unknowns this is all from memory.

Regardless I'm hoping you may find some of these useful, for someone confident in a little bit of bracket fabricating and slight modifying installing the S3 Intercooler into a PD150 will work.

I paid £180 for a Nissens S3 Intercooler and about £20 for the brackets and bolts/nuts - I already had the other tools, so even if you had to buy a few tools it would still come in cheaper than forking out for a Darkside one for £522. Some people want an easy bolt on option, I had already had the DS one and fitted to my previous ARL Leon so wanted to see how difficult it really was without the corrected mounting points.

Any questions, please let me know - I'm not an expert as you can imagine but I'm an enthusiast like I'm sure you all are, so will do my best to help.

I can only upload 10 photos at a time so, I'll put some in of the original setup first and then put some of the install parts.

Thanks!!!
 

Attachments

  • 2020_07_13_IMG_5016.JPG
    2020_07_13_IMG_5016.JPG
    338.1 KB · Views: 718
  • 2020_07_13_IMG_5017.JPG
    2020_07_13_IMG_5017.JPG
    583.1 KB · Views: 675
  • 2020_07_13_IMG_5018.JPG
    2020_07_13_IMG_5018.JPG
    592.9 KB · Views: 954
  • 2020_07_13_IMG_5020.JPG
    2020_07_13_IMG_5020.JPG
    608.9 KB · Views: 693
  • 2020_07_13_IMG_5022.JPG
    2020_07_13_IMG_5022.JPG
    361.7 KB · Views: 666
  • 2020_07_13_IMG_5023.JPG
    2020_07_13_IMG_5023.JPG
    393 KB · Views: 700
  • 2020_07_13_IMG_5024.JPG
    2020_07_13_IMG_5024.JPG
    305.4 KB · Views: 637
  • 2020_07_13_IMG_5030.JPG
    2020_07_13_IMG_5030.JPG
    474.3 KB · Views: 676
  • 2020_07_13_IMG_5031.JPG
    2020_07_13_IMG_5031.JPG
    352.4 KB · Views: 659
  • 2020_07_13_IMG_5032.JPG
    2020_07_13_IMG_5032.JPG
    423.3 KB · Views: 682
Last edited:

S10EAT

Active Member
Jul 31, 2010
407
8
Eastbourne
Intercooler size comparison and mounting points
 

Attachments

  • 2020_07_13_IMG_5026.JPG
    2020_07_13_IMG_5026.JPG
    439.5 KB · Views: 624
  • 2020_07_13_IMG_5033.JPG
    2020_07_13_IMG_5033.JPG
    761.4 KB · Views: 619
  • 2020_07_13_IMG_5036.JPG
    2020_07_13_IMG_5036.JPG
    514 KB · Views: 611
  • 2020_07_13_IMG_5037.JPG
    2020_07_13_IMG_5037.JPG
    663.3 KB · Views: 602
  • 2020_07_13_IMG_5040.JPG
    2020_07_13_IMG_5040.JPG
    606.5 KB · Views: 579
  • 2020_07_13_IMG_5049.JPG
    2020_07_13_IMG_5049.JPG
    415.7 KB · Views: 593
  • 2020_07_13_IMG_5052.JPG
    2020_07_13_IMG_5052.JPG
    524.6 KB · Views: 578
  • 2020_07_14_IMG_5063.JPG
    2020_07_14_IMG_5063.JPG
    533.4 KB · Views: 593
  • 2020_07_14_IMG_5068.JPG
    2020_07_14_IMG_5068.JPG
    485.3 KB · Views: 582
  • 2020_07_14_IMG_5070.JPG
    2020_07_14_IMG_5070.JPG
    641 KB · Views: 599

S10EAT

Active Member
Jul 31, 2010
407
8
Eastbourne
Intercooler Fitment continued
 

Attachments

  • 2020_07_14_IMG_5067.JPG
    2020_07_14_IMG_5067.JPG
    491.2 KB · Views: 560
  • 2020_07_14_IMG_5070.JPG
    2020_07_14_IMG_5070.JPG
    641 KB · Views: 547
  • 2020_07_14_IMG_5072.JPG
    2020_07_14_IMG_5072.JPG
    738.5 KB · Views: 606
  • 2020_07_14_IMG_5073.JPG
    2020_07_14_IMG_5073.JPG
    649.8 KB · Views: 575
  • 2020_07_14_IMG_5077.JPG
    2020_07_14_IMG_5077.JPG
    717.6 KB · Views: 582
  • 2020_07_15_IMG_5080.JPG
    2020_07_15_IMG_5080.JPG
    580.4 KB · Views: 756
  • 2020_07_15_IMG_5086.JPG
    2020_07_15_IMG_5086.JPG
    704.3 KB · Views: 818
  • 2020_07_15_IMG_5088.JPG
    2020_07_15_IMG_5088.JPG
    760.1 KB · Views: 1,038
  • 2020_07_15_IMG_5090.JPG
    2020_07_15_IMG_5090.JPG
    451.4 KB · Views: 543
  • 2020_07_16_IMG_5095.JPG
    2020_07_16_IMG_5095.JPG
    412.2 KB · Views: 586

S10EAT

Active Member
Jul 31, 2010
407
8
Eastbourne
Outlet, One bolt sheared on headlight due to rust, just had to drill it out and put a nut/bolt and washer combo on it and final photo is the finished article.
 

Attachments

  • 2020_07_16_IMG_5097.JPG
    2020_07_16_IMG_5097.JPG
    373.5 KB · Views: 513
  • 2020_07_16_IMG_5098.JPG
    2020_07_16_IMG_5098.JPG
    580.9 KB · Views: 502
  • 2020_07_16_IMG_5099.JPG
    2020_07_16_IMG_5099.JPG
    617.1 KB · Views: 869

S10EAT

Active Member
Jul 31, 2010
407
8
Eastbourne
Hi Martin,

I would say the time between the intercooler getting heatsoaked is dramatically increased, I can use WOT a lot more now and the power is still there and keeps consistent even after several runs - before this would tail off and had a noticeable decrease in power after a few WOT sessions between roundabouts for example.

Ironically, I was obviously with this mod trying to cool the engine air intake down but I was coming back from a long trip last week and in the 36 degree ambient temperature outside blew my radiator! Had coolant spraying out from the back/sides and fans chucking it everywhere! Well when you combine 36 degree heat with a 15 year old radiator I'm not surprised. Luckily I'm hoping that I won't have to pull the whole bumper and crash bar assembly out again, should be able to gain access to the bolts at the bottom of the rad once I've removed the fan assembly and outlet intercooler pipe.

I'll let you know how I get on - I've ordered a Nissens part for the radiator as well as I was pleased with the intercooler they had supplied.

Thanks!
 

S10EAT

Active Member
Jul 31, 2010
407
8
Eastbourne
Well new radiator is in, was such a pain in the arse getting it out because I was being stubborn about removing the front bumper, crash bar and front assembly again but was just about doable with some manipulation and swearing ? So I've put the latest G13 Evo coolant in and so far so good - was the radiator, no more leaks.

Whilst this had been going on and car was off the road I bought some gold heat management wrap to treat cold side intercooler pipes with and turbo inlet pipe.

Did top half of intercooler pipe so far, photos to follow...
 
Progressive Parts, performance parts and tuning specialists