Water leak into footwell - dodgy seal info and DIY repair guide (Image links dead)

markv

Guest
Was it cheaper than the Seat one?
Also what are the dimensions (ish) of the actual sealant on the roll?

It's the same part no. AKD 497 010 04R10 and cost 28.88 inc. VAT. 4 x 2.5 m

It's fatter, softer and squashier than I expected. 1 cm wide and about 0.5 cm thick.

I'd really like some advice on how much of the existing seal to replace considering my existing seal has only failed for about 3-4 inches along the bottom under the speaker.

Everything is one possibility. But how easy is it to scrape off the existing seal? Particularly as the majority of mine is completely fine - looks like new. Tempted to just do the bottom third of the door.

After all, the holes which the door trim attaches to are obviously not water-tight, so there seems no point in re-sealing above them.

If I don't replace the entire length, any tips on getting a good join between what I leave of the original seal, and the new seal?
 

markv

Guest
P.S. one interesting result of having the door trim off for several weeks... Almost every passenger has remarked it smells like a brand new car. (51 reg) Explain that!
 

LEE69

Stage 2 Revo'd
Dec 10, 2004
21,262
74
C\UK\Devon\Torquay
No idea why i never thought of it sooner, i have a mate who fits car windscreens/ glass and they use a sealant in a gun, we shall be doing mine ASAP.
 

art103

Guest
Just adding my 2 pence worth...

I read this thread some months ago when my rear footwell turned into a swamp.

I asked my local garage to replace the seal, but they quoted me 70GBP plus labour per door and said it wasn't economical. I think they mis-understood when I asked them to replace the seal, i.e. the main rubber door surround rather than the internal seal.

Dumbfounded, I set about with two blunt kitchen knives to prise the door handle off - lo and behold, the hardest part was over!

Having removed the door panel, I went to my cupboard to get the silicone sealant... Oh dear, all dried up!
An interesting trip to the DIY store with a small metal rope to pull in place of the door handle :)

Once I had the sealant, the whole process of cleaning up, removing the perished seal and re-sealing with sealant took around 25 minutes per door.

Well within the grasp of most DIY enthusiasts.

I'm glad to report that a(nother) week of rain has passed, and none of the 4 doors are leaking.
The swamp has turned into more of a damp patch!
Previously any door that was opened (front or rear) would yeild a torrent of water running off the sill.

Thank you for posting this information, without it I would be considerably poorer!
 

Dave H

Active Member
Mar 12, 2007
87
0
Perth, Scotland
The VW part number on my receipt is V1H0 803 535 A - 022C05 CORD SEAL

I have just visited VW and the part number above is a plate for exhuast ?
An alernative part number AKL 450 005 05 at £16.04 incl VAT is very similar although not as fat as the AKD 497 010 04R10.
Not sure of the length as the box did not say, but would say that this would do 2 doors (guess).

Important, VW dealer parts dept had AKD 497 010 04R10 in stock and price matched a SEAT dealership @ £24.58 + VAT
(I had first phoned a SEAT dealer that is 45 miles away to enquire about cost prior to a visit at VW parts dept, then asked why SEAT price was cheaper)

MORE IMPORTANT
Having bought (AKD 497 010 04R10) 4no x 2.5m seal cord kit in a hexagonal box and a 6 clips (3B0868243), I have managed to seal 4 doors only using only TWO of the cords, ie 5m is all that is needed! DO NOT BUY 4 seal cord AS YOU ONLY NEED 2.

I did not break any clips but did notice that I did need 2 clips as some were missing. It also took me about 45 minutes each door.

I returned the 2no x 2.5m seal cord in the hexagonal box and the 4 door clips to obtain a part refund from VW. Thank you to the local VW garage!

TOTAL COST OF FIX = £16.07 including VAT (2no 2.5m seal cord + 2 door clips.) job done in less than 3 hours and i am complete novice!
 
Last edited:

LEE69

Stage 2 Revo'd
Dec 10, 2004
21,262
74
C\UK\Devon\Torquay
No idea why i never thought of it sooner, i have a mate who fits car windscreens/ glass and they use a sealant in a gun, we shall be doing mine ASAP.

Had mine done nearly two weeks now and we had the most horrendous rain last night, even though i trust my mate 100% there was a little doubt it was done, but i opened all four doors and the sills were bone dry.


RESULT!!
 

scottym

Diesel Powered
Sep 19, 2007
124
0
Ashford, KENT
I have just fixed my leaks.

Does anyone know how much it costs for a new front sound deadening pad? Mine stinks even thouigh its dry, I have had enough of mates taking the piss out of how my car smells.

Any ideas?

Scott
 

scottym

Diesel Powered
Sep 19, 2007
124
0
Ashford, KENT
well, whats the chance of finding a car that hasnt had a leak? not very high if ALL the posts on here are anything to go by.

The thing that annoys me is my car was valeted before I got it, so didnt have any idea of ransid water or manky smells, its bloody annoying!

Every bloody car I have had, has leaked! :censored:
 

alex_morley

Guest
Morning guys, just thought I'd give a bit of info on my similar problem.

I've had my '99 Toledo V5 for about 18 months now and it's been a bit damp on and off in the driver and driver's side rear footwell all that time. Sometimes it would be bad, sometimes it'd be bone dry but last winter I was having to scrape frozen condensation off the inside of the windscreen most mornings which was obviously not fun and I knew there was a problem.

However, being lazy, I kept putting off fixing it, thinking "ah well, it's only a bit damp, nothing major."
That was until Sunday morning when I went to the car, opened the back door and found about 5cm of standing water in the rear footwell. Having sworn profusely and mopped it up with as many towels as I could find, my father and I set about trying to fix the problem.
I've now re-sealed the two doors with silicone (loosened the carrier panel, squirted behind it and then tightened it again to try and get a good bead of seal) and have also sliced wedges out off the lower door seal around the drain holes to try and help there.

I simply can't fathom how awful this design is; who on earth came up with a drain hole that was self-closing when you shut the door?!

I now have to worry about the wet carpet. Obviously I've got to remove it and hang it up in the shed to dry. Without a Haynes Manual for the car, I'm going to have to tackle taking the bits out one step at a time. Does anyone have any tips?
As for drying the car itself once that's out, does anyone have any great ideas? The car's kept on the road outside my house so can't exactly put it in a nice warm dry garage with doors open to dry out. Anyone know of anything like a portable de-humidifier that plugs into the 12V supply or similar?

Thanks to the guy who posted this original guide, I'd have been struggling to find the cause without it.

Al
 

Culli

Guest
Hi, im having the same probelm as many others with my Leon Mk1. Except im a little confused with some of the terms used. When i open my driver side front door there is water collecting on the sill and rushing out. Some of it seems to be rushing into the car though too as the driver side rear footwell is soaking. Im presuming from what i have read above that it is the seal inside my door which is the problem.

Im confident i can do a repair but not so confident i know exactly what im repairing. Is the seal which is causing the problem the one around the 'Carrier' (i think thats the panel inside the door) and do i have to remove the 'Carrier' to fix it or can i leave it in place? Also, aside from the tools to actually take the door apart, am i likely to need any spare parts, whats the best thing to use to reseal, where can i get them and how much will it cost me? Any thanks will be great.
 

Culli

Guest
thanks for the reply, but can you answer the part regarding the removal of the 'Carrier' if i can avoid taking that off it will obviously make life easier.
 

marshyc

Full Member
Mar 12, 2006
299
0
Huddersfield
I now have to worry about the wet carpet. Obviously I've got to remove it and hang it up in the shed to dry. Without a Haynes Manual for the car, I'm going to have to tackle taking the bits out one step at a time. Does anyone have any tips?
As for drying the car itself once that's out, does anyone have any great ideas? The car's kept on the road outside my house so can't exactly put it in a nice warm dry garage with doors open to dry out. Anyone know of anything like a portable de-humidifier that plugs into the 12V supply or similar?

Thanks to the guy who posted this original guide, I'd have been struggling to find the cause without it.

Al

I did this to mine on Friday and just had to fudge my way through it but it ain't that bad once you start.

You will need a selection of Philips and flat-head screwdriver, Allen keys, 6, 10 & 13 mm sockets and a T20 torx drive.

First of all disconnect your batteries negative terminal (10mm socket). Then remove the two plastic covers on the runners for each seat. To do this you need to remove the little circular screw cover from the back of the runners using a small flat-head screwdriver. Once this is off use the T20 drive to remove the two small screws and then slide the covers forward and pull up then back.

Next slide the seat as far back as it will go on the runner and using a 13mm socket undo the 2 nuts at the front of the seat in the middle. Then you need to push the seat back out of the runners and lift. At this point I tilted the seat back and unclipped the air bag wiring on the yellow plug. This plug then needs unclipping from the seat on the white plastic piece.

Next job is to remove the inner sill trim. Just pull up on this and it will pop out of the clips. This runs the full length of the interior and if I remember right there is a small philips head screw just behind the B-pillar cover. You will need to unclip this from the front trim pieces under the dash. You will also propably need to remove the lower B-pillar trims too and the drivers side one has the interior monitor switch on for the alarm. You will need to unclip the wire for this.

Next remove the drivers side trim panel under the dash around the bonnet lever. This is held in place by a screw and a large plastic screw you use a flat-head screwdriver in to undo it. Then comes the clutch foot rest again a large plastic screw and a allen key screw 3mm I think. Once this is off you need to remove the trim underneath where the foot rest was. This is the same shape as the foot rest but has 3 large holes in it. Get the 10 mm socket and in these holes are plastic nuts. Undo these and pull it off. One of mine would not undo but it pulled off with no problem.

Next you next you need to undo the screws on the centre console trim. Remove the two small covers on the side, one at the front and one around the middle, and undo the screws. Now remove the rear ashtray and undo the 2 T20 screws. Pop up the gaiter trim around the gear stick and pull up the centre console trim from the rear. At this point you need to unclip the switch wire for petrol flap and TCS/ESP. Then push the gear stick gaiter trim through the hole it clips into by turning it sideways. Carry on lifting the centre trim and pulling away from the bottom of the dash. You also need to get this over the handbrake.

Right almost there. You now need to remove the front ashtray & radio and undo the T20 screws for the trim and remove this. Then take out the climate control unit, undoing all the wiring connectors. Now slide out the cup holder and switches and unclip the wires from these. At the top of the centre dash there are two screws and two clips with screws in. Undo all these and then you will need to undo the screws at side where the lower driver and passenger trim attaches to the centre. Then remove the centre trim. Also while you are here undo the rest of the lower drivers dash via fuse board and other T20 screws on the lower edge. You will now need to remove the glove box.

Now you will see a silver metal piece which runs vertically between gear box tunnel and lower dash. You need to undo the blots holding this in place, 13mm again I think. Once this is undone you need to undo the brown metal bar which runs horizontally. One this is out you need to remove the air duct which sits right on the tunnel at the rear.

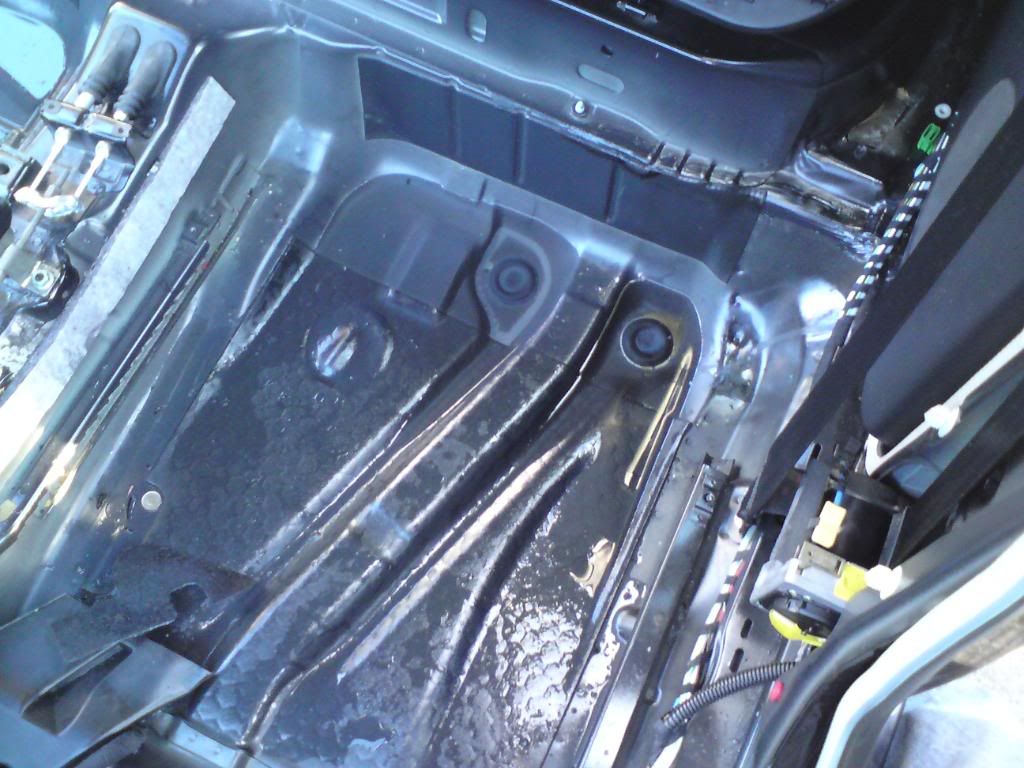
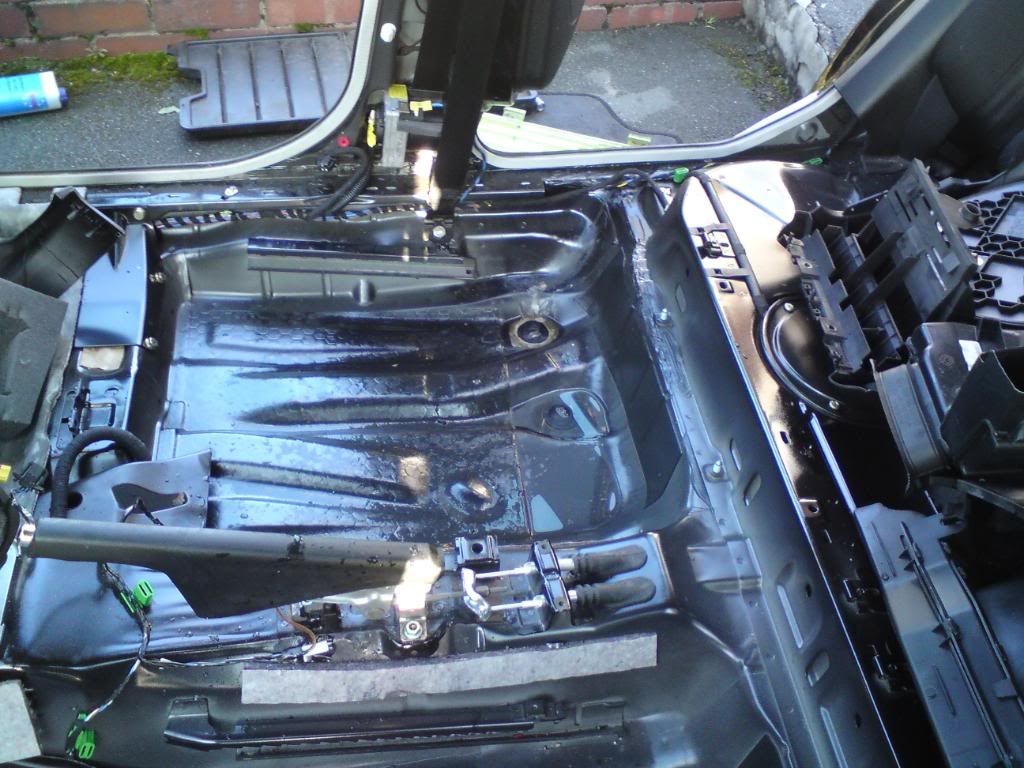
Next and final stage is to pull the back seats, the ones you sit on, forward and pull the hooks out of the holes and take the back seats out. Then you can begin to remove the carpet from the back forward and over the gear stick/handbrake and once this is out remove the thick sound deadening.

You will then see something like this.

PhoneC902098-1.jpg


PhoneC902100-2.jpg


I had to use a wet vac to get all the water up and put the carpet and sound deadening on newspaper in the hut.

The above instructions are from memory of doing this and I may have missed some parts. I take no responsibility for any damage caused whilst following these instructions. :D
 
Last edited:

alex_morley

Guest
Marshyc,

WOW! Thanks for that, that's a seriously impressive amount of writing and input, really appreciate it!

I'll hopefully start tonight (depending on light levels when I'm back from work) and will let you know how I get on.
Let's hope that I can soak up all the water with towels as I don't have a wet vax.

Thanks again, really appreciate the effort.
 

marshyc

Full Member
Mar 12, 2006
299
0
Huddersfield
No worries.

Towels will do the job fine.

Just take your time and look for screws etc. that you need to undo. Like I say I wrote all that from memory so might have missed the odd part out.
 
Adrian Flux insurance services - discount for forum members.