We can swop shells? Will be a lot of work but I reckon I could reshell a 1p over a weekend ? lol just kidding mate

-
Hey Guest👍👎 We're looking for reviews of your local CUPRA or SEAT Dealership - it's quick and easy to do: Leave a review now
Aidan's Mk2 Leon Cupra
- Thread starter Aidanr97
- Start date
-
- Tags
- 2.0 tfsi cupra inferi black
You are using an out of date browser. It may not display this or other websites correctly.
You should upgrade or use an alternative browser.
You should upgrade or use an alternative browser.
We can swop shells? Will be a lot of work but I reckon I could reshell a 1p over a weekend ? lol just kidding mate
The insurance would love that ??
Actually thinking about it don’t think the dvla would appreciate my vin tag on your car lol I need a black 1p mines too bright.

They won't ?... I love that mate, looks awesome splitter is on my list at some point
The splitter is a sore subject mate ? it’s no longer on the car it came off. I’m trying to import another one from lativa but it is hard at the moment. When you fit your splitter do it properly nuts and bolts with big washers not self tapping screws if your gonna drive your car fast...


Excuse me now while I cry myself to sleep ... lol that was a bad day when that came off however did get my car to 160mph on the dial and 155 on gps
Excuse me now while I cry myself to sleep ... lol that was a bad day when that came off however did get my car to 160mph on the dial and 155 on gps
Oh dear, silver lining and all that ?? Yeah I have a lift so should be a nice easy job, done my mates on the floor self tapped that one in and he's "tested" it and it's not came off for about a year or so lol
And managed to break my window reg I'm assuming, in the cold weather for some reason I tried to open the drivers window, heard a break then could hear the window reg operating whilst the glass is still frozen in placepushed the glass back into whatever makes it go up and down and it works but getting a really annoying rattle so need to take the doorcard off to inspect damage, hopefully not having to drill rivets out to get the doorskin off

Managed to fix this, taken off the plastic and fabric trim off the doorcard ( Just pulls off ) and seen that the guide bolt was loose where the window sits in, used a T27 bit to tighten it back up and it doesnt vibrate like mad now when driving.
when my new one comes finally I’m gonna nut an bolt it and use big washers to spread the load.
I don't blame you mate, don't want it coming off at 160 on a private runway ?
I am hoping it’ll go off the clock when it’s stage2+I don't blame you mate, don't want it coming off at 160 on a private runway ?
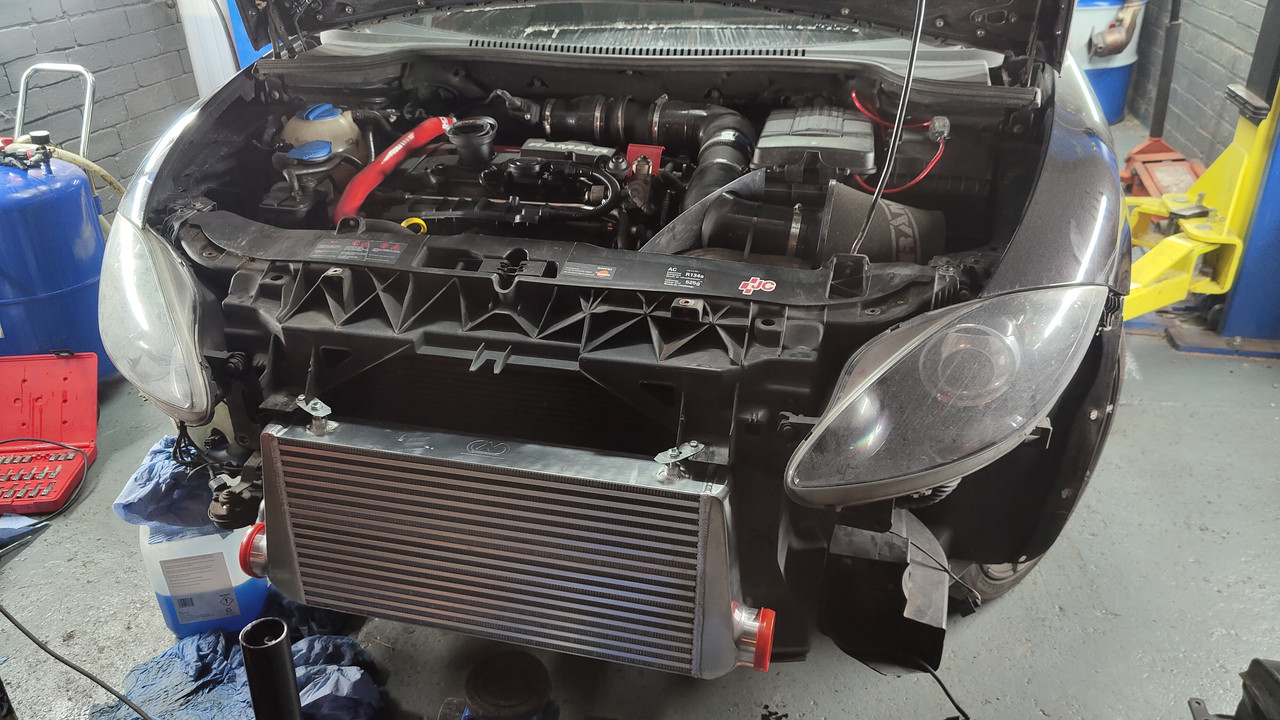
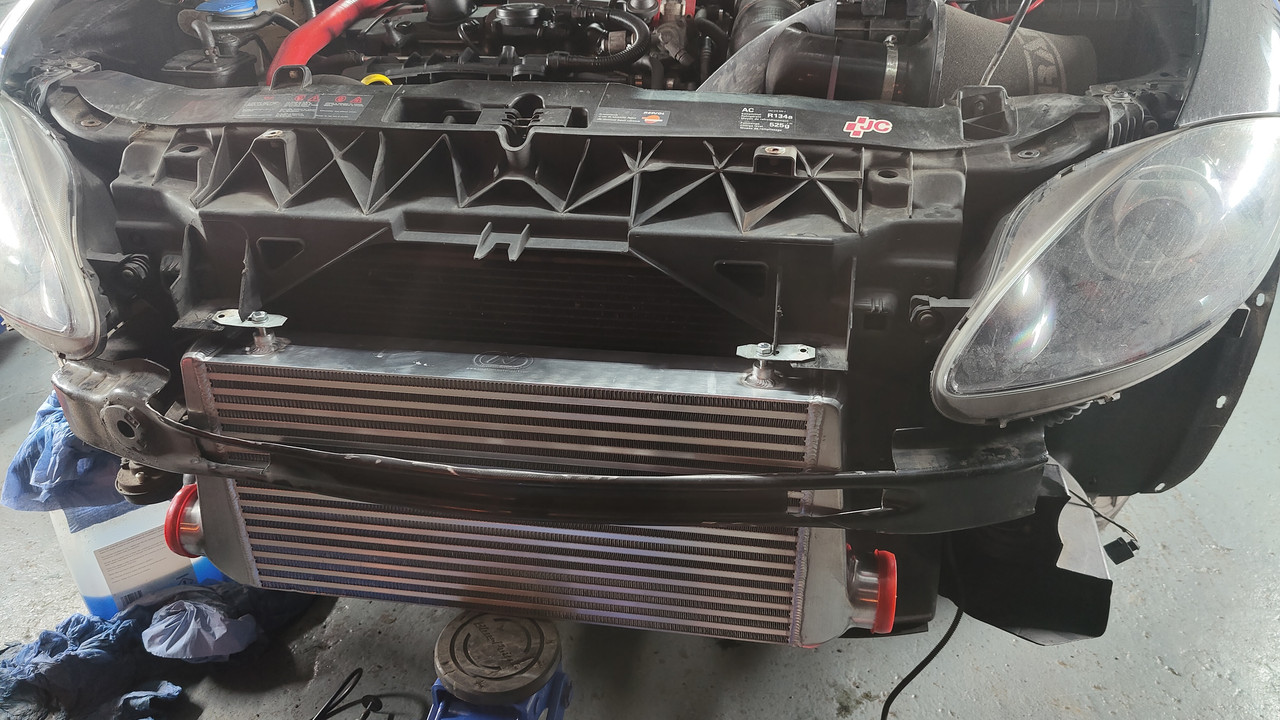
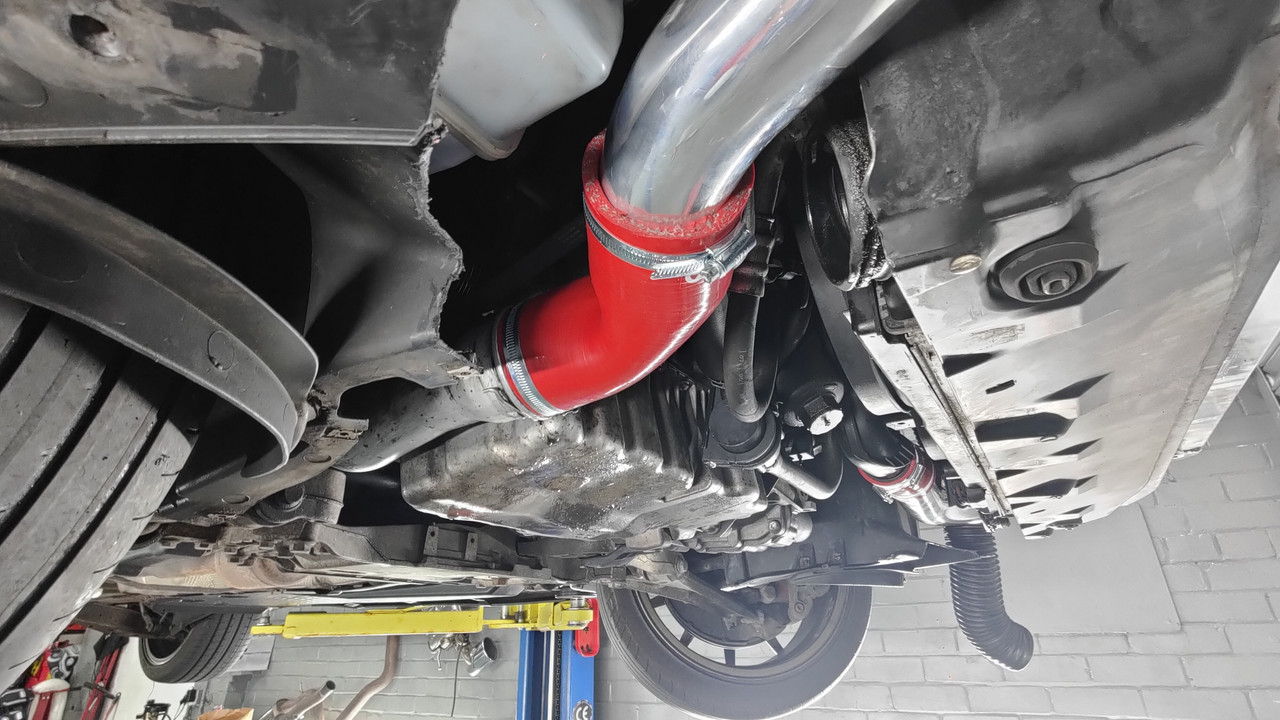
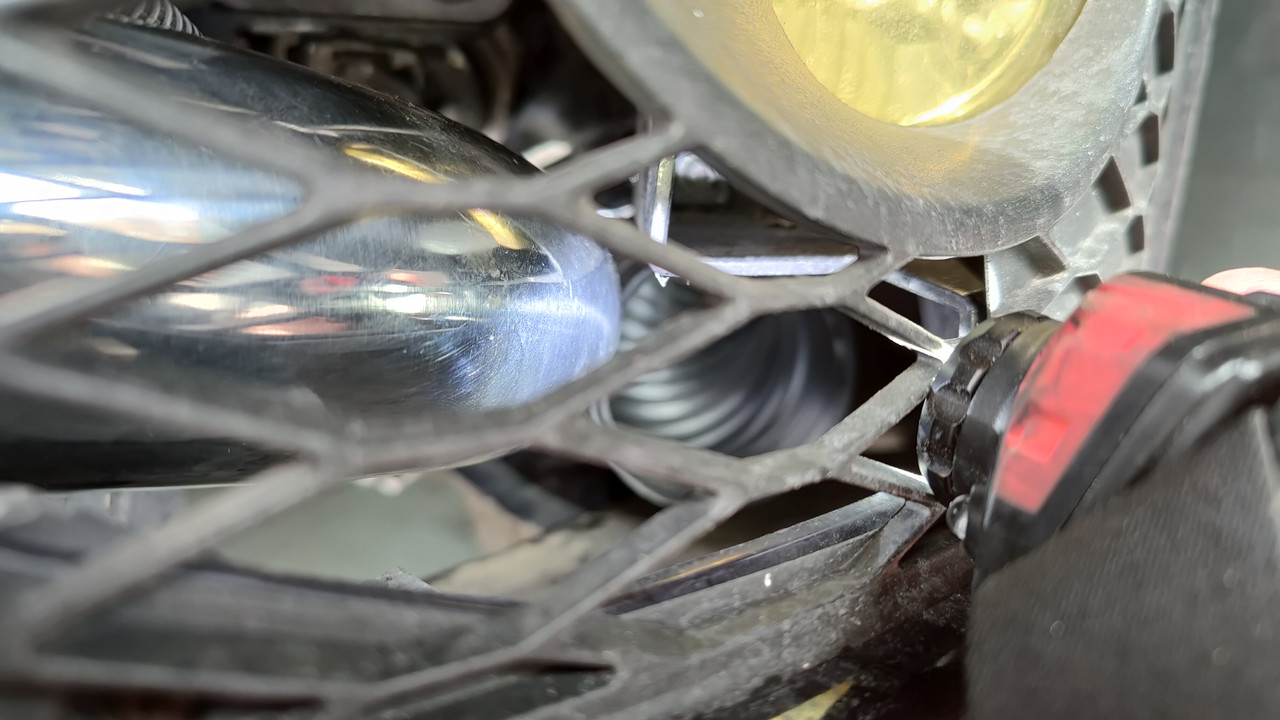
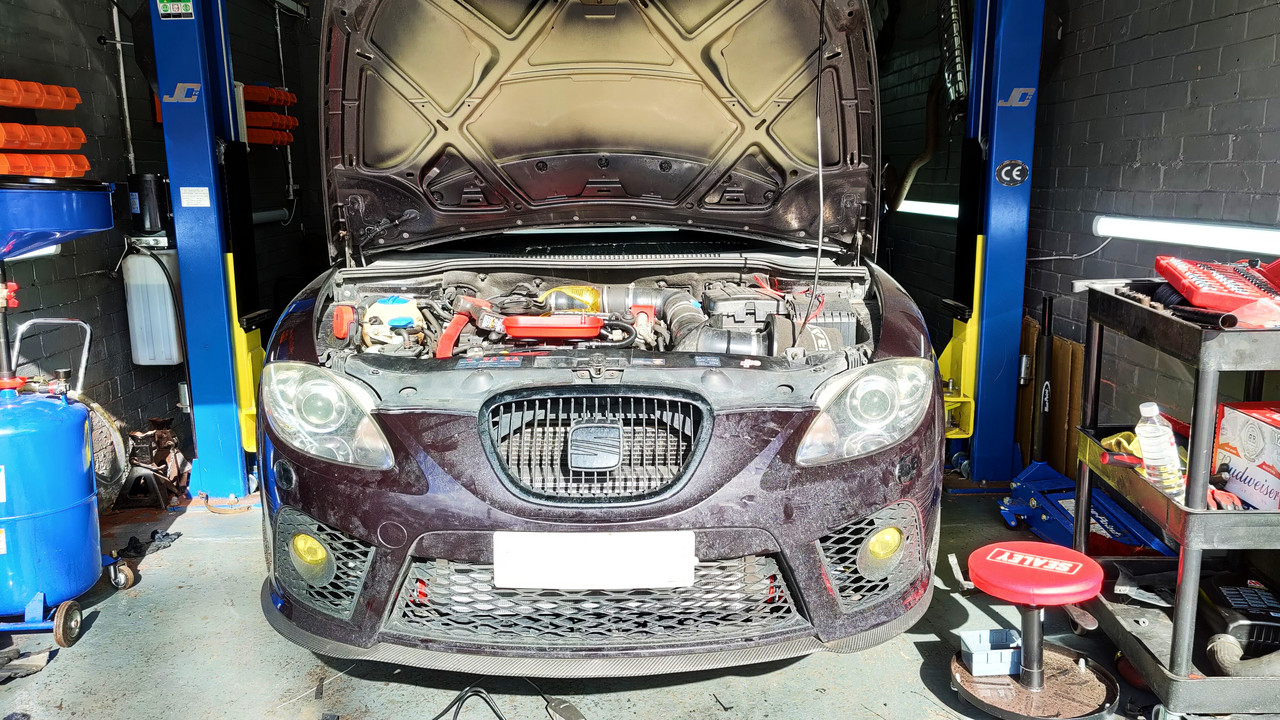
Been a busy few days on the cupra, I decided to treat myself to a Welly cooler, I went for the creations motorsports kit as we have a dealership with them through the company so get a few quid off.
It's the standard size "Welly cooler" core (600x300x76) along with the pipe kit and bayonet coupler. It was a pretty hard install in all honesty, I wouldn't want to do another ? but it's all in now and the cars seems to be pulling stronger all over and is more noticeable top end when before it was gasping for cool air.
Started off by removing the front bumper which is a relatively easy job, and lifted up the car to disconnect the old piping. On the old discharge pipe you need to keep the smaller green o ring to put on the bayonet coupler which attaches on to the discharge pipe!
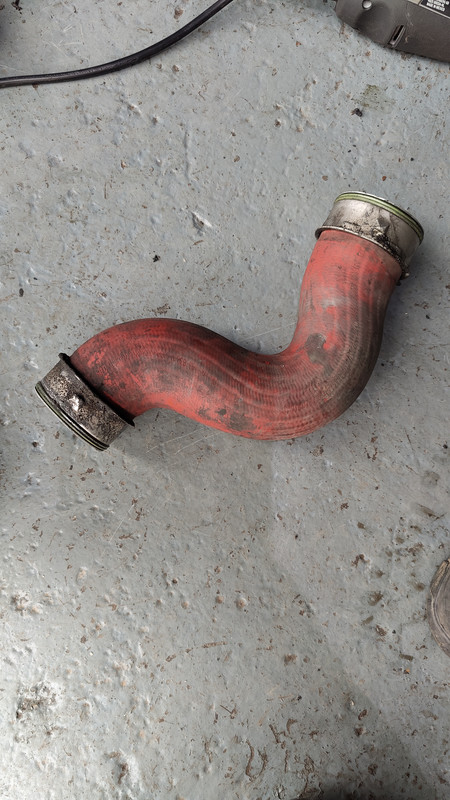
Mine was perfectly fine once I cleaned it up and I smoke tested it which it passed!
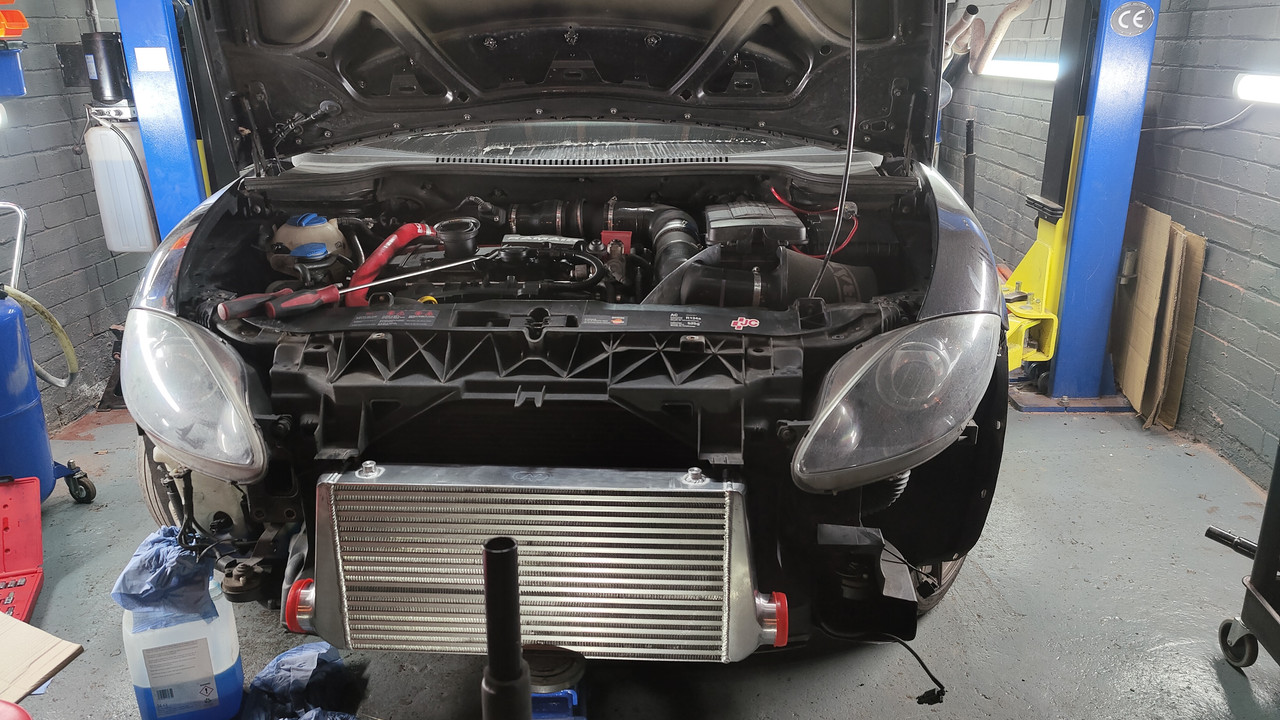
I Ihen started chopping up the crash bar, this process was pretty long as it's just trial and error, I also had to cut the front of the rad pack support so the intercooler could sit more flush against the air con rad. Also had to move the air temp sensor and bend the horns out of the way.
I managed to get the intercooler to sit behind the crashbar and made a little bracket to hold it in place,
I had some old brackets for tube lights which worked perfectly so drilled a hole and nut + bolted them in place,

also it's a fairly tight fit behind the crash bar so the intercooler is pretty solid.
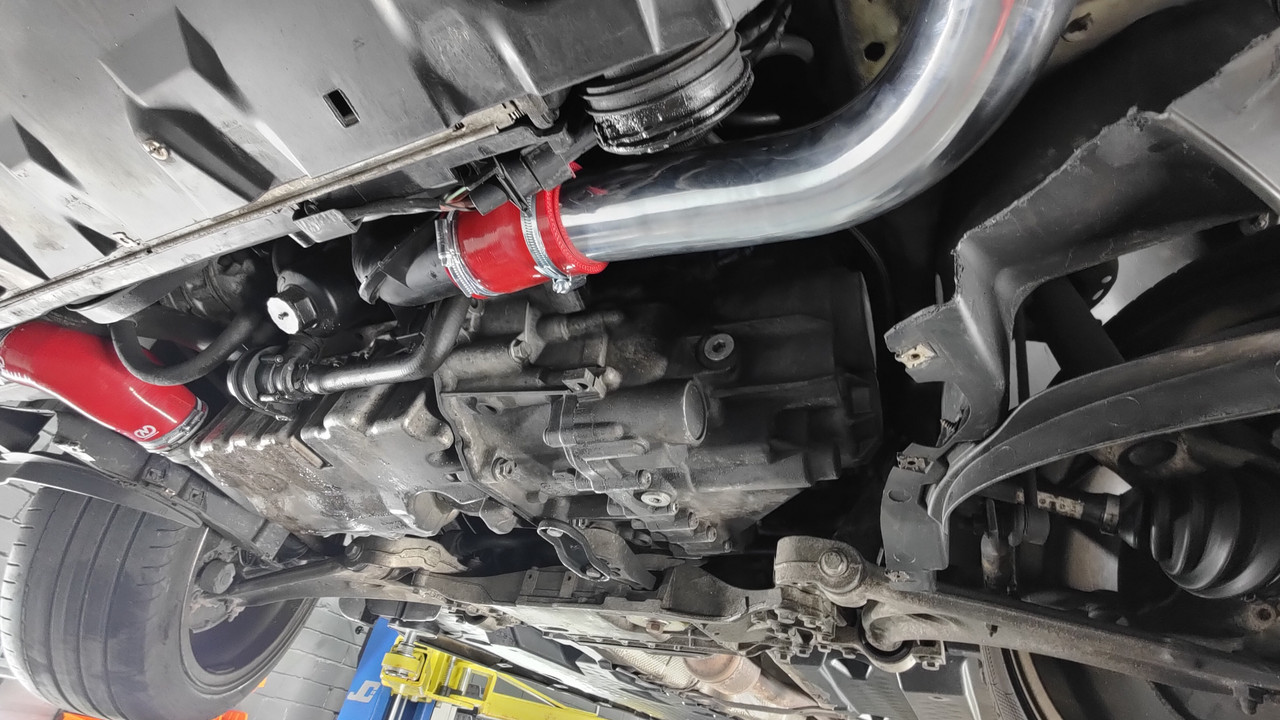
The pipework is difficult to connect up, probably the hardest part. Some people Tig weld pipe to the original discharge pipe which if I could Tig weld and had spare pipe I would have done. Unfortunately had to make do with the coupler and as mentioned just takes a super long time and patience to get the pipes in. The other side (charge) was a breeze.

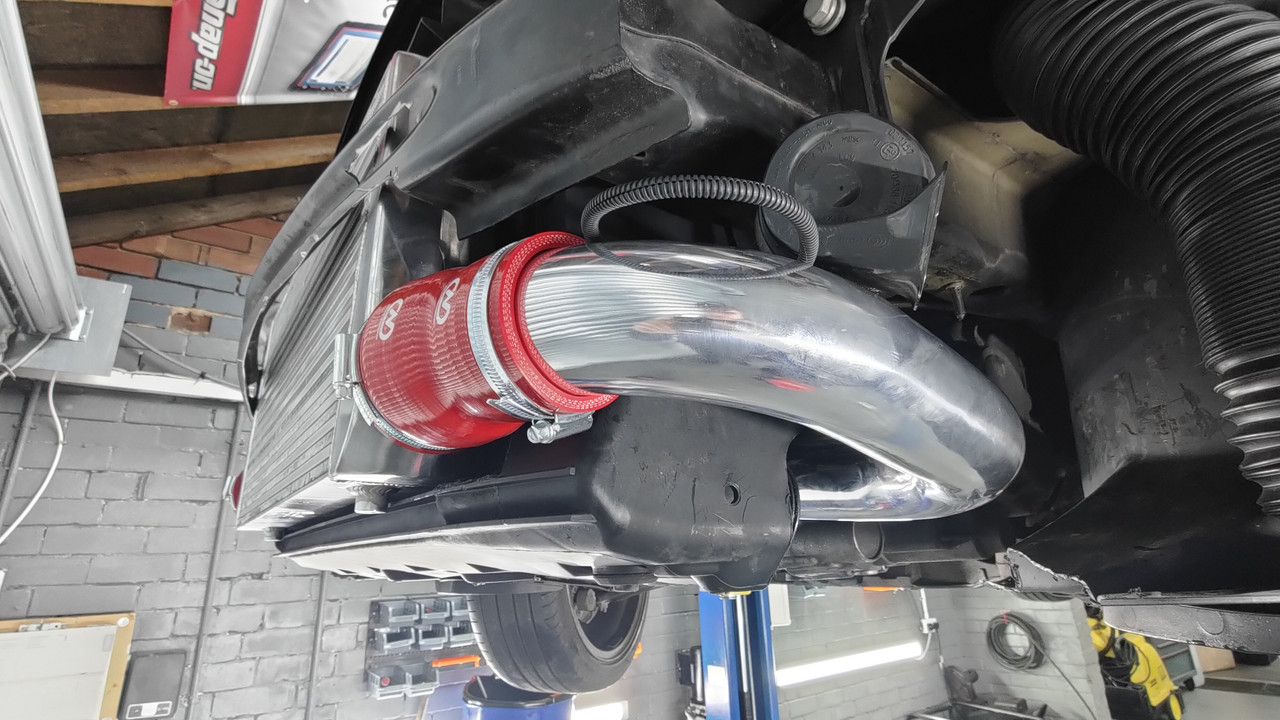
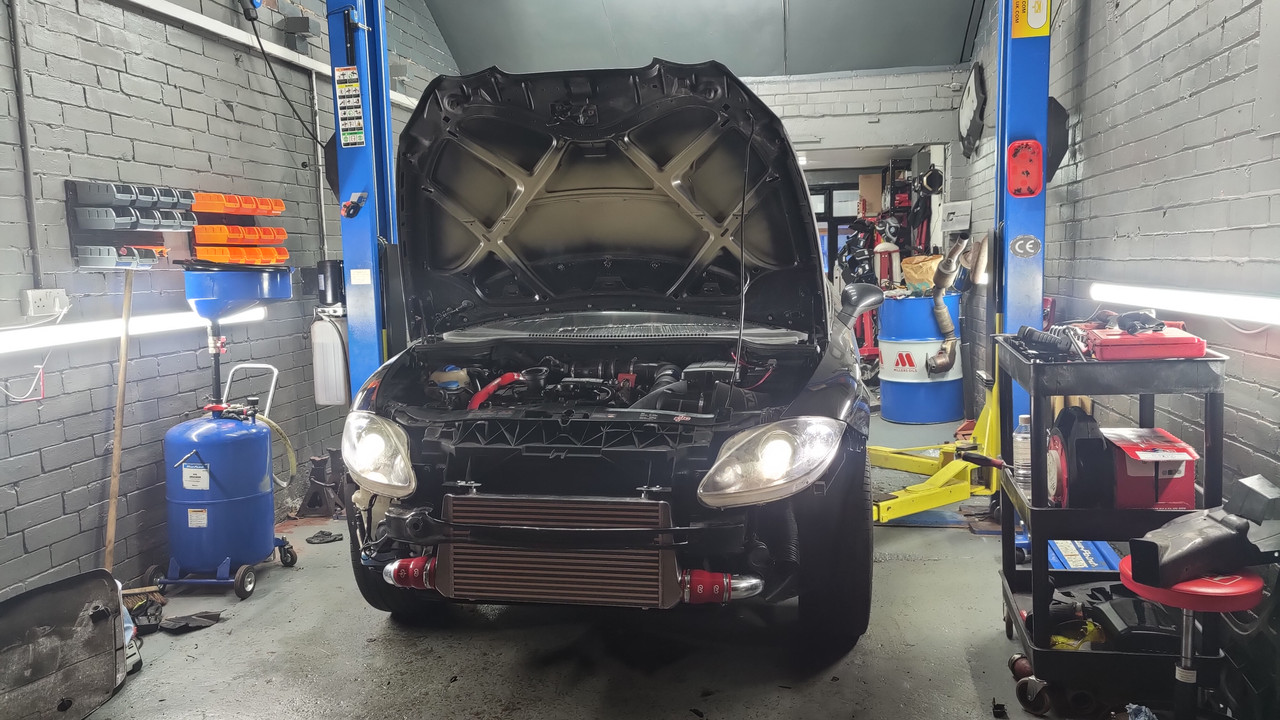
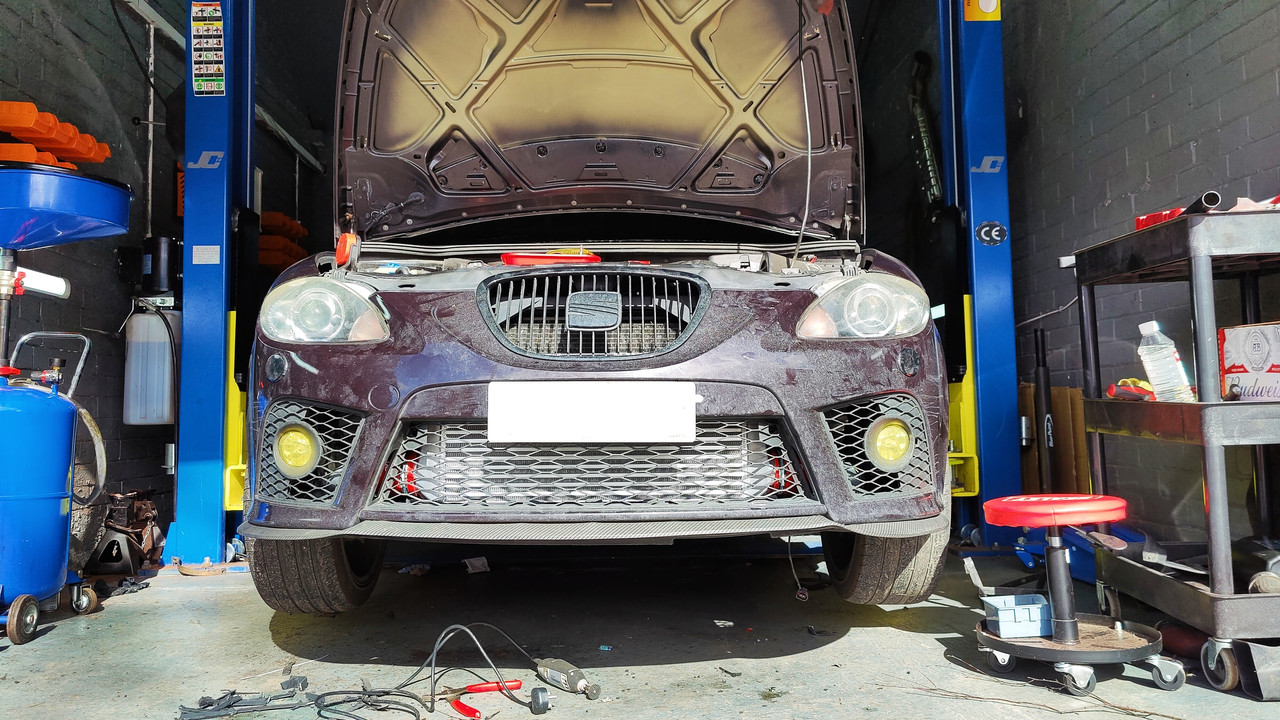
Once I'd got it all fitted up was pretty hard to get the front bumper on, had to wriggle the horns around, the one on the right I mounted it the opposite way so it was out the way, and left side I just moved till it wasn't fouling the fog light housing. Also had to take off the air duct and bracket, I probably could of made that fit with enough effort but in all honesty I just wanted the car back together and instead I put the cold air feed for my intake there instead ( the black pipe to the right of the shiny one)
After cutting the plastics out at the bottom inside of the front bumper and messing around with the headlight washer hoses I finally managed to get it back together.
Thank God for that never doing a Welly cooler again ??
So worth it though
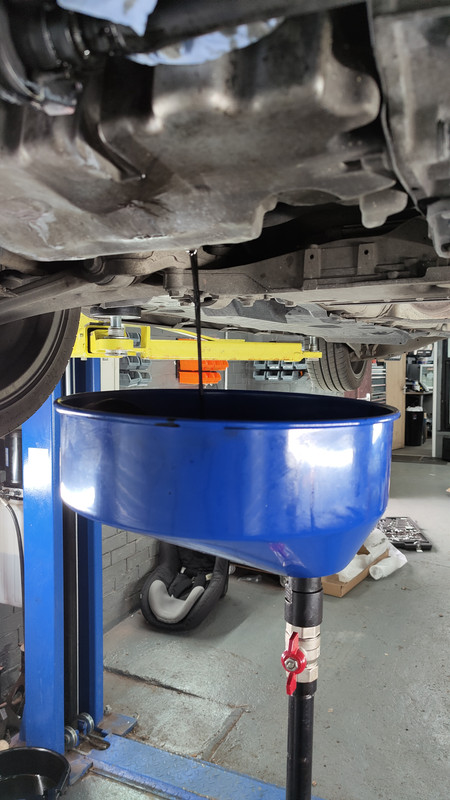
And whilst I had it up on the ramp it'd be rude not to do a quick oil and oil filter change
It's the standard size "Welly cooler" core (600x300x76) along with the pipe kit and bayonet coupler. It was a pretty hard install in all honesty, I wouldn't want to do another ? but it's all in now and the cars seems to be pulling stronger all over and is more noticeable top end when before it was gasping for cool air.
Started off by removing the front bumper which is a relatively easy job, and lifted up the car to disconnect the old piping. On the old discharge pipe you need to keep the smaller green o ring to put on the bayonet coupler which attaches on to the discharge pipe!
Mine was perfectly fine once I cleaned it up and I smoke tested it which it passed!
I Ihen started chopping up the crash bar, this process was pretty long as it's just trial and error, I also had to cut the front of the rad pack support so the intercooler could sit more flush against the air con rad. Also had to move the air temp sensor and bend the horns out of the way.
I managed to get the intercooler to sit behind the crashbar and made a little bracket to hold it in place,
I had some old brackets for tube lights which worked perfectly so drilled a hole and nut + bolted them in place,
also it's a fairly tight fit behind the crash bar so the intercooler is pretty solid.
The pipework is difficult to connect up, probably the hardest part. Some people Tig weld pipe to the original discharge pipe which if I could Tig weld and had spare pipe I would have done. Unfortunately had to make do with the coupler and as mentioned just takes a super long time and patience to get the pipes in. The other side (charge) was a breeze.
Once I'd got it all fitted up was pretty hard to get the front bumper on, had to wriggle the horns around, the one on the right I mounted it the opposite way so it was out the way, and left side I just moved till it wasn't fouling the fog light housing. Also had to take off the air duct and bracket, I probably could of made that fit with enough effort but in all honesty I just wanted the car back together and instead I put the cold air feed for my intake there instead ( the black pipe to the right of the shiny one)
After cutting the plastics out at the bottom inside of the front bumper and messing around with the headlight washer hoses I finally managed to get it back together.
Thank God for that never doing a Welly cooler again ??
So worth it though
And whilst I had it up on the ramp it'd be rude not to do a quick oil and oil filter change
Last edited:
Epic mateBeen a busy few days on the cupra, I decided to treat myself to a Welly cooler, I went for the creations motorsports kit as we have a dealership with them through the company so get a few quid off.
It's the standard size "Welly cooler" core (600x300x76) along with the pipe kit and bayonet coupler. It was a pretty hard install in all honesty, I wouldn't want to do anotherbut it's all in now and the cars seems to be pulling stronger all over and is more noticeable top end when before it was gasping for cool air.
Started off by removing the front bumper which is a relatively easy job, and lifted up the car to disconnect the old piping. On the old discharge pipe you need to keep the smaller green o ring to put on the bayonet coupler which attaches on to the discharge pipe!
Mine was perfectly fine once I cleaned it up and I smoke tested it which it passed!
I then started chopping up the crash bar, this process was pretty long as it's just trial and error, I also had to cut the front of the rad pack support so the intercooler could sit more flush against the air con rad. Also had to move the air temp sensor and bend the horns out of the way.
I managed to get the intercooler to sit behind the crashbar and made a little bracket to hold it in place,
I had some old brackets for tube lights which worked perfectly so drilled a hole and nut + bolted them in place,
also it's a fairly tight fit behind the crash bar so the intercooler is pretty solid.
The pipework is difficult to connect up, probably the hardest part. Some people Tig weld pipe to the original discharge pipe which if I could Tig weld and had spare pipe I would have done. Unfortunately had to make do with the coupler and as mentioned just takes a super long time and patience to get the pipes in. The other side (charge) was a breeze.
Once I'd got it all fitted up was pretty hard to get the front bumper on, had to wriggle the horns around, the one on the right I mounted it the opposite way so it was out the way, and left side I just moved till it wasn't fouling the fog light housing. Also had to take off the air duct and bracket, I probably could of made that fit with enough effort but in all honesty I just wanted the car back together and instead I put the cold air feed for my intake there instead ( the black pipe to the right of the shiny one)
After cutting the plastics out at the bottom inside of the front bumper and messing around with the headlight washer hoses I finally managed to get it back together.
Thank God for that never doing a Welly cooler again
So worth it though
And whilst I had it up on the ramp it'd be rude not to do a quick oil and oil filter change
 but it's all in now and the cars seems to be pulling stronger all over and is more noticeable top end when before it was gasping for cool air.
With the creation kit did you have to modify any of their hoses to fit?
Might look at this myself
Sent from my SM-G950F using Tapatalk
Epic mate
With the creation kit did you have to modify any of their hoses to fit?
Might look at this myself
Sent from my SM-G950F using Tapatalk
Cheers bud! Love the look on the front end now
Yeah sorry I forgot to say in the little write up I trimmed a fair bit off the silicon discharge pipe in order to get it to fit. You'll always have a bit of a kink in that silicon pipe though unfortunately
I was considering getting dynodaze to do mine in the summerCheers bud! Love the look on the front end now
Yeah sorry I forgot to say in the little write up I trimmed a fair bit off the silicon discharge pipe in order to get it to fit. You'll always have a bit of a kink in that silicon pipe though unfortunately
Yeah they charge 550 but they look like they do a cracking job , but I remember trying to do my last cupras welly cooler and after failing to fit a darkside intercooler and just mounting the welly core I cant do that heart break again lol
Sent from my SM-G950F using Tapatalk
Haha sometimes it's worth it in the end to give it to someone who does them day in day out, seen their work and it looks awesome, credit to them! Still pretty good bang for buck considering the performance and the competitionI was considering getting dynodaze to do mine in the summer
Yeah they charge 550 but they look like they do a cracking job , but I remember trying to do my last cupras welly cooler and after failing to fit a darkside intercooler and just mounting the welly core I cant do that heart break again lol
Sent from my SM-G950F using Tapatalk
Cheers buddy it's getting there slowlyLooks good @Aidanr97 cars really coming on nicely.
Did you have any issues with the 45 deg red hose fouling the coolant pipe?
I still need to adjust mine so it clears properly.
I still need to adjust mine so it clears properly.
Similar threads
- Replies
- 24
- Views
- 3K
