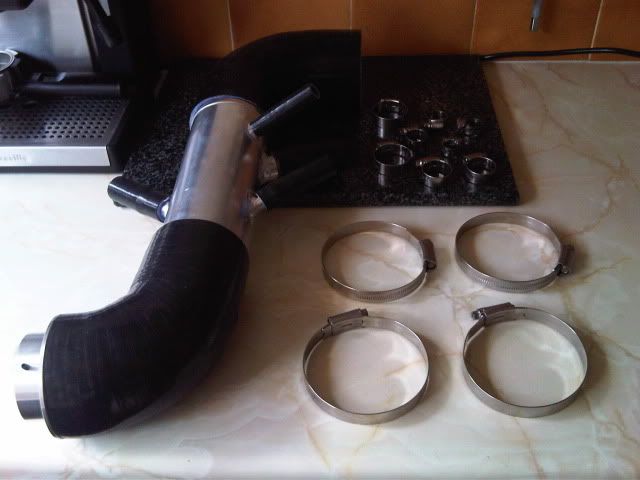
3" TIP Fitted
Right all, Saturday saw the addition of Badger 5's 3" TIP. Here's a brief review that I posted up elsewhere:
Firstly, the difference between uprated silicone TIP (i.e. Forge) and this is night and day, the car feels like a complete animal and it pulls very very hard. People have reviewed that this TIP gives more power top end, I would like to disagree here and say that it gives more power from 0 - Red Line. The car is extremely eager to move and the turbo loves the extra air that it's allowed to breath. The DV sound has changed, I wouldnt say that is has become louder however the sound with open cone now makes the car sound more highly tuned. I've never driven anything like this and it's my car

, acceleration is relentless, massive smiles!
This was about 30mins after my first drive. I took the car out again the next day and the ECU is adapting nicely, it feels quicker than it initially did and the car seems to have a lot more torque, I honestly have to fight the car
. I was sceptical about this before fitting it and I honestly couldn't see it being much better than the THS pipe on there before which was fantastic but this really does open up a whole new door into the tuning of K04 powered 1.8T's and for those of us who want to take the car far. I would say however that a normal silicone TIP is sufficient for most people without a money pit.
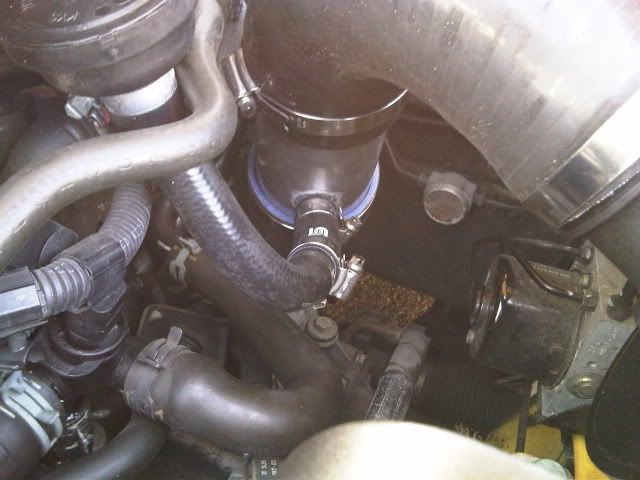
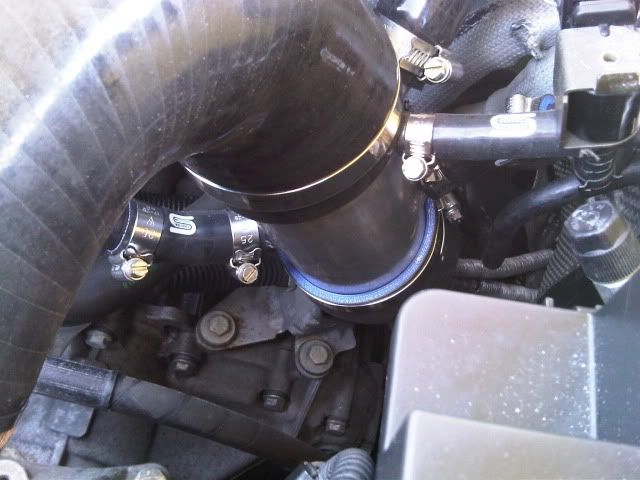
Pics of it installed:
I took my time with this but it's a relatively simple job. Here's a little guide:
- Unplug the connector from the MAF meter housing and remove the air filter from it. Losen the TIP from the MAF meter housing and place the housing somewhere safe and dirt free.
- Undo all jubilee clips holding in the various components plumbed into the TIP and carefully pull them out one by one, placing them out of the way in the engine bay.
- You'll now have a lot more room to work in and should be able to get a hand down to the turbo inlet. Once you have located the jubilee clip holding the current TIP to the turbo, undo it with a stubby screwdriver or rachet (7mm). Now pull your 'old' TIP off of the turbo and out of the engine bay.
- Take the alloy turbo adapter out of its packaging and wind the grub screws out a little with an allen key (2mm). Wipe a small amount of silicone sealant around the inside of it where it will make contact with the turbo. Coat the threads of the grub screws in Loctite thread locker (Or another brand. Halfords sell Granville for half the price, it's just as strong yet easier to apply). Now reach down to the turbo and push the adapter on right back as far as it will go, give it a wiggle and a knock to make sure it's on. Try to put the adapter on in a way that you can reach both grub screws and then tighten them up. With a clean, fluff free cloth, wipe any excess silicone away.
- Take the smaller of the 90degree hoses and place it onto the adapter sitting on the turbo, making sure it is sat on there properly. Slide a jubilee clip over it and tighten, also slide a second jubilee clip over it to clamp the ported hose joiner.
- Take the ported alloy hose joiner and start attaching all of the the hose stubs and tightening with jubilee clips. I found all to be a good fit apart from the one which joins the hose coming from the charcoal canister which I trimmed circa 10mm from. Insert the ported hose joiner into the bottom hose but do no tighten it up at present.
- Start putting in the parts that plumb into the TIP and tighten up. You may find that the routes of the hoses need to change slightly to stop them tangling up and to give you some more flex.
- Now, this step I neglected to do and I ended up with a slightly downwards facing filter and the inability to refit the filter shield however, I recommend that you fit this hose first to see just how much you need to trim. The top 90degree bend (larger hose) is sent by Badger 5 purposely long to cater for all setups, those with a shield will most likely need to cut circa 1" from it at one end so that the MAF/filter sits horizontally and fits into the shield. This is of course at your discretion and every application will be different.
- So...slide the top 90degree bend onto the ported hose joiner and slide a jubilee clip over it, the reason for not tightening the bottom of the ported joiner is apparent now. You'll notice that the top hose points downwards so wiggle the bottom of the ported joiner so that it sits more vertical in the bottom 90degree bend, the top hose should now look more horizontal. If the top hose does not point horizontally then apply the same technique to this hose. Tighten both jubilee clips up so that the ported joiner is locked in.
- Take your MAF meter housing and insert it into the top hose and then if you have a shield, try to refit it however you will most likely see that the top hose is just too long and you cannot refit the shield. In this case the you will need to trim the top hose small bit by small bit until it all fits nicely.
- Once you are happy that everything lines up correctly, doesn't foul the bonnet etc then refit the filter and tighten up. Go over everything you have done and make sure that everything is tight, now fire the car up and let it idle. Once warm, give it a rev and see if there are are issues, if not then it's time for a drive. Providing everything is fitted correctly and you haven't smashed up any vital components then you'll notice the difference right away
.
I hope this helps!
I am yet to trim my top hose but I will be shortening a section of it at the MAF end to allow the shield to push back far enough to meet its mountings.